What is Take Ownership? How to add Take Ownership to right-click Menu
What is Take Ownership ? Basically, in Windows operating system, before renaming, modifying or deleting a protected system file, users need to own the file, called Take Ownership . However, this is not easy, it has to go through a lot of steps whether it be done on the GUI or Command Prompt. To solve that problem, I will show you how to add the Take Ownership feature right from the right-clicking menu.
I. What is Take Ownership ?
In Windows, users with ownership of a file (or directory) will have the ability to implicitly change permissions on that file (directory). The user is also always allowed to access the file (directory) even if other permissions seem to conflict with this access.
Sometimes, you may encounter some situations need to take ownership ( Take Ownership ) a file or folder. It may be a system file that you need to change to apply some tricks, such as replacing Notepad with another text editor (in this case, an integrated user account named Trusted Installer will have ownership by default). Or maybe you need to control the files on one hard drive from another computer.
With a few registry tweaks, you can add the Take Ownership command to the File Explorer context menu to take ownership of any file or folder in one step. The following tutorial will show you how to manually make those changes to the Registry, but there is also a faster way for you to immediately apply those settings without any hassle. tangled yet.
II. Instructions to add Take Ownership to the right-click menu
1. By editing the Registry manually
* Note: Registry Editor is a powerful tool and misusing it can make your system unstable or even stop working. This tutorial is pretty simple anyway, so as long as you follow the steps correctly, nothing will happen. However, be sure to back up the Registry before making any edits.
To open the Registry Editor , use the Windows search feature, enter the keyword "regedit" and select the search result.

Next, you will make similar changes in two locations in the Registry. The first position adds the Take Ownership function to the right-click menu for files (of any format), and the second position applies to the folder.
a) Add Take Ownership to the right-click menu for files
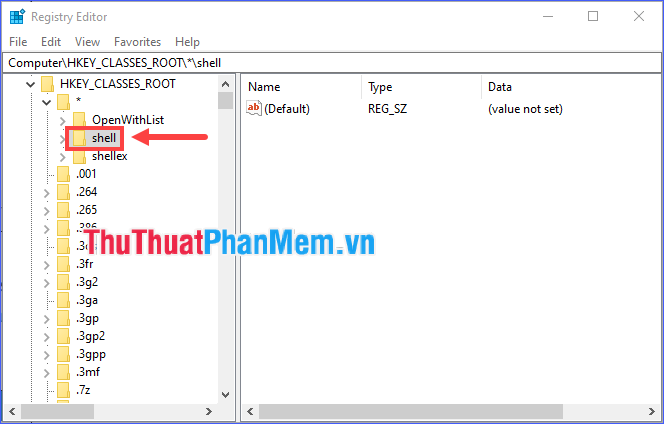
Step 1: In the Registry Editor window , navigate to HKEY_CLASSES_ROOT * shell.
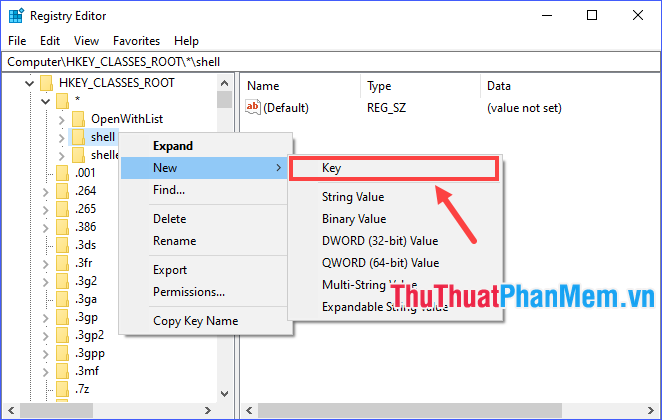
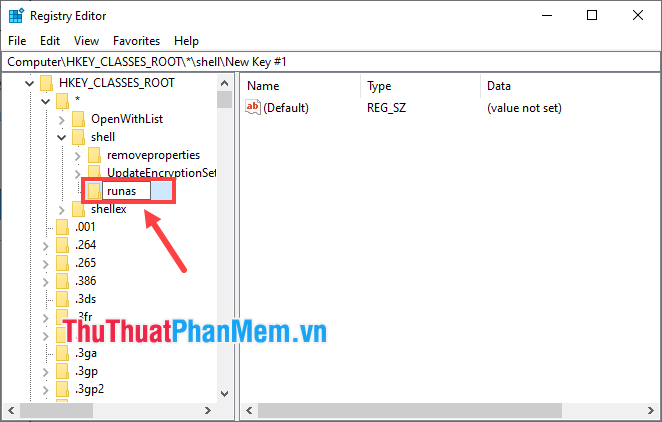
Step 2: Right-click on the shell , select New > Key . Name the new key "runas" (if there already exists a key named runas in the shell , skip this step).
Step 3: Select the runas key , double click on the (Default) value in the right pane.

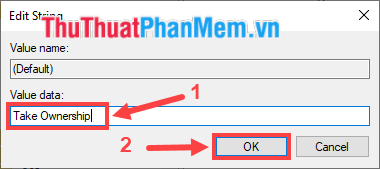
Step 4: Enter "Take Ownership" in the Value data field and click OK .
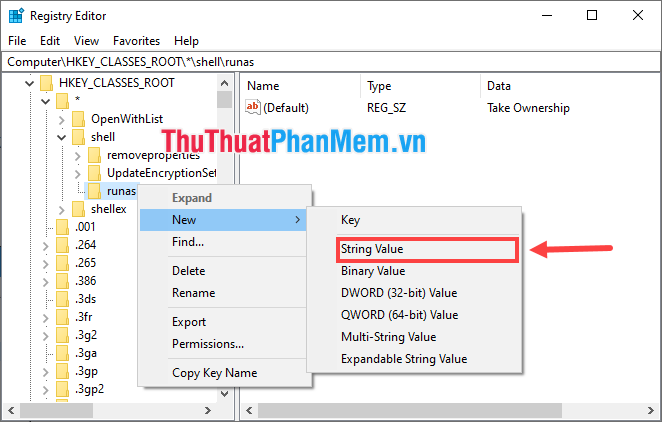
Step 5: Create a new value in the runas key by right-clicking the runas and selecting New > String Value . Name the new value "NoWorkingDirectory".

Step 6: Create a new key in runas , name it "command".
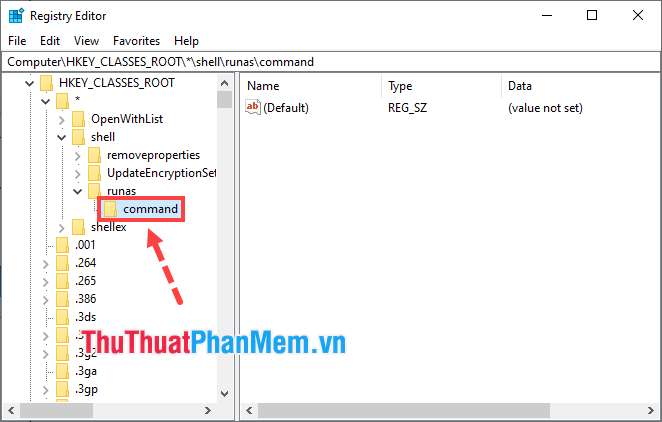
Step 7: Double-click the (Default) value of the command key in the right pane.

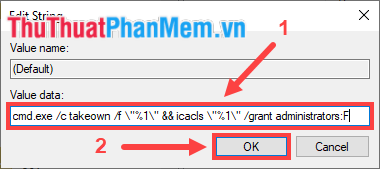
Step 8: Copy and paste the following text into the Value data field :
cmd.exe / c takeown / f "% 1" && icacls "% 1" / grant administrators: FThen click on OK .
Step 9: Create a new String Value in the command key , name it "IsolatedCommand".
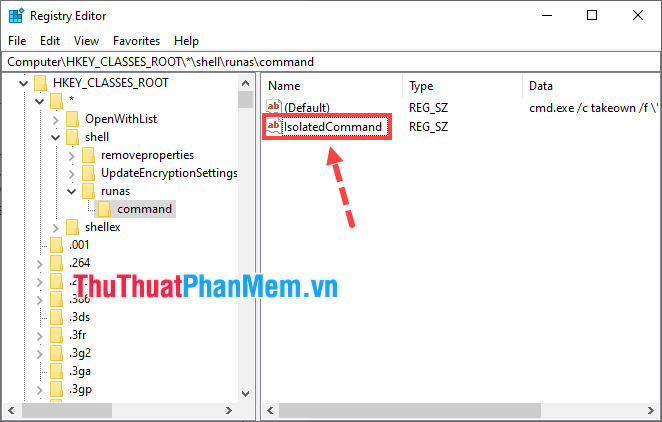
Step 10: Double-click the newly created IsolatedCommand value .
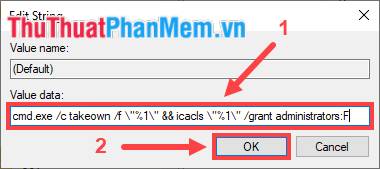
Step 11: Copy and paste the following text into the Value data field :
cmd.exe / c takeown / f "% 1" && icacls "% 1" / grant administrators: FThen click on OK .
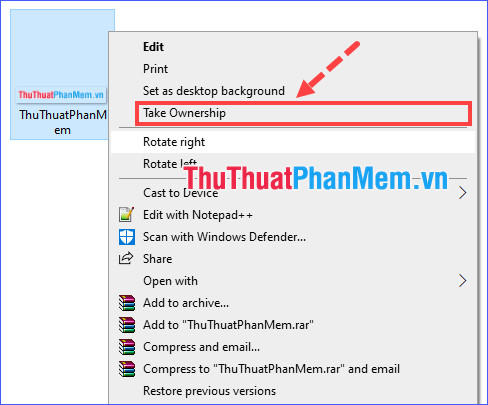
Now the Take Ownership command appears in the context menu when you right-click on any file.
b) Add Take Ownership to the right-click menu for the folder
In this section, you follow the same instructions for Adding Take Ownership to the right-clicking menu for the file , except for the following details:
- Step 1: Navigate to HKEY_CLASSES_ROOTDirectoryshell.
- Steps 8 and 11: Replace with the following text:
cmd.exe / c takeown / f "% 1" / r / dy && icacls "% 1" / grant administrators: F / tIn case you don't need Take Ownership to appear in the right-click menu any more, simply go back to the Registry and delete the created runas keys in both locations. Or, if runas keys already exist, delete the command keys instead .
2. By the Registry file (.reg) is available
As you can see, it takes quite a few steps to do it manually. If you feel "lazy" or not brave enough to tamper with the Registry, you can use the two pre-created .reg files (located in the compressed .zip file). A file that creates the keys and values needed to add the Take Ownership command to the right-click menu. The remaining file will remove those keys, delete the Take Ownership command and restore the settings to their original settings. Just double click on the file you want to run and select Yes when the prompt appears.
* Download Take Ownership Context Menu.zip
take-ownership-context-menu.zip

Through the above article, I have introduced to you what is Take Ownership , as well as adding the Take Ownership feature to the right-clicking menu to be able to take ownership of the files or folders you are needing. I wish you successful implementation!