Use the Backup utility in Windows XP
This article describes how to use the Backup utility provided in Windows XP to back up files and folders on your computer. You must have rights as a backup administrator or moderator on the computer you want to back up.
This article describes how to use the Backup utility provided in Windows XP to back up files and folders on your computer.
Note : You must have rights as a backup administrator or moderator on the computer you want to back up. Backup administrators and administrators can back up, restore encrypted files and folders without decrypting the file or folder.
This article is for beginners who are familiar with computers. You can do it easily by following these steps.
How to back up files and folders
Step 1: Launch the Backup utility
- Click Start , select Run , enter ntbackup.exe and then click OK
- If the Backup or Restore Wizard starts, follow step 3. If you receive the following error message, the Backup utility may not have been installed:
Windows không tìm thấy 'ntbackup.exe'.
In this case, click Exit then follow step 2
Step 2: Install Backup utility
- Insert the Windowsx XP disc into the CD or DVD drive on your computer
- Click Exit
- Go to Start, select Run , enter the following command and then click OK :
CDDrive : valueaddmsftntbackupntbackup.msi
Note : CDDrive is the drive symbol of the CD or DVD drive. If you don't know what it is, try the name 'D' or 'E'.
- When the Backup or Restorer Wizard appears, click Finish .
- Remove the Windows XP disc from the drive
- To launch the Backup utility, click Start, run Run , enter ntbackp.exe and click OK .
Step 3: Select the folder or drive to backup
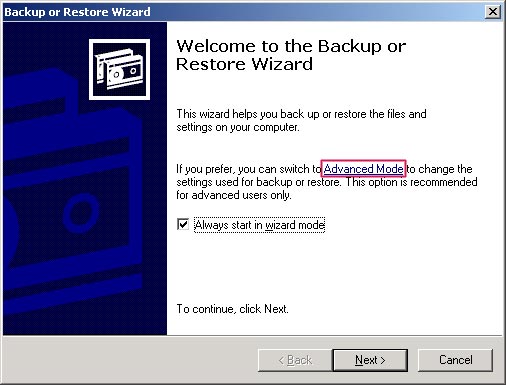
- In the 'Welcome to the Backup and Restore Wizard' page, click Advanced Mode .
- Select Backup tab
- On the Job menu, select New
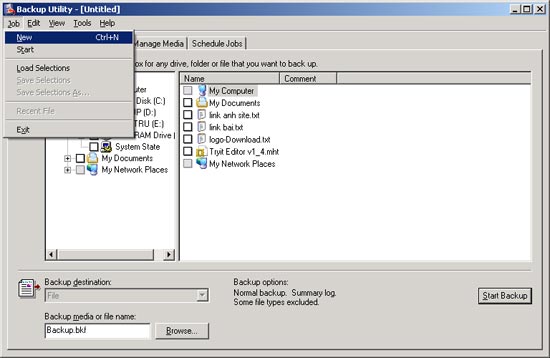
- Click the box corresponding to the drives you want to backup. If you want more detailed options, expand the section inside the corresponding drive, click the box to select the files and folders you want to backup.
- Click on the System State box.

Note : If you want to back up system settings and data files, back up all the data on the computer to include the System State data. System State data are information such as registry, COM + registration database, files in the Windows File Protection section and boot files.
Step 4: Select the location of the backup files
- In the Backup destination list, click on the destination to place the backup files you want.
- If you clicked File in the previous step, click Browse and select the location where you want to place the backup file. You can use network sharing to have a destination location for the backup file.
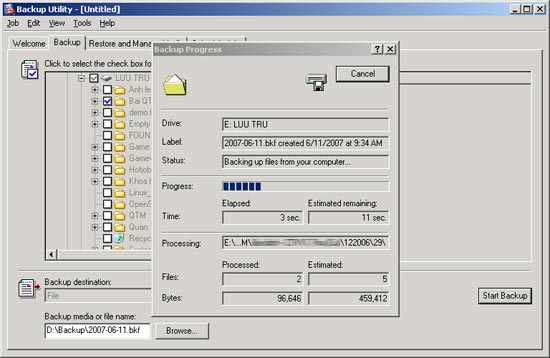
Step 5: Backup files
- In the Backup tab, select Start Backup . The Backup Job Information dialog box will appear.
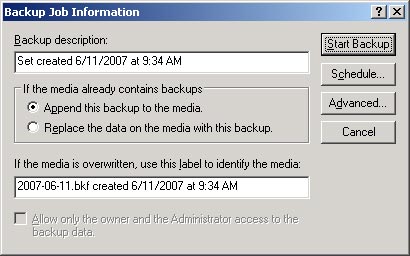
- Under If the media already contains backups , use one of the following steps:
-
If you want to append this backup to previous backups, click Append this backup to the media .
-
If you want to overwrite this backup to previous backups, click Replace the data on the media with this backup .
- Click Advanced
- Click on Verify data section after backup .
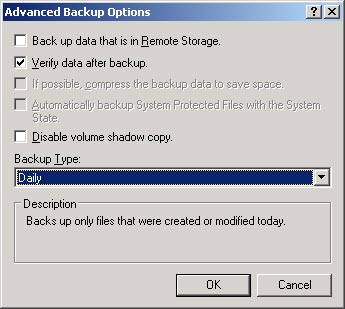
- In the Backup Type dialog box, click the type of backup you want. When you select a backup type, the description of that backup type will appear in the ' Description ' section.
- Click OK and then click Start Backup . A Backup Progress dialog box will appear and the backup process starts.
Step 6: Close the Backup utility
- When the backup process is complete, click Close
- In the Job menu, select Exit
Video instructions on how to use the Backup utility
Was this article helpful?
Your feedback helps us improve.
Related Articles
 How to use Backup and Restore on Windows 7?5 minutes read
 Microsoft launches new utility to simplify data backup and transfer on Windows 113 minutes read
 5 best open source backup utilities for Linux5 minutes read
 4 ways to manage the process of Backup Windows Server 2008 on multiple servers7 minutes read
 How does Windows 11's new backup feature work?6 minutes read
 Complete how to use all backup and restore tools on Windows 1011 minutes read
Reader Comments 0
Sign in with email or Google to join the discussion.