How to Back Up Windows 7
Method 1 of 2:
Using Backup and Restore
-
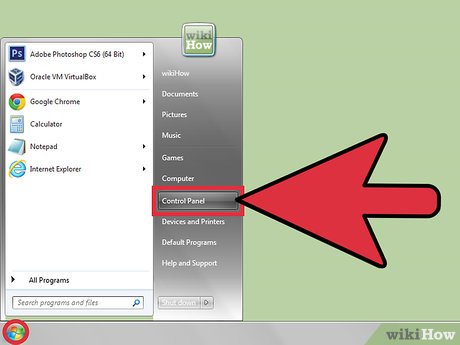
 Click on the Start menu and select 'Control Panel.'
 -
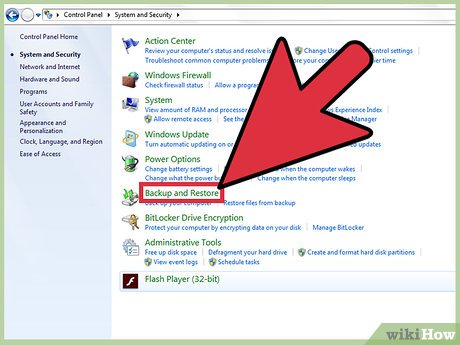
 Click on 'System and Maintenance,' then click on 'Backup and Restore.'
 -
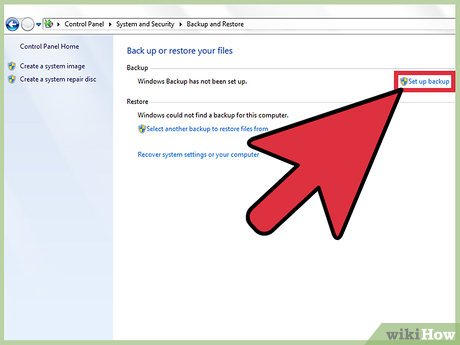
 Click on 'Set up backup,' then select the drive to which you want your data backed up. Microsoft recommends storing backups on hard disks separate from Windows 7, such as a CD, DVD, or external hard disk.[1]
- Insert the device to which you want your backup saved, click on 'Refresh' in the Backup and Restore window, then select your storage device.
-
 Select 'Let me choose' when asked which files you want backed up. This will allow you to choose the items you want backed up on a regular basis.
- Alternately, you can select 'Let Windows choose.' If you select this option, Windows will not back up Program Files, items formatted with the FAT file system, items in the Recycle Bin, or temp files larger than one gigabyte.
-
 Place checkmarks next to all files and items you want backed up, then click on 'Next.' You can save photos, documents, music, contacts, favorites, and more.
 -
 Review the backup settings you selected, then click on 'Save settings and run backup.'
- Click on 'Change schedule' if you want Windows to automatically back up your data on a schedule you specify. Otherwise, Windows will back up your data once per month by default on the date specified.
-
 Wait for Windows 7 to finish backing up your data. The process may take up to several minutes to complete, based on the amount of data you want backed up. A progress bar will display on-screen to indicate the status of the backup. When the backup is complete, your backup folders and media storage will display in Windows Explorer.
 -
 Eject the storage device from your computer and store in a safe place. Your Windows 7 files will now be backed up.
- If you set up the Backup and Restore program to run on an automatic schedule, Windows will prompt you to insert the storage media at the time of the next scheduled backup.[2]
Method 2 of 2:
Using Alternate Methods
-
 Install and use third-party backup software. There are numerous free backup programs available online that allow you to manually backup your Windows 7 data to an external device. Examples of free, reputable backup programs you can use are AOMEI Backupper, EaseUS Todo Backup Free, Redo Backup and Recovery, and Cobian Backup.[3]
- Launch the software program and select the external drive to which you want your data backed up.
- Select the Windows 7 partition or drive you want backed up, then select the option to run the backup.
- Eject the storage device from your computer, and store your backup media in a safe location.
-
 Back up your data to an online cloud storage service. This backup method is ideal for users who have an ample amount of network bandwidth that can handle the amount of data they want backed up. In many cases, online cloud storage services will charge between $50 to $100 per year to back up all files on your Windows 7 computer. Examples of cloud storage services you can use are Google Drive, SkyDrive, iDrive, Carbonite, and Mozy.[4]
Share by
Marvin Fry
Update 04 March 2020


