Table of Contents
The sections below explain Microsoft Windows powershell and SQL server 2005 smo - part 6 in a clear and practical way. Review the key details, examples, and considerations before applying the information.
 Microsoft Windows PowerShell and SQL Server 2005 SMO - Part 1
  Microsoft Windows PowerShell and SQL Server 2005 SMO - Part 2
  Microsoft Windows PowerShell and SQL Server 2005 SMO - Part 3
  Microsoft Windows PowerShell and SQL Server 2005 SMO - Part 4
  Microsoft Windows PowerShell and SQL Server 2005 SMO - Part 5
How Microsoft Windows Powershell and SQL Server 2005 SMO - Part 6 Works
The MAK
In Part 6, I will show you how to use PowerShell and scripts to back up the database.Method 1 Let's assume we have a database ' MyDatabase ' on the ' HOME ' server. Now let's assume that we want to make a full backup of the database to the C: test Directory. Execute each cmdlet one by one. Refer to Figure 1.0
[System. Reflection. Assembly]:: LoadWithPartialName ("Microsoft. SqlServer. Smo") |Out-null[System. IO. Directory]:: CreateDirectory ("C: test") |Out-null$ srv = New-Object "Microsoft. SqlServer. Management. Smo. Server" "HOME"$ bck = new-object "Microsoft. SqlServer. Management. Smo. Backup"$ bck. Action = 'Database'$ fil = new-object "Microsoft. SqlServer. Management. Smo. BackupDeviceItem"$ fil. DeviceType = 'File'$ fil. Name = [System. IO. Path]:: Combine ("C: test", "MyDatabase" + ". bak")$ bck. Devices. Add ($ fil)$ bck. Database = "MyDatabase"$ bck. SqlBackup ($ srv)Write-host "Backup of MyDatabase done"
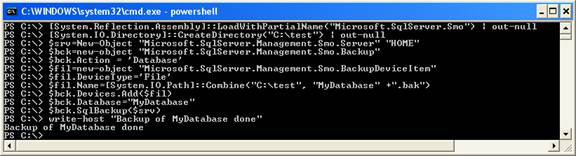 Figure 1.0
This script will create a full backup of the MyDatabase database to the c: test directory as shown below. (Refer to Figure 1.1)
 Figure 1.1
Method 2 Let's assume we have a database ' MyDatabase ' on the ' HOME ' server and want to perform a Transaction log backup of the databases into the C: test Directory. Execute the cmdlet below, times the amount of each instruction (refer to Figure 1.2).
[System. Reflection. Assembly]:: LoadWithPartialName ("Microsoft. SqlServer. Smo") |Out-null[System. IO. Directory]:: CreateDirectory ("C: test") |Out-null$ srv = New-Object "Microsoft. SqlServer. Management. Smo. Server" "HOME"$ bck = new-object "Microsoft. SqlServer. Management. Smo. Backup"$ bck. Action = 'Log'$ fil = new-object "Microsoft. SqlServer. Management. Smo. BackupDeviceItem"$ fil. DeviceType = 'File'$ fil. Name = [System. IO. Path]:: Combine ("C: test", "MyDatabase" + ". trn")$ bck. Devices. Add ($ fil)$ bck. Database = "MyDatabase"$ bck. SqlBackup ($ srv)Write-host "Log Backup of MyDatabase done"
 Figure 1.2
This scenario will perform a Transaction log backup of the MyDatabase database to the c: test directory, as shown in the figure below (refer to Figure 1.3).
 Figure 1.3
Method 3 Let's assume we have a database ' MyDatabase ' on the ' HOME ' server and want to make a Differential backup for the databases into the c: test directory. Follow the commands below, one by one (refer to Figure 1.4).
[System. Reflection. Assembly]:: LoadWithPartialName ("Microsoft. SqlServer. Smo") |Out-null[System. IO. Directory]:: CreateDirectory ("C: test") |Out-null$ srv = New-Object "Microsoft. SqlServer. Management. Smo. Server" "HOME"$ bck = new-object "Microsoft. SqlServer. Management. Smo. Backup"$ bck. Incremental = 1$ fil = new-object "Microsoft. SqlServer. Management. Smo. BackupDeviceItem"$ fil. DeviceType = 'File'$ fil. Name = [System. IO. Path]:: Combine ("C: test", "MyDatabase" + ". diff")$ bck. Devices. Add ($ fil)$ bck. Database = "MyDatabase"$ bck. SqlBackup ($ srv)Write-host "Differential Backup of MyDatabase done"
 Figure 1.4
This script will perform backup Differential of MyDatabase database to c: test directory as shown below (refer to Figure 1.5)
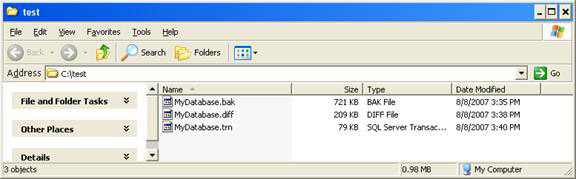 Figure 1.5
Method 4 Now let's connect methods 1, method 2 and method 3 to a PowerShell script that takes the Server name, Database name, Backup type and Folder folder as parameters so that it can be easily implemented. automatically. Create the Backup. ps1 script below in the C: PS folder (refer to Figure 1.6, 1.7).
Param ([string] $ ServerName,[string] $ DatabaseName,[string] $ Backuptype,[string] $ BackupPath)[System. Reflection. Assembly]:: LoadWithPartialName ("Microsoft. SqlServer. Smo") |Out-null[System. IO. Directory]:: CreateDirectory ($ BackupPath) |Out-null$ srv = New-Object "Microsoft. SqlServer. Management. Smo. Server" "$ servername"$ bck = new-object "Microsoft. SqlServer. Management. Smo. Backup"If ($ Backuptype -eq "FULL"){$ bck. Action = 'Database'$ extenstion = ". BAK"$ text1 = "Full Backup"}If ($ Backuptype -eq "TRAN"){$ bck. Action = 'Log'$ extenstion = ". LOG"$ text1 = "Transactional Log Backup"}If ($ Backuptype -eq "DIFF"){$ bck. Incremental = 1$ extenstion = ". DIFF"$ text1 = "Differential Backup"}$ fil = new-object "Microsoft. SqlServer. Management. Smo. BackupDeviceItem"$ fil. DeviceType = 'File'$ fil. Name = [System. IO. Path]:: Combine ($ BackupPath, $ DatabaseName + $ extenstion)$ bck. Devices. Add ($ fil)$ bck. Database = $ DatabaseName$ bck. SqlBackup ($ srv)Write-host $ text1 of $ Databasename done
 Figure 1.6
 Figure 1.7
Now let's execute the above PowerShell script with the following parameters (refer to Figure 1.8).
./backup. ps1 HOME MyDatabase FULL C: test./backup. ps1 HOME MyDatabase DIFF C: test./backup. ps1 HOME MyDatabase TRAN C: test
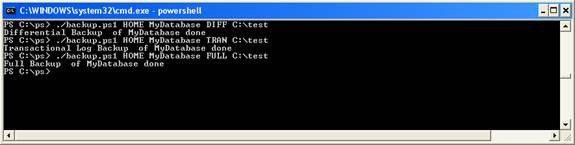 Figure 1.8
Executing the script above gives the results below. (Refer to Figures 1.8 and 1.9)
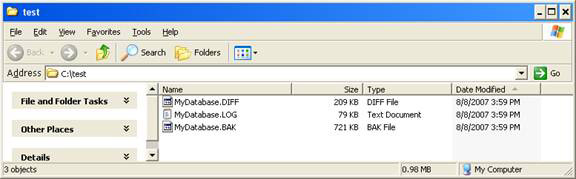 Figure 1.9
Method 5 Let's assume that we need to add the Stamp with the file name when performing backup with the above script. To do that, update the script with the code below (refer to Figure 2.0)
Param ([string] $ ServerName,[string] $ DatabaseName,[string] $ Backuptype,[string] $ BackupPath)[System. Reflection. Assembly]:: LoadWithPartialName ("Microsoft. SqlServer. Smo") |Out-null[System. IO. Directory]:: CreateDirectory ($ BackupPath) |Out-null$ srv = New-Object "Microsoft. SqlServer. Management. Smo. Server" "$ servername"$ bck = new-object "Microsoft. SqlServer. Management. Smo. Backup"If ($ Backuptype -eq "FULL"){$ bck. Action = 'Database'$ extenstion = ". BAK"$ text1 = "Full Backup"}If ($ Backuptype -eq "TRAN"){$ bck. Action = 'Log'$ extenstion = ". LOG"$ text1 = "Transactional Log Backup"}If ($ Backuptype -eq "DIFF"){$ bck. Incremental = 1$ extenstion = ". DIFF"$ text1 = "Differential Backup"}$ fil = new-object "Microsoft. SqlServer. Management. Smo. BackupDeviceItem"$ fil. DeviceType = 'File'$ fil. Name = [System. IO. Path]:: Combine ($ BackupPath, $ DatabaseName + "_" + [DateTime]:: Today. ToString ("yyyy_MM_dd") + $ extenstion)$ bck. Devices. Add ($ fil)$ bck. Database = $ DatabaseName$ bck. SqlBackup ($ srv)Write-host $ text1 of $ Databasename done
 Figure 2.0
Now let's execute the above PowerShell script with the following parameters (refer to Figure 2.1).
./backup. ps1 HOMESQLExpress Admin FULL C: test./backup. ps1 HOMESQLExpress Admin DIFF C: test./backup. ps1 HOMESQLExpress Admin TRAN C: test
Note : HOMESQLExpress is a named example of SQL server on the HOME host; Admin is the database name. Executing the above scenario results in Figure 2.1 and 2.2.
 Figure 2.1
 Figure 2.2
Conclude Part 6 of this series illustrated how to use PowerShell and PowerShell scripts to perform a complete backup - Full Backup, Transaction Log backup and Differential backup for the database with the file name already stamping outside.
 Microsoft Windows PowerShell and SQL Server 2005 SMO - Part 7
  Microsoft Windows PowerShell and SQL Server 2005 SMO - Part 8
  Microsoft Windows PowerShell and SQL Server 2005 SMO - Part 9
  Microsoft Windows PowerShell and SQL Server 2005 SMO - Part 10
  Microsoft Windows PowerShell and SQL Server 2005 SMO - Part 11
FAQ
What is the main benefit of Microsoft Windows powershell and SQL server 2005 smo - part 6?
The main benefit is a clearer understanding of the topic and a practical way to apply the information covered in this guide.
What should I check before using Microsoft Windows powershell and SQL server 2005 smo - part 6?
Confirm compatibility, review the required settings, protect important data, and use the latest supported version whenever possible.
What should I do if the result is different?
Repeat the steps carefully, verify permissions and version differences, and consult the product's official support documentation for changes not shown in the article.
Related Articles
 Microsoft Windows Powershell and SQL Server 2005 SMO - Part 28 minutes read
 Microsoft Windows Powershell and SQL Server 2005 SMO - Part 510 minutes read
 Microsoft Windows Powershell and SQL Server 2005 SMO - Part 78 minutes read
 Microsoft Windows Powershell and SQL Server 2005 SMO - Part 37 minutes read
 Microsoft Windows Powershell and SQL Server 2005 SMO - Part 117 minutes read
 Microsoft Windows Power Shell and SQL Server 2005 SMO - Part 48 minutes read
Reader Comments 0
Sign in with email or Google to join the discussion.