MS Access 2003 - Lesson 35: Creating a Form using the Form Wizards
For other database objects, Access provides Form Wizards that you can use to create forms..
Note : This section uses the Customer database as outlined in this collection of articles
For other database objects, Access provides Form Wizards that you can use to create forms. To see the entire Form Wizards area available, select Form from the Insert menu. Access displays the New Form dialog box as shown in Figure 1.
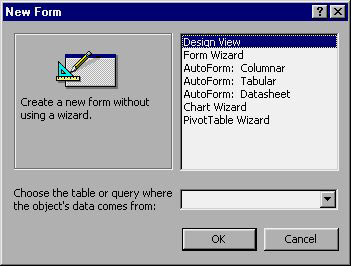
Figure 1: New Form dialog box
This dialog box looks like most of the dialogs you used to create queries and reports. The first step is to use the drop-down list at the bottom of the dialog box to select a data table or query that you want to use to create the Form. You should select the Business Customers table.
The top of the dialog box is 7 options to identify the various resources you can use to create a new Form. The choices are:
• Design View . Allows you to create a report using the report design window. This option will be discussed in more detail shortly after this chapter.
• Form Wizard . Create a Form using the basic Form Wizard. This option is similar to the Wizard when you double-click the Create Form By Using Wizard in the Forms area of the Database window.
• AutoForm: Columar . The form displays all fields in the table by a single column, with the Caption property of the field on the left
• AutoForm: Tabular . The form will display all the fields in the table in the same row as each record is a single line.
• AutoForm: Datasheet . The form looks like when in the Datasheet mode of the table or query.
• Chart Wizard . The form displays a chart based on the table data.
• PivotTable Wizard . Access creates a Form that includes a PivotTable. This option may be the same as in Excel; Allows information to be viewed under a compact form that helps with some types of data analysis
The basic difference between these forms is the layout of information on the form. There is no difference in what the Form does or how to create it. In the following sections, you will learn how to use the Form Wizards to create some Forms of Forms.
Create a basic Form
To create a basic Form, select the Form Wizard from the New Form dialog box and click your mouse on the OK button. (You can also double-click the Create Form By Using Wizard option from the Forms section of the Database window). Access displays the Form Wizard dialog box as shown in Figure 2.
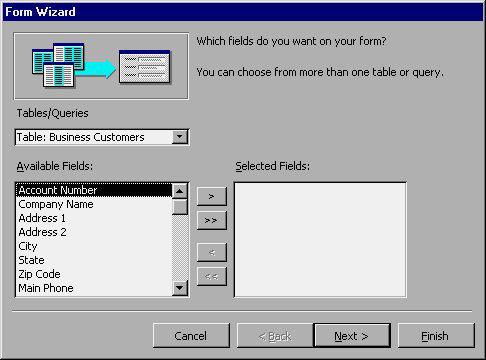
Figure 2: The Form Wizards dialog box
Notice that the dialog box includes the Business Customers table as the data source for your Form. (Remember, you should select this section from the New Form dialog box). Below the left part of the dialog box, you can see the different fields of the Business Customers table. All you need to do is select the fields you want to place on the form and use the controls right to the list to move those fields to the Selected Fields area.
For example, you want to create a data entry form that can be used when setting up a new account. There are only a few fields needed for this Form. In turn, you select the fields except the Account Number field (this field has been automatically selected), Account Opened, Credit Limit, Last Order and Active (this field should be set automatically).
Select the fields, click your mouse on the > button. Field names appear on the right side of the dialog box. When finished, the dialog box appears as shown in Figure 3.
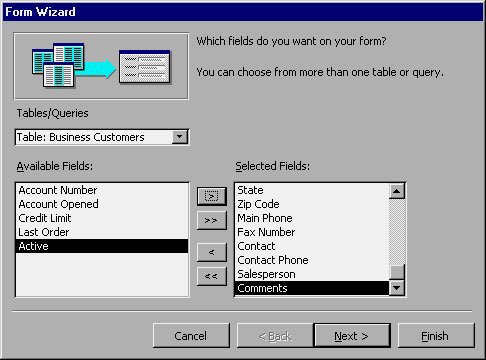
Figure 3: The Form Wizard dialog box after selecting the fields.
When you're ready to proceed, click your mouse on the Next button. Access displays the dialog box shown in Figure 4.
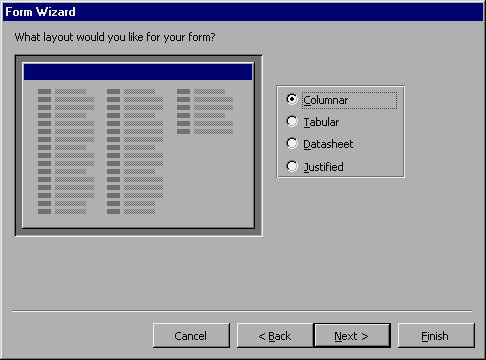
Figure 4: The Form Wizard dialog box to select a layout.
In this dialog box, there are four ways you can choose: Columnar (column type), Tabular , Datasheet . Basically, these arrangements are the same as what you create with the 3rd, 4th, and 5th options in the first dialog box. When you select the option button associated with each type of arrangement, note that the Preview mode changes. This gives you a good idea of how you want the Form to appear. For example, select Columnar, then click your mouse on the Next button. Access displays the next Form Wizard dialog box as shown in Figure 5.
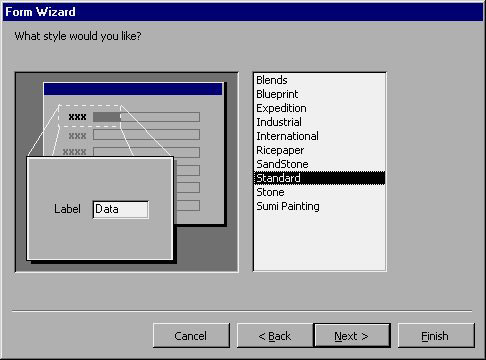
Figure 5. The next dialog to select the Form type.
This dialog box gives you 10 different forms. When you select a style, you can see the results now in the dialog box. These types provide quite a lot of different states in the presentation of data, which show that many types of data can be presented in Access. Because we are working with the Business Customers table, we should choose Standard . Click your mouse on the Next button, the final Form Wizard dialog box appears, as shown in Figure 6.
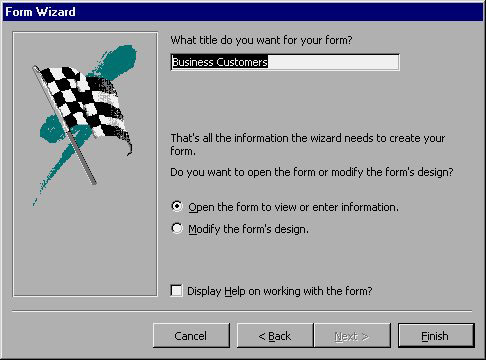
Figure 6: Finish the Form
Those are the basics for creating a Form. All you need to do now is provide a title for the Form. This topic will appear at the top of that form and it will be used to save the Form in the database. Because the default Form name can be accepted, click your mouse on the Finish button. The Wizard will create the Form according to your definitions and display them on the screen. Figure 7 shows what we have done from the beginning of the article.
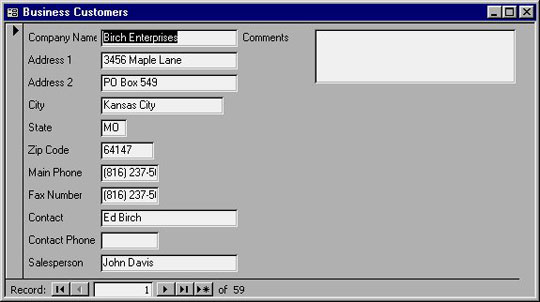
Figure 7: Complete form
You can see an input form like this will be more useful than the Datasheet. At the top of the Form, is the title bar of the form you defined. Below the Form is the control area, where you can locate from one record to the other in the table. You can also review and edit those records, or you can move to the last record and add new records.
Note : Form Wizard is not always good at creating Forms. For example, as shown in Figure 7, the phone number field is too small, resulting in the phone number being lost some. Explaining this reason, many people use the Wizards to create a 'starting point' for creating Forms. Then they can customize them to meet specific needs. Right after this chapter, you will learn how to create a form from scratch. The same method is used to edit the form that was created and saved earlier .
Create an AutoForm form
If you look at the New Form dialog box, you can see that Access allows you to create 3 types of AutoForms: Columnar, Tabular, Datasheet. AutoForms are the simplest type of form you can create. The wizard does all the decisions, all you need to do is determine the data source to be a table or query used in the Form.
As an example of how to use an AutoForm - Wizard is displayed in the New Form dialog box. Make sure that Business Customers is selected as the data source. Then select AutoForm: Tabular and click your mouse on the OK button. In turn, the Wizard creates Tabular a form that includes all fields in the form of tables. You do not need to choose any format, style, field or other issues that may affect how the form appears. Figure 8 shows an example of creating an AutoForm form:
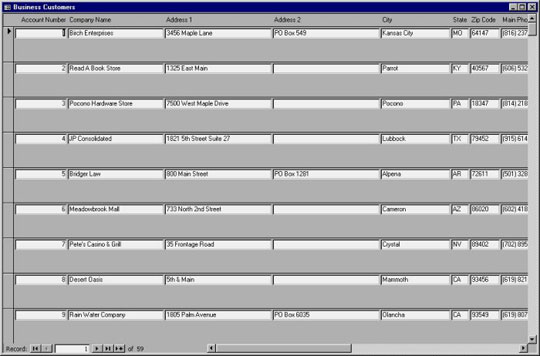
Figure 8: Complete AutoForm
When working with a form, you can close it at any time, Access will ask if you want to save the Form. If you click Yes , a dialog box will appear asking you to name it. For example, if you name the form AutoForm Example, after you finish, click your mouse on the OK button. Access will save the form and update it to the Database window.