Create forms (forms) in Access 2016
Creating a form for your database can make data entry more convenient. When you create a form, you can design it to match your database.
Table of Contents
Creating a form for your database can make data entry more convenient. When you create a form, you can design it to match your database.
In this lesson, you will learn how to create and modify forms. You will also learn how to use form options such as design control features and form properties to make sure the form works exactly the way you want.
Throughout this tutorial, the article will use a sample database. If you want to monitor, you can download the Access 2016 sample database file. You will need to install Access 2016 on your computer to open the example file.
How to create a form
Access makes it easy to create forms from any table in your database. Any form you create from the table will allow you to view the data already in that table and add new data. Once you have created the form, you can modify it by adding additional fields and design control features such as combo boxes.
1. In the Navigation panel , select the table you want to use to create the form. You do not need to open the board.
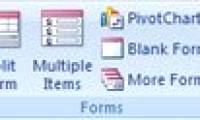
2. Select the Create tab , locate the Forms group and click the Form command .

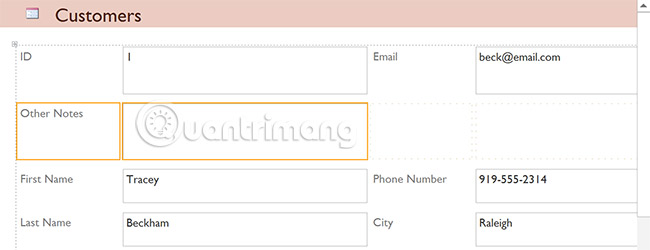
3. Your form will be created and opened in Layout view .

4. To save the form, click the Save command on the Quick Access Toolbar . When prompted, enter a name for the form, and then click OK.

About subform (subform)
If you created a form from a table where the content is linked to another table, your form may include subforms. A subform is a data form that displays linked content in tabular format. For example, the subforms included in the Customers form that you created will display linked customer orders.
You do not need to include this subform because you may only want to use the Customers form to enter and review contact information. If you find that you don't need a subform, you can easily delete it. To do this, simply click on it and press the Delete key on your keyboard.

However, subforms are often quite useful. Depending on the content and source of the form, you may find that the subform contains useful information, as in the example below. In the Orders form , the subform contains the name, quantity, and price of each item in the order. That's all useful information.

Add additional fields to the form
When you use the Form command on an existing table, all fields from the table are included in the form. However, if you later add additional fields to the table, these fields will not automatically show in the existing forms. In situations like this, you can add additional fields to a form.
How to add a field to the form
1. Select the Design tab , then locate the Tools group on the right of the Ribbon.
2. Click the Add Existing Fields command.

3. The Field List control panel will appear. 4. Double-click the desired field (s).

4. The field will be added.
You can also use the above procedure to add fields to a completely blank form. Just create the form by clicking the Blank Form command on the Create tab , then follow the steps above to add the desired fields.

How to add a field from another table
You can also add fields from different tables in your database to the form.
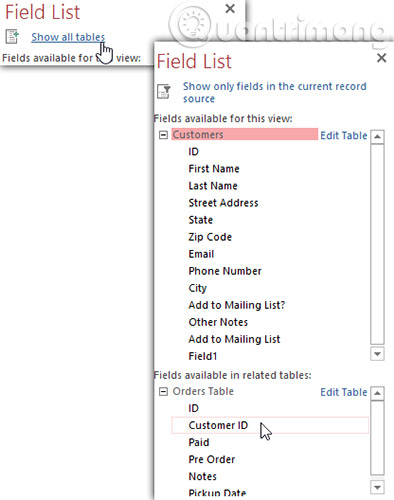
1. From the Field List control panel , click Show All Tables.
2. Click the plus sign + next to the table containing the field you want to add, then double-click the desired field. New fields will be added.
Add design control features
Design control features set restrictions on the fields in the form. This gives you greater control over how data is entered into your form, thereby helping to keep your database consistent.
Combo box
A combo box is a drop-down list you can use in your form instead of a field. The combo box limits the information that users can enter by forcing them to select only the options you have specified.
A useful combo box for schools with a limited number of valid responses. For example, you can use combo boxes to ensure people only enter a valid state in the United States when entering an address or just select products that already exist in the database.
How to create a combo box
1. In the Form Layout view , select the Design tab , then locate the Controls group .
2. Select the Combo Box command , which looks like a drop-down list.

3. Select the desired location for the combo box. A line will appear, indicating the location where your combo box will be created. In this example, it will be placed between the City field and Add to Mailing List.

4. The Combo Box Wizard dialog box will appear. Select I will type in the values that I want , then click Next.

5. Enter the options you want to appear in your drop-down list. Each option must be on its own row. This example is creating a combo box for the Add to Mailing List field? in the form, so we will enter all possible valid responses for this school. Users will be able to select one of three options from the completed combo box: No, Yes - Weekly and Yes - Special Events and Offers .

6. If necessary, change the column size so that all of your text is displayed. When you're happy with your listing, click Next.

7. Select Store that value in this field , then click the drop-down arrow and select the field you want to select from the combo box recorded. After making your selection, click Next.

8. Enter the label - or name - that will appear next to your combo box. In general, you should use the name of the field you selected in the previous step.

9. Click Finish. Your combo box will appear on the form. If you created a combo box to replace the current field, you should delete the first field. In this example, you may notice that there are now two fields with the same name. These two fields send information to the same location, so we don't need both. I will delete the one without the combo box.

10. Switch to the Form view to check your combo box. Just click the drop-down arrow and verify that the list contains the correct choices. Combo boxes can now be used to import data.

If you want to include a drop-down list with a variety of options and don't want to import them all, create a combo box and select the first option in the Combo Box Wizard: I want to get the values from another table or query . This will allow you to create a drop-down list from a field in the table.
Some users report that Access is having trouble working with the form. If you have trouble performing any of the Layout views , try switching to Design view .
Customize the form settings with the Property Sheet
The Property Sheet is a control panel containing detailed information about your form and its components. From the Property Sheet, you can make changes to every part of the form, both in function and interface.
The best way to familiarize yourself with the Property Sheet is to open it and select the options in it. When you select an option, Access displays a brief description of the option on the bottom left border of the program window.

Pay attention when you modify your form and its fields. You can make subtle changes to the Property Sheet. Because there are so many options, it can sometimes be difficult to remember which ones you used to modify each aspect of the form.
Modify form settings
There are too many options in the Property Sheet to discuss in detail all within this article. The article will only look at two useful items here: The Hiding and Setting field comes with the Dates option to automatically fill in the current date. Practicing these processes will also help you understand how to work with other Property Sheet settings.
How to hide a field
1. In Layout or Design view , select the Design tab , then find the Tools group . Click the Property Sheet command .

2. Property Sheet will appear in the right panel. On the form, select the field you want to hide. In this example, we will hide the Customer ID field because we do not want any user to try to edit it.

3. In the Property Sheet page , click the All tab , then find the Visible option on the fifth row.
4. Click the drop-down arrow in the right column, then select No.

5. Switch to the Form view to verify that the field is hidden.
How to set the field to automatically fill in the current date
1. In Layout or Design view , select the Design tab , then find the Tools group . Click the Property Sheet command .
2. Property Sheet will appear in the right panel. On the form, select the school you want to automatically fill in the current date. This must be a field with a date data type. The example in this article will select the Pickup Date field on the Orders form .

3. In the Property Sheet, click the Data tab , and then select the Default Value field in the fourth row. Click the Expression Builder button that appears in the column on the right.

4. The Expression Builder dialog box will appear. In the Expression Elements list , click on the words Common Expressions.
5. In the Common Expressions list, double-click Current Date.

6. The expression for Current Date will be added. Then, click OK.

7. Switch to the Form view to verify that the expression works. When you create a new record with that form, the modified date field will automatically fill in the current date.

Practice!
- Open the practice database mentioned above.
- Create the form from the Customers table .
- Delete subforms.
- Create a combo box. Add the following options to the combo box:
- Raleigh
- Durham
- Hillsborough
- Cary
- Chapel Hill
- Garner
- Charlotte
- Store the value in the City field and label the combo box as NC City List . Click Finish when you are done with the Combo Box Wizard.
- Switch to Form view and click the drop-down arrow in the combo box you created. You will see the list of cities.
See more:
- Create data queries in Access 2016 from simple to complex
- Edit tables in Access 2016
- Work with data in Access 2016
Was this article helpful?
Your feedback helps us improve.
Related Articles
 MS Access 2003 - Chapter 9: Creating Form4 minutes read
 MS Access 2003 - Lesson 36: Defining individual Forms26 minutes read
 How to add branches or nested questions in Google Forms4 minutes read
 MS Access 2007 - Lesson 12: Design Forms3 minutes read
 How to create a quiz on Google Forms, generate multiple-choice questions, and automatically grade them.9 minutes read
 Format forms in Access 201610 minutes read
Reader Comments 0
Sign in with email or Google to join the discussion.