Ms Access 2003 - Lesson 14: Chapter 4: Creating another database
In Chapter 2, ' Learning Access for 1 hour ', you have learned how to perform all of Access's basic functions. Create both a database and create a table, learn about issues around the Datasheet mode. In this chapter, you will meet some of the parts mentioned in chapter 2, but from a different perspective. You will learn how to manually create a table without relying on the Table Wizard .
After finishing this chapter, you will understand the following:
- How to create a database
- How to design your own table
- How to sort tables using the Design view window
- How to check the table arrangement
Lesson 14: Self-created database
To get started, you will create a new database. As in Chapter 2, you can create a database by following these steps:
Click New on the toolbar. Access displays the New dialog box as shown in Figure 1
Figure 1: New dialog box
Make sure the Database object is selected, then click the OK button. Access displays the File New Database dialog box as shown in Figure 2.
Figure 2: File New Database dialog box.
1. If necessary, change the drive and folder for the new database.
2. In the File Name box, enter the Customer name. This is the name you will use for the database in this chapter.
3. Click the Create button. After Access creates the required database file, you will see the Database window displayed as shown in Figure 3.
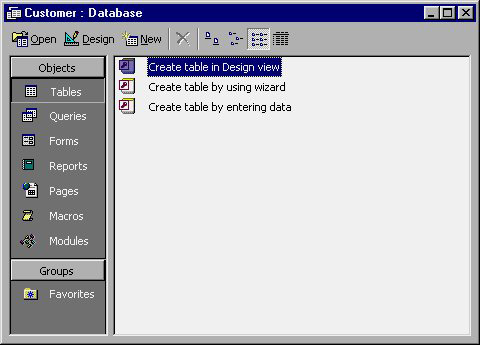
Figure 3: Database window appears after Access creates the Customer database.
You should read it
- MS Access 2003 - Lesson 12: Working with a table
- MS Access 2003 - Lesson 5: Chapter 2: Access Learning in 1 hour
- MS Access 2003 - Lesson 25: Chapter 7: Printing tables
- MS Access 2003 - Chapter 9: Creating Form
- MS Access 2003 - Lesson 1: Chapter 1: Terminology Access
- MS Access 2003 - Lesson 27: Printing information for objects
- MS Access 2003 - Lesson 11: Chapter 3: Customizing components
- MS Access 2003 - Lesson 31: Creating a Report
May be interested
- MS Access 2003 - Chapter 9: Creating Formfrom the beginning of the lessons so far, you have entered and edited the information in the tables. in this lesson, you will learn how to use forms for entering and editing data.
- MS Access 2003 - Lesson 21: Chapter 6: Using Query to check datain this chapter, you will learn how to filter and organize data, which is a powerful tool provided by access - queries.
- MS Access 2003 - Lesson 35: Creating a Form using the Form Wizardsfor other database objects, access provides form wizards that you can use to create forms.
- MS Access - Lesson 4: Create a new databaseyou can create a new database from scratch or from the wizard database.
- MS Access 2003 - Lesson 37: Summary of chapter 9forms provide a convenient and convenient way to represent information and import data from users.
- MS Access 2003 - Lesson 32: Using other Report Wizardsthe report wizard you used earlier in this chapter is not the only part provided by access, but other parts you can use as well.
- MS Access 2003 - Lesson 18: Chapter 5: Sorting and filtering informationin order for you to quickly apply information in the table and display it in a more organized way, access provides two special tools: sorting and filtering.
- MS Access 2007 - Lesson 1: Get started with Microsoft Access 2007the microsoft office button (the yellow circle icon in the upper left corner) performs many functions that are located in the file menu in older access versions. this button allows you to create a new database (new), open an existing database (open), save (save) and save as (save as), print (print), send or close.
- MS Access 2003 - Lesson 33: Creating Mailing Labels (mailing labels)in the previous section, you learned about the lable wizard that you can use to create mailing labels. mail necessary labels in every business.
- Introduction to databases - Databasemicrosoft access is a database creation and management tool. in order to understand access, you must first understand the database.