MS Access 2003 - Chapter 9: Creating Form
From the beginning of the lessons so far, you have entered and edited the information in the tables. In this lesson, you will learn how to use forms for entering and editing data..
From the beginning of the lessons so far, you have entered and edited the information in the tables. In this lesson, you will learn how to use forms for entering and editing data . Forms allow you to make a new step in addition to normal data entry. In short, Form provides custom interfaces that allow you to work with data in most cases.
For example, if you are working with an employee database, you can create a form that matches that record. Depending on the company, you may have several different departments that use these records. Using Forms in Access, you can create an arbitrary interface for each section. In turn, each form of that section will show only the fields that employees in that section need to use.
At the end of this chapter, you will understand the following:
-
What are forms and what are their benefits?
-
Ways to create Forms
-
How to boot and use Forms Wizards
-
How to create Forms from the beginning
-
How do you use the form design toolbox?
-
You can use the Access palette for forms
-
How to put objects into the form
-
Properties apply to objects and forms like
-
How to save the form in the database
Lesson 35: Learn about Forms
In chapter 2 ' Learning Access in an hour ', you have been using the Datasheet to display the contents of a table (Datasheet can also be used to display a query result as learned in Chapter 6 ' Use Queries to check data '). Using the Datasheet, you can import and edit information easily. The bad thing is, the Datasheet does not create user friendliness. For example, in Chapter 4 ' Creating Another Database ', you presented a table to track customers. The table contains information about when customers opened their accounts, what their financial limits are . It is not appropriate for people to access this information.
You can create forms that display part or all of the table. In addition, a form can contain information designed to enter, such as on-screen help, buttons, or custom tools. There are many features to use in the form. For example, the form shown in Figure 1 is one of the forms you will create shortly after this chapter. Note that the form is more flexible and easier to use than the Datasheet
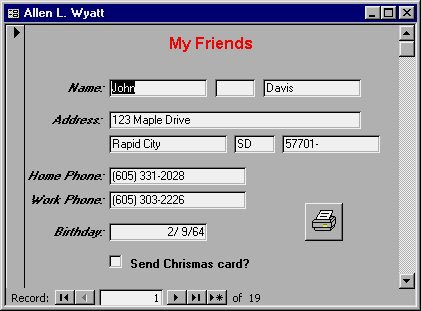
Figure 1: A form template
To use a form for importing, you need to select the Forms button in the Database window. If there are any forms available in the database, Access will list them. Select the form you want and click your mouse on the Open button. Turn off a form and turn off other windows: click your mouse on the Close icon in the upper right corner of the form window
Because forms are database objects, you can manipulate them in the same way as other objects such as tables, queries, and reports. This means you can use menus in Access to customize operations such as copying, renaming and deleting forms.