MS Access 2003 - Lesson 33: Creating Mailing Labels (mailing labels)
In the previous section, you learned about the Lable Wizard that you can use to create mailing labels. Mail necessary labels in every business . Assuming you have the Customer.mdb database, you can start the process of creating a mailing label by selecting Report from the Insert menu or clicking the Report button at the Database window. The New Report dialog box appears, as shown in Figure 1

Figure 1: New Report dialog box
Use the drop-down list below the dialog box to select the Business Customers table as the data source. When this is done, select the Lable Wizard and click your mouse on the OK button. Access displays the first step in the Label Wizard as shown in Figure 2
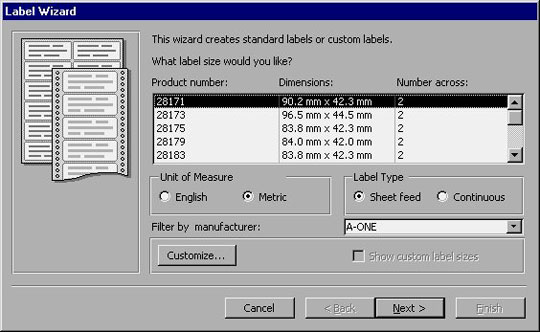
Figure 2: Select a label type
The first step in creating labels is to determine the type of label you want to use. Fortunately, Access is easy to define a label type. While there are many different labels available in the market, the standard industry for different types of labels. Label Wizard supports over 650 labels from 13 different manufacturers. Fortunately, you can find specific labels that were previously defined by Access
To select a label type, use 3 controls in the middle of the dialog box to filter which labels are displayed. The 3 controls are as follows:
• Unit of Measure . You can choose English or Metric. Your choice will determine which labels are displayed in the list
• Label Type . You can select Sheet Feed or Continuous. (Sheet-feed is used in conjunction with the printer when it is required to control each sheet of label. Continuous is used when the printer controls provide material for the machine.) Your choice determines which labels are displayed in the list.
• Filter by Manufacturer : Use this drop-down list to indicate who created your label. Only labels produced by the manufacturer will be listed
If you're in the US, and don't see the manufacturer listed, choose Avery. Most lable manufacturers have the same standard as the size supported by Avery. If you can't find the Avery label, you can go to the Dimensions column on the dialog to find out the label you want to use.
Note : if you cannot find the label you want or a corresponding label, you can click the Customize button to indicate the specific label type you are using .
In this example, you are creating a standard label (1 'x 4'). This is Avery label 5216. These labels allow you to print 6 lines on the label and are designed for laser printers, this is a standard label produced by many other agents. To illustrate this example, select English Measure, Sheet Feed, and Avery. Then select label 5216.
Select Fonts and colors
Click your mouse on the Next button to indicate that you have finished selecting the label type. Now you are ready to choose the font and color. Access displays the dialog box shown in Figure 3.
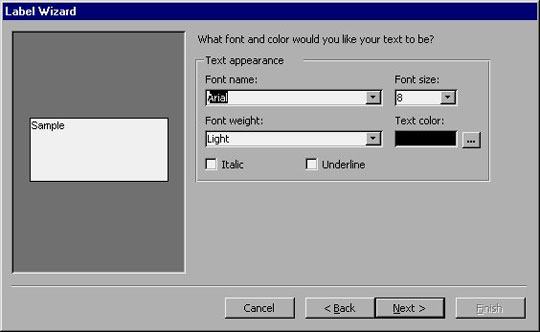
Figure 3: Select font and color.
The font and size given by the Label Wizard are the Arial font and the font size is 8, using the weight font is light. This is a smaller point and you should increase it a little more if possible. Whether to change the font size or not depends on your printer type and its features. To illustrate this example, we do not change the font size, but can change any other properties you want. For example, you can change the Font Weight to Normal or Bold . Unless you have a color printer, it doesn't make sense to change the Text Color .
Select Label content
After determining the font used, click your mouse on the Next button. Access displays the dialog box shown in Figure 4.
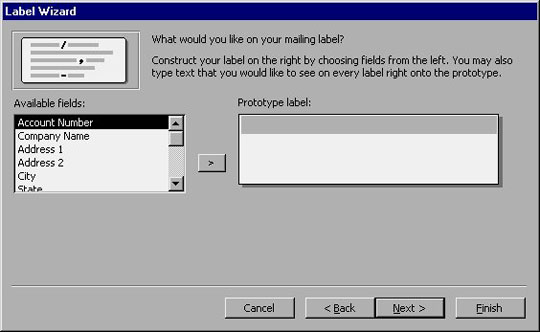
Figure 4: Presentation of the label content
The Label Wizard lets you determine how you want the label to appear. To the left of the dialog box, you can select different fields from the table. You can also enter content that will appear on every label. If you want to do this, you must insert spaces, commas, and underscores.
There will be only 6 lines to work, you need to plan how you want the label to appear. The Label Wizard will use two lines for spaces above and below each label, so you only have 4 lines left to work. You know that the company name and address will take 3 lines. This means you only have one line left. It must be useful if you are using the top line of the label to display the heading.
To create a label in this format, perform the following steps:
1. In the Prototype box, enter your account number is . (Don't forget to add a space at the end of the content. This space will separate the content from the current account)
2. Select the Account Number field in the field list, then click your mouse on the > button. This will move the account number to the end of the first line in label. You have completed the first line.
3. Press ENTER to complete the first line and move to the second line of label.
4. Click your mouse on the Company Name field in the field list, then click your mouse on the > button.
5. Press the ENTER key.
6. Click your mouse in the Address 1 field in the field list, then click the > button
7. Press the ENTER key.
8. Click your mouse on the City field in the list and click on the > button.
9. Enter a comma
10. Click the State field in the list, and click the > button.
11. Enter the second space
12. Click on the Zip Code field in the list and select the > button.
You have finished designing the label, and it will appear as shown in Figure 5. Take a moment to review the label to make sure it displays correctly. If not, you can select the line you want to change and press the DEL key to remove the line. Then it can be reset properly.
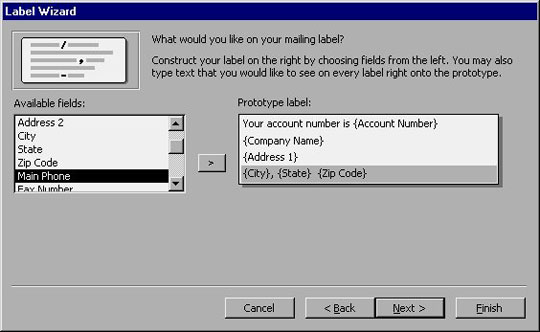
Figure 5: Ending the label layout.
Sort Label
When you are satisfied with the lable layout, click your mouse on the Next button. Access displays the dialog box shown in Figure 6.

Figure 6: Select the sort order.
Usually you want to sort labels by Zip code , but you can use any field you want. In this example, we will sort with two levels: first by Zip code and then by company name . To do this, select each field in these fields in order, then click the > button. Both fields will appear on the right side of the dialog box.
End Label
You have actually completed your label. Click your mouse on the Next button. Access displays the dialog box shown in Figure 7.

Figure 7: End label
There is nothing you need to change in this dialog. Click your mouse on the Finish button and Access displays a print preview mode. Figure 8 shows what we see.
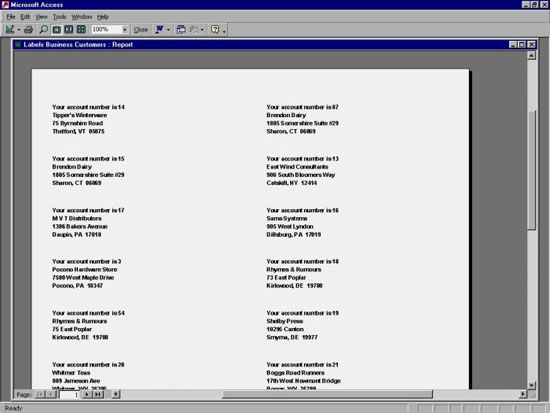
Figure 8: Preview mode when printing for label
When you have finished viewing the report, close the print preview window.