MS Access 2003 - Lesson 36: Defining individual Forms
When Wizard forms do not meet your needs, you can use the Design window to create a separate form or edit an existing form.
When Wizard forms do not meet your needs, you can use the Design window to create a separate form or edit an existing form. While the form design window gives you more flexible control than working with Wizards, using the Form design window is more complex than using Wizards.
Note: This section uses the MyFriend.mdb database that you used in the previous chapters.
To create a separate Form, click your mouse on the Forms button in the Database window. Then, double click on the Create Form in Design View option . Access displays the Design window as shown in Figure 1.
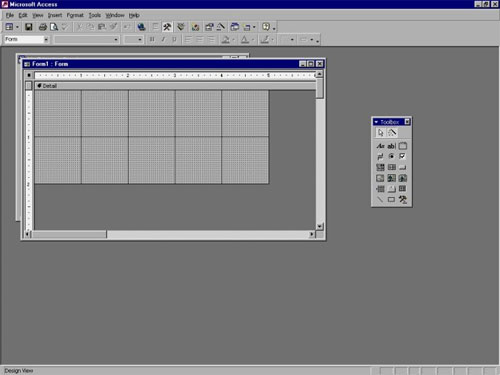 Figure 1: Design window of the Form
There are several items you should pay attention to in this window. First, there are some new tools on the toolbar. You will learn the purpose of each of these tools right after this chapter. Second, it's the design toolbox. You will use the toolbox (briefly described) along with creating the form.
The main part of the design window is the design grid. This design grid will become the form you intend to design. The idea to design the Form is to place objects on the design grid. Objects can be fields, labels, buttons, controls, and other items, etc. You will learn how to place objects on a design grid immediately after this chapter These objects have properties that determine how they appear and perform.
Edit existing forms
You can edit existing forms using the same method to create a new form. Select the Forms name in the Database window, and then click your mouse on the Design button. Many people use the Forms Wizard to create a basic Form and then use the design window to change the Form accordingly.
Note that the Form design grid is not large, it is 2 inches high by 5 inches wide. If you want to increase the size of the grid (in this case increasing the size of the form you are creating), move the mouse pointer over the outer border of the grid. Next, hold down the mouse button and drag the border to a new position. When you release the mouse, the design grid has been expanded. You can see the illustration as shown in Figure 2.

Figure 2: Design grid size
Note: You can enlarge or reduce the size of the Design grid size any time you want. You will need to enlarge the grid when adding new objects, and before scaling the design grid size, you must remove the objects that appear in the design grid you want to remove.
Attached to the data source
If you do not edit an existing Form, it is possible that the Form you are creating has not been defined as a data source. The first step in creating a new Form is to identify the data source. To determine the data source we perform the following steps:
1. Click your mouse on the Properties tool in the toolbar. Or select Properties from the View menu. Access displays the Properties dialog for the Form
2. Make sure the Data tab is selected. Access displays the Properties dialog box shown in Figure 3.
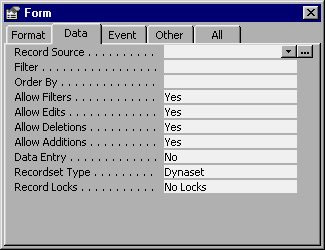
Figure 3: Properties dialog for the new Form.
3. Consider the Record Source attribute. If there are some in that attribute, you already have a data source defined for the Form. In this case, you can skip the next step.
4. Select the Record Source property and use the down arrow to the right of the property to select the My Friends table as the data source. (Remember, My Friends is the name of the table created in the My Friends database).
5. Close the Properties dialog box by clicking your mouse on the Close button in the upper right corner of the dialog box.
Note : The Record Source is a Form property. Immediately after this chapter you will know more about how to change the properties for the Form.
Form design tool
When the design grid appears, the design toolbox also appears. (In Figure 1, the toolbox is located on the right side of the screen). This toolbox contains objects that you can place on the Form. These objects are often called controls. You can hide or show this toolbox by clicking your mouse on the Toolbox tool on the toolbar or selecting Toolbox from the View menu. The toolbox contains 20 tools described in detail in the following table:
Tool Illustration Description Select Objects Used to select objects already on the Form Control Wizards
 When selecting this tool, Access uses the Wizards to help you create Form Label controls
 Place text on the Form Text Box
 Used for users to enter or display the current value, as the content of an Option Group field
 Group buttons, options and check boxes together. Any objects inside a group option are selective (can only be selected once in the group). Toggle Button
 A button to turn on or off. When selected, it will consider the True Option value
 This tool is also called a radio button. Appears as a circle, when selected, it will be filled. Check Box
 Appears like a square. When selected, it has traces in it. Combo box
 A list box with a textbox above its List Box
 A box contains a sequence of values that the user can select. Command Button
 Execute a macro or a basic module Image
 Insert images into the Form. Unbound Object Frame
 Link and display images, graphs or other OLE objects. The object is not stored in the table or query. Bound Object Frame
 Just like a frame object, regardless of the object stored in a table or query. Page Break
 Divide a Form into two parts Tab Control
 Used to add a tab to the Form, like dialogs containing Subform / Subreport tabs
 Add another Form or Report from an existing Form or Report. Often used to display relevant information in tables. Line
 Draw a Rectangle line
 Add a rectangle or square More Controls
 Allows adding controls beyond the controls in the toolbox Table 1: Tools in the toolbox (top to bottom and left to right).
Note : You can use the mouse to move the toolbox or change its size. By pointing to the toolbox's title bar and using the mouse to drag it to a new location, point to the outline of the toolbox and use the mouse to drag it to a new size.
To place a control on the Form, click your mouse on the tool you want and use the mouse to indicate where you want to place the control on From. For example, if you are late setting a Text box, first click your mouse on the Text Box tool. Then, use the mouse pointer to indicate where you want to place the corner of the box. When you click and hold the mouse, Access holds the corner of the box. When you drag, the Text box will be larger. When the text box has a proper size, release the mouse button. The text box will be placed at the location you select on the Form. You can put any other controls in the same way.
Each time you place an object on the Form, you can move it or resize it using the mouse. For all objects, when selected it will be surrounded by controls. This small square surrounds the control. You can use the mouse to drag these controls to a new location. If you simply point to the edge of the object and hold down the mouse button, you can drag the entire object to a new position on the Form. When you release the mouse, the object will be in that position.
Note: You can move an object because the mouse pointer changes to a hand shape. Other objects, hand images appear when you point over the edge of the object (not where a control is located). For other objects, the hand shape appears when the mouse pointer is in the middle of the object. Just move the mouse around the object until the hand image appears and then use the mouse to drag the object to a new location.
Place objects on the Form
Suppose you want to create a Form so you can review the records in the My Friends table once. Next, you want to set the properties for the Form. Start with the first operation using the Form Design window. Put an object on the form, then put other objects. And repeat the process until completed.
The first step in creating a Form is to adjust the size of the design grid to match. Then, you can change the background color for the Form. To change the Form background color, select that Form (just click your mouse on the form grid), then adjust the color using the Fill / Back Color tool on the toolbar (this tool looks like a brush). Click your mouse on the down arrow to the right of the tool, and Access displays a color palette. You can choose any color. Click your mouse on that color. If you set a color different from the current color, notice that Access will replace the entire design grid with that color.
Set the Label object
Next, you may want to have some small text as the title on the Form. To assign a title, place the Label object on the form by selecting it from the toolbox. Put Label on the form and adjust according to the appropriate size. This case is illustrated in Figure 4.
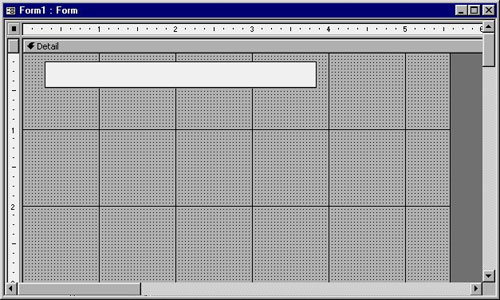
Figure 4: After placing the Label object
Now Access waits for you to enter the content you want to appear on the label. Enter the word My Friends and then press Enter. That content will appear on the left side of the Label box and controls appear around it. You can set the color for the object. Set the background color (using the Fill / BackColor tool) and the border color (Line / Border Color tool) or select the color along with the form background or transparent color (Transparent). You can then set the font color using the Font / Fore Color tool.
Pay attention to the tool above the screen. When you have selected an object that contains text, the content controls are activated. You can set properties such as font, size, etc. You should change the properties for this Label so that the content looks like a Form title. Figure 5 shows an illustration for setting up the Lalel properties (14, Tahoma, bold, placed in the middle of the Label box).
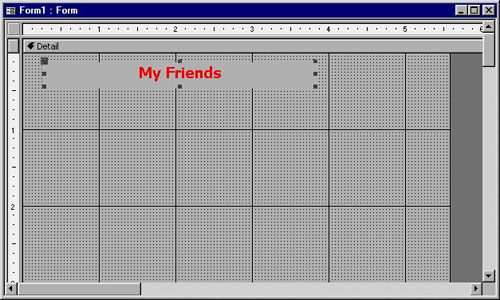
Figure 5: End of the Form title
Place the fields on the Form
To start, select the Field List from the View menu. After selecting, the list of fields will be displayed as data sources (My Friends table). Next, use the mouse to select a field and drag it to the Form. For example, click your mouse on the FirstName field and drag up the form. When releasing the mouse, Access places two objects on the Form: a Label and a Text box. The label object contains the Caption property for the field, the Text box object contains the name of the field. The following illustration:

Figure 6: Place a field on the form
You can use the mouse to adjust the position of the Label and Text box objects on the screen. (If you move the Labels and Text boxes to separate them) Use the color and formatting on the toolbar to adjust objects so that they are easier to see on the Form. When completed, the Label and Textbox objects will appear as shown in Figure 7.

Figure 7: Format the controls.
It would be more convenient to change the content in the Label object to only Name instead of FirstName. In this way, users can enter the entire name to the right of the Label object. To do this, select the Label object, when you move the mouse pointer over the content in Label, notice that the cursor changes to an insertion point. Click your mouse and you can change the content in the Label object easily. When done, press Enter, Access will make that change.
Note: Any time you change content in a Label, you may also want to change the size of the Label object. Make any adjustments you deem necessary for a more reasonable object.
Now you want to add more fields to the Form. You do it with the same way as the first school. Just click your mouse on the Middle Initial field in the field list and drag to the design grid. Position the mouse pointer so that it is only a little right of the used Text Box for the FirstName field. When you release the mouse button, Access places two objects on the form as shown below:
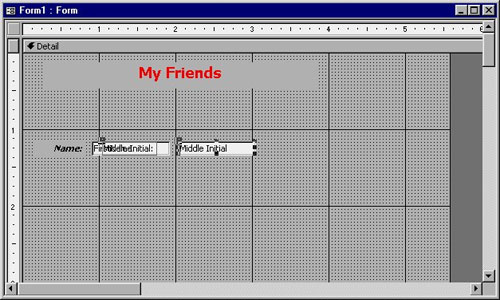
Figure 8: Put the second field on the Form
Notice that the Label object overlaps with the previously placed field. Therefore, you do not need to name the label (because the previous label object is Name is suitable for the entire net), use the mouse to select it and press the DEL key. The Label box disappears but the Text box remains. Now you can position the Textbox and change its properties and sizes to match other objects.
You can set the LastName field with such a way. The result is shown in Figure 9:
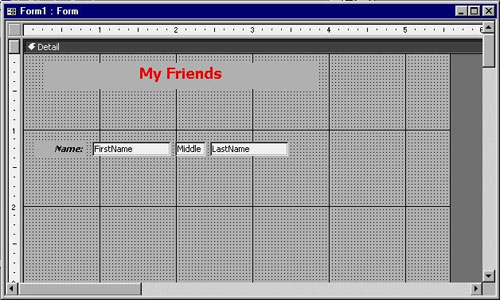
Figure 9: Complete the first line of the Form
The most basic thing is to place the fields on the Form. You should adjust the first field and place the remaining fields and change their properties to the best. Use operations like you did for the first 3 fields. (No need to set the Christmas Card field, it will be mentioned in the next section). Figure 10 shows the Design window after setting the fields for the Form.

Figure 10: Form almost completed
Set the Check Box object
The last school you need to set is the Christmas Card school. You can recall Chapter 2, 'Access Learning in 1 hour', whether the Yes / No field indicates whether you sent a Christmas card to an individual. Yes / No fields can be displayed with any of the following objects:
• Toggle Button
• Option Button
• Check Box
Any of these controls can indicate the status of Yes / No or On / Off status, the difference between them is only formality. However, the effect on one user may be quite different. For example, a toggle button indicates if some status is on or off, while the other two are more accurate corresponding to Yes or No. In fact, the object you use depends on what you choose, but in this case, you should select the Check Box object.
To set a check box for the Christmas Card field, click your mouse on the Check Box tool in the toolbox. Then drag the Christmas field from the field list to the Form. When releasing the mouse, Access places two objects on the Form: the Check Box object and a Label object. Illustrated as follows:
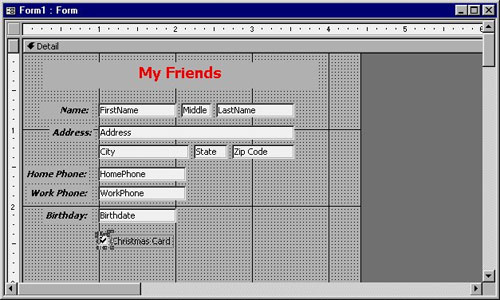
Figure 11: Set the checkbox
Note that, unlike the other fields you have previously set, Access places the Label object on the right side of the Check Box object (instead of the left side). Access places the right side to follow the interface instructions for Windows. Locate the objects on the form and format them as best as possible. You may also want to change the content in the Label object to match the purpose of the Check Box box, which can be changed with content such as Send Christmas card.
Learn the properties
In this section, you are also quite familiar with the concept of attributes. You know that Access uses attributes to describe how an object appears or how Access handles it. You also know that fields, tables, and queries have attributes. Objects you place on a Form can also have attributes. The exact attributes depend on the object you selected.
Typically, attributes describe the properties of an object. For example, elevation, width and position are attributes of an object. Including colors and fonts. When working through the previous sections, you have set properties for some objects even though you may not have knowledge of it yet.
Change object properties
You can view and change the properties of an object using either of the following methods:
• Double click on the object
• Select the object and click your mouse on the Properties tool on the toolbar.
When you have done one of the two ways, Access displays the Properties dialog for that object. For example, Figure 12 shows the Properties dialog box for the first Label object you have placed on the Form (the object used as the title for the Form).

Figure 12: Properties dialog for Label object
All have 38 properties for this object. For other objects, there may be more or fewer attributes. The number of attributes is not important, but it is important to know how to change a property.
To change a property, first display the Properties dialog box. Next, use the mouse to select any attribute item in the tabs in that dialog box. Then, select the attribute you want to change. You can enter a new value or use the drop-down arrow to select an appropriate value. When changing an attribute, the result will change immediately.
Note: When changing some properties, it is easy not to use the Properties dialog box. For example, to change colors, using the toolbar will be faster. If possible, use another way to change properties when one of the attributes is available.
Because there are so many different attributes available, you have to start with wondering what common properties are used for. The best way to find an answer is to select an attribute and view Access's status bar. You will find information that provides the quickest to help what an attribute does. If you need more help, you can use the online help system. The help system fully describes the purpose and usage of some of the attributes.
Example of attribute change. Select the Check Box object that you placed on the Form in the previous section. Notice that the properties in the Properties dialog box change according to the new object you selected. When selecting the Other tab in the dialog box, it will appear as follows:

Figure 13: Properties dialog for the Check Box object
A useful attribute that you can change is the Status Bar Text property. This is an attribute indicating what Access should display in the status bar when the Christmas Card control is selected. All you need to do is select the Status Bar Text property and start typing what you want to display. For example, enter the content Should this person receive a Christmas card? When done with the Properties dialog box, close it.
Note: Many properties for Form objects also resemble properties for fields in Access. You can refer back to Chapter 3 for more information about properties.
Change the Form property
The form also has attributes. You can see these properties by selecting Form. To select a form, click your mouse on the small gray blocks on the left side of the horizontal bar at the top of the Detail window. If the Properties dialog box is open, you will see properties for the entire Form. There are 81 properties that can be applied to forms, and Access sets many properties automatically when you edit a form. You changed a property for the Form at the beginning of the chapter when you changed the Record Source property for the Form.
Many properties are very useful for high-level programming languages. However, you can use one of them directly. For example, you want to change the word that appears in the Form title bar. By default, the title bar will display the word 'Form', before it is a colon and the Form name. However, because you work with a table that contains information about your friends, you want the title bar to display the name.
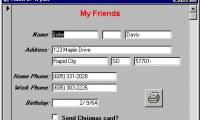
To make this change, simply edit the Caption property for the Form. Any words you reach in the Caption property will appear in the Form's title bar. When I change the Caption property I replace it with my name, Access changes as shown in Figure 14:

Figure 14: Form after changing the Caption properties
Note: Access does not change the title bar until you actually open the Form. If you use the design window, the Form will use the default title bar.
Save Form
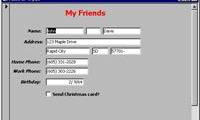
Once you have created and changed the form, you need to save it. Access automatically gives you a default name when you close the design window. If you have made changes to the form (or if you are designing the Form for the first time). Access will ask if you want to save the changes. The effect of clicking the mouse on the Yes button depends on whether you edit or create the Form. If you edit the Form, Access will save the change under the name Used previously. If you are creating a Form, Access will ask you to provide a Form name, as shown below:
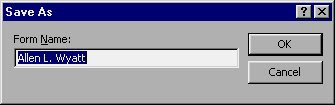
Figure 15: You can specify a name for the Form
In this case, Access suggests a name based on the subtitles I have set for the Form (remember, this name is set when setting the Form property change). This name can be changed in different ways. You should use the name to represent the meaning of the Form. In case I changed the name to Reviewing Friends form. When pressing ENTER, Access saves the Form and returns to the Database window.
Was this article helpful?
Your feedback helps us improve.
Related Articles
 MS Access 2003 - Chapter 9: Creating Form4 minutes read
 MS Access 2003 - Lesson 37: Summary of chapter 92 minutes read
 MS Access 2007 - Lesson 12: Design Forms3 minutes read
 Format forms in Access 201610 minutes read
 MS Access 2003 - Lesson 27: Printing information for objects5 minutes read
 Create forms (forms) in Access 201613 minutes read
Reader Comments 0
Sign in with email or Google to join the discussion.