How to Use OneNote 2013
OneNote is an essential learning tool for school, and work. It is similar to Notes on iOS, and the third-party Evernote but has a lot more options. Here is how to use it. Open OneNote. Simply click on the application from the Start....
Part 1 of 3:
Taking Your First Look at OneNote 2013
-
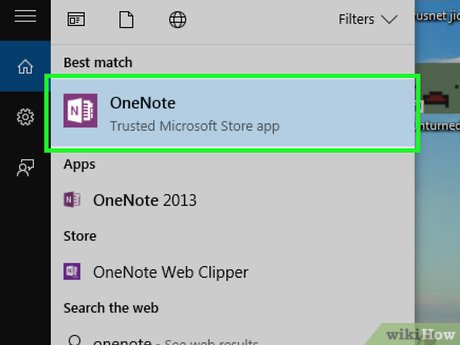 Open OneNote. Simply click on the application from the Start menu/Start screen, program screen containing all your programs after swiping up (or if you have a Start menu under the All Programs list).
- Be careful when opening the Windows Start menu if you are running this on Windows 10. Windows 10 has an integrated OneNote that you should be aware of. The integrated OneNote has a lot less features than OneNote 2013 and if you have that 2013 version should be avoided. (Also, if you didn't update to the overhaul-update in November 2015, your notes on the integrated OneNote won't sync to OneNote 2013 and you'd be fried with lost notes everywhere!) Microsoft gave Windows 10 users a ploy type of program in hopes that people will be like "Wow!" in hopes that it would be enough for people to purchase the full version of any of the Office suites which all contain the program.
-
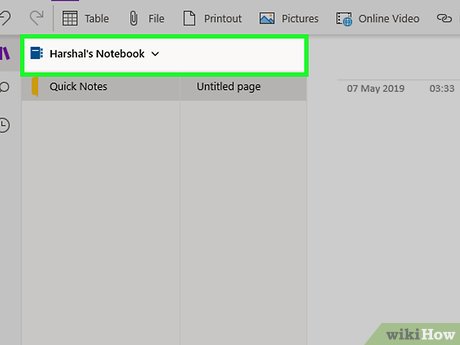 Look at your current options. You should have a notebook that says "__(name)______'s Notebook" if you are signed into your current Microsoft account (includes Outlook, Hotmail and Windows Live Hotmail), or Office 365. There should be some setup instructions.
 -
 Create a new notebook. If you want to create a new Notebook click 'Add Notebook' on your left or you can import files as a Notebook. If you've created notebooks on other Microsoft account linked apps or other computers and would like to retrieve them on the computer, after letting your named Notebook load in it's entirety single-click the notebook drop-down and click "Add Notebook" then choose one of your open Notebooks in your Microsoft account.
 -
 Add a section. Although you get a "Quick notes"(unremovable) section and "My notes" section installed to each notebook by default, you can create other sections by clicking on an empty page or on the plus sign to the right of the last section in that particular notebook typing your Notebook sections' name and clicking onto the first page blank page created to save your name.
 -
 Add a page to the section. Click 'Add Page' and name it whatever you like. OneNote will send you directly to the title portion of the Note, but as you type, the title will appear in the Notes list on the right hand side bar. By default, OneNote will save two how-to like notes in your named Notebook's QuickNotes folder, (one called "OneNote: one place for all of your notes" and the other called "OneNote Basics".
 -
 Get to know the parts of the screen that you will know and love. Besides the Ribbon and toolbar set (that a majority hate for whatever reason it is)(You'll understand what each section of the Ribbon contains by the end of this article and probably be ready to work and get your notes written and potentially be using your notes soon enough, you have a drop-down list of all your notebooks you've opened, a set of visualized tabs for all your Notebook sections (much like tabs that a regular notebook has with those plastic edges and a thin piece of cardboard and writing on them) as well as a portion for the note itself, while to the right of the note is a listing of Notes inside each section of the Notebook.
Part 2 of 3:
Getting to Know the Available Note-Creation and Note-Formation Options
-
 Research some of the basic note formation options such as bold, italic, and underline, as well as some of the main font size and type options. These are all there, even without touching anything (found underneath the Ribbon bar after clicking the Home button).
- You can also use the copy, cut and paste options in this part of the bar too, as well as change the text and background colors for text portions of a note as well as create individualistic styles (such as adding to-do like boxes and many other flag-like options from the one box underneath the Home button of the program.
- Also from here, you can begin numbered and bulleted lists by clicking the button that describes the list type you'd like.
-
 Get to know about what things you can insert and use some of them. Besides adding text, you can also add blank space lines, tables/charts, attached files and linked files, spreadsheets (with Excel 2013 installed) and diagrams (with Visio 2013 or as far back as Visio 2003 installed), screen captures (most must be done with the OneNote Clipper (which is installed by default when you install OneNote for the first time and can't be turned off - ever), many types of image files, audio clippings (if you have access to a microphone that is associated to your computer), video clippings (if there is a webcam associated to your computer), equations and various symbols...all of which can be found underneath the Insert drop-down portion of the Ribbon.
 -
 Get to know a bit about your Draw menu from the Ribbon of the program. Besides many drawing tools that will allow you to draw and erase digital ink onscreen, this menu also contains an "Ink to Math" option, as well as...at times, an "Ink to Text" (but most often Ink to Text is disabled).
 -
 Review your notes using the Review menu on your Ribbon. Not only does OneNote 2013 contain ways to spell and grammar check (using the Spelling) tool option on the ribbon, but it also contains ways to research information (such as a translation tool and dictionary as well as a basic search method on Bing) and a separate Thesaurus option/tool from the same portion of the toolbar.
 -
 View your created notes in other ways. Use the View menu. Although by default your are shown your notes in "Normal" view, there are other ways that notes can be displayed. Also found here are ways to Zoom In/Zoom Out as well as add ruler-lines (by clicking Rule Lines) and adding colors to the background of the document by clicking the "Page Color" option.
Part 3 of 3:
Other Key Features of OneNote 2013
-
 Type and use your notes as they are needed, formatting and adding information. With your notebooks synced to one account, you'll never be lost without your notes; so that whether you are at another place in town at a town/village WiFi spot on a PC/Mac or you are able to sign into the account on the OneNote app on your phone (all Windows Phones have this feature installed, as well as Android and iPhones have Microsoft linked apps you can install that will allow you to view your notes), you'll never leave without all your information in one place.
 -
 Sync your notes often when you feel a synchronization hasn't taken place. (When the program synchronizes, the area of the screen will add a blue set of arrows where your named notebooks are labelled). If you haven't seen this and need to synchronize, right click the option and click "Synchronize this Notebook Now" or press ⇧ Shift+F9 then wait for the "icon" to disappear and make no other corrections otherwise you'll be out of sync again with the server.
 -
 Change the color of the appearance of a Note section tab. Right-click the Note section tab, click Section Color and choose your color from the drop-down section that appears.
 -
 Move or Copy notes from one section to another section or another notebook (whether inside the same notebook or another opened notebook onscreen). Find the Note on the right hand side of the screen, single click the Note, right click this Note title then select "Move or Copy (Ctrl+⇧ Shift+M)" locate the Notebook you'd like to place it in on the list of opened notebooks that displays and click either "Move" or "Copy to" button to do the selected deed.
 -
 Delete notes you no longer need. Find the Note on the right hand side of the screen, single click the Note, right click this Note title then select "Delete", or once you've single clicked the Note, you can press the Delete key on your keyboard.
 -
 Arrange your notes so that some notes are placed as subordinates of other notes (if the notes have a special link/bond between them. Drag the note to place it directly above or directly below the Note that is the parent note in the list of all your notes in the selected notebook section, right click the note and click "Make Subpage" (there is no keyboard shortcut for this task). To restore it to it's former location, click the "Promote Subpage" from he right-click context list to the Note in question.
 -
 Share your Notebook. To do this, click 'File' on the left hand side and click 'Share'. Next click 'Invite People' and simply type their email addresses in. You can also right-click a Notebook from your Notebooks list and select Share this Notebook to get you to the same place where you are typing in their email addresses and sending away to the people.
 -
 Close your notebooks, if you feel you will no longer have a need to work with them. But realize that closing your notebooks in OneNote won't delete them. Much like closing a paper-like notebook, closing a digital notebook is used the same way - it just makes it disappear until you need it again. Click the Notebooks tab that holds your notebook, right click your notebook and select "Close this Notebook" to hide it from your view.