Table of Contents
This updated guide examines How to Use Onenote and organizes the essential facts, background, and practical takeaways in clear American English.
Part 1
Downloading OneNote
 Navigate to the official Microsoft OneNote landing page athttp://www.onenote.com/.
 Click on 'Free Download' and follow the on-screen instructions to download and install OneNote to your computer. OneNote is currently available across multiple platforms, including Android and iOS from Google Play Store and the iTunes Store.
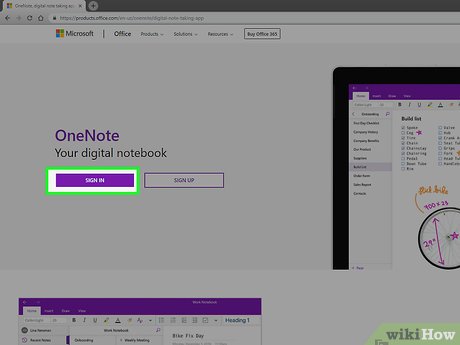 Sign into OneNote using your Microsoft account login credentials. If you don't already have a Microsoft account, click on 'Sign up' and follow the on-screen instructions to create an account.
 Launch the OneNote app on your computer or device following installation. Your virtual notebook will display on-screen.
Part 2
Creating Notebooks
 Click on 'File' and select 'New.'
 Indicate where you want your new notebook saved. Select 'OneDrive' to save your notebook to the cloud so it can be accessed across all devices, or select 'Computer' or 'Add a Place' to store your data to another location.
 Click anywhere in the notebook and start typing your notes. You can make several notes in different places anywhere on the notebook page.
 Click on the page header section at the top of the page and type a title for your notebook page. This title will also display on its page tab to the right.
 Drag and resize notes as needed anywhere on the page. OneNote gives you the freedom to type notes anywhere on the document and customize as needed.[1]XResearch source
Part 3
Creating Checklists
 Click on the 'Home' tab and open the 'Tags' dropdown menu.
 Select 'To Do.' A section with an empty box will display in the main notebook pane.
 Start typing checklist items and press 'Enter' after each item. A checklist box will display to the left of each item.
 Click or tap on each checklist box to check off an item.
Part 4
Attaching Files
 Go to the notebook page to which you want a file attached.
 Click on 'Insert' in the top menu bar and select 'File Attachment.'
 Select the file you want attached to your notebook, then select 'Insert.' The file will display as an icon on your notebook page.[2]XResearch source
Part 5
Inserting Images
 Position your cursor in the place you want your image inserted.
 Click on 'Insert' in the top menu bar and select one of the following options. The image will now be inserted into your notebook.
- Screen Clipping: Captures a section of your computer screen.
- Pictures: Allows you to insert a picture file saved on your device or external storage.
- Online Pictures: Allows you to insert pictures from online sources.
- Scanned Image: Allows you to insert a scanned image from a scanner attached to your device.
Part 6
Creating Tables
 Position your cursor in the place you want a table created. Tables can help keep your notes organized by arranging information in rows and columns.
 Click on the 'Insert' tab and select 'Table.'
 Move your cursor over the grid to highlight your desired grid size, then left-click your mouse. For example, to create a 2x3 table, highlight the first three boxes in the top row and the next three boxes below in the second row.
 Click on 'Insert Table.' The table will now be added to your notebook page.[3]XResearch source
Part 7
Adding Pages
 Click on the notebook section to which you want pages added.
 Click on 'Add Page' in the pane located to the right of your notebook section.
 Type a page title into the page header section, then press 'Enter.'
 Click and drag the page tab to its desired position in your notebook.
Part 8
Adding Sections to Pages
 Right-click on any section tab at the top of your notebook page and select 'New Section.' Sections function similarly to color tabs in a typical three- or five-section paper notebook.
 Type a title for your new section, then press 'Enter.' You can now start taking notes on the new section.
Part 9
Setting Up Checklist Reminders for Outlook
 Select an item in your checklist for which you want a reminder sent to your Outlook account.
 Click the 'Home' tab and select 'Outlook Tasks.' This feature allows you to set up reminders in Outlook using items from your checklist. For example, if an item in your to-do list is 'Go to dentist appointment,' select this item to be reminded about your appointment in Outlook.
 Select when you want to receive a reminder in Outlook. You can choose 'Today,' 'Tomorrow,' 'This Week,' 'Next Week,' or customize a date. Outlook will now send a reminder based on the time and date selected.
Part 10
Sharing Notebooks
 Click on 'File' and select 'Share.'
 Type the email address of the person with whom you want to share your notebook. You can enter one or multiple email addresses.
 Click on 'Share.' The individuals listed will now receive an invitation to view or edit your notebook in OneNote.
Part 11
Using Tags
 Position your cursor at the beginning of any text you want tagged. Tags are ideal for categorizing and prioritizing notes for one or multiple notes or notebooks.
 Click on the 'Home' tab and click on the 'Tags' dropdown menu.
 Select the tag symbol you want applied to your text. You can choose from several options, such as 'Idea,' 'Book to read,' or 'Critical.' For example, if tagging an article you want to write about for your blog, select 'Remember for blog.'
 Search for tags at any time by selecting 'Find Tags' from the 'Tags' dropdown menu. You can then click on tags to access notes categorized by tag.[4]XResearch source
Part 12
Recording Audio or Video
 Position your cursor in the section of your notebook where you want the recording inserted.
 Click on the 'Insert' tab and click 'Record Audio' or 'Record Video.' Your computer or device will start recording audio or video using its built-in microphone or webcam. This feature is useful when you want to record important meetings, lectures, or events.
 Click on 'Stop' or 'Pause' to stop recording. A media icon will display in your notebook where you positioned the cursor.
 Click on the media icon and select 'Play' to play your recording at any time. [5]XResearch source
FAQ
What is How to Use Onenote about?
It provides a structured overview of click, explains the main context, and highlights practical takeaways for readers.
Why does this topic matter?
Understanding the main concepts helps readers evaluate the issue, avoid common mistakes, and make better-informed decisions.
How should readers use this information?
Use the guidance as a practical starting point, confirm details that may have changed, and follow current product, safety, or security recommendations.
Related Articles
 How to Use Onenote Template10 minutes read
 Why Should I Switch from Onenote 2016 to Onenote for Windows 10?12 minutes read
 The Best Microsoft Onenote Download Sites: Onenote Templates7 minutes read
 Top 5 Sites to Download Free OneNote Templates6 minutes read
 Steps to Use Feeds in Onenote4 minutes read
 How to Crop Pictures in Onenote App?4 minutes read
Reader Comments 0
Sign in with email or Google to join the discussion.