Table of Contents
This practical guide walks through how to crop pictures in onenote app?, explains the main requirements, and highlights common issues that may appear along the way.
How to crop pictures in Microsoft OneNote Web
To crop pictures in Microsoft OneNote web, you first need to sign in to the OneNote website from any browser. On the Notebook screen, select the note document containing the picture you want to cut (or you can insert a picture by clicking Insert> Picture).

Next, select the image you want to crop by clicking on it. Immediately, a dashed border appears around the image.
Once the image is selected, you will see the Picture tab appear, Click on it then choose ' Crop '.
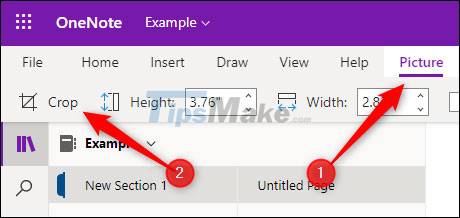
The Crop window will appear. Click and drag the corners or edges of the border to position the image the way you want to crop. Gray areas are removed. Finally, click 'Crop' to crop the image.
Your image is now cropped.
Crop images in Microsoft OneNote desktop application
With that said, the desktop version of Microsoft OneNote apps currently doesn't support cropping - which is pretty confusing. When you insert and select an image, the 'Picture' tab will not appear, while this is the tab that contains all the image editing tools you need to use.
'The hard comes the smart', both Mac and Windows 10 come with a built-in tool that lets you take a picture of the full screen or a specific location on the screen - and you can use the tools themselves. to crop the image before inserting it into OneNote.
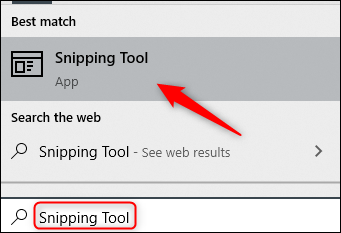
If you're using Windows 10, you can quickly launch the familiar Snipping Tool by pressing the Windows Key + Shift + S keyboard shortcut. Of course, you can also use any cutting tool. Any other photo editing is fine.
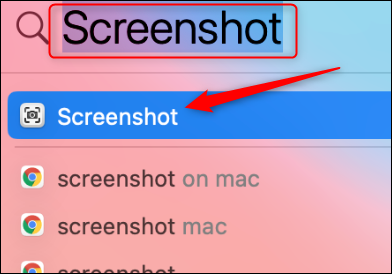
On a Mac, you can use the keyboard shortcut Command + Shift + 4 or press Command + Space to open Finder. Enter the keyword 'Screenshot' in the search bar, then click on the 'Screenshot' app.
In short, you can use these tools to crop an image, and then insert the cropped image into OneNote (Insert> Picture).
Key Takeaways
Use the information above as a practical reference for how to crop pictures in onenote app?. Review each step carefully, confirm any requirements, and choose the option that best fits your situation.
FAQ
What does this guide explain about Crop Pictures in Onenote App?
It explains the main concepts, practical considerations, and useful steps related to crop pictures in onenote app without requiring advanced knowledge.
Who can benefit from learning about Crop Pictures in Onenote App?
This information is useful for readers who want a clear overview, practical guidance, and reliable steps related to crop pictures in onenote app.
What should I check before applying this information?
Review the requirements, confirm that your device, software, or situation matches the instructions, and back up important data before making major changes.
Related Articles
 How to Use Onenote Template10 minutes read
 How to Edit Photos in Word Is Extremely Useful That You Should Know3 minutes read
 Why Should I Switch from Onenote 2016 to Onenote for Windows 10?12 minutes read
 The Best Microsoft Onenote Download Sites: Onenote Templates7 minutes read
 Top 5 Sites to Download Free OneNote Templates6 minutes read
 Steps to Use Feeds in Onenote4 minutes read
Reader Comments 0
Sign in with email or Google to join the discussion.