How to Unmount a Drive
This wikiHow teaches you how to unmount a hard drive that is connected to your computer. Unmounting a drive is the same thing as ejecting a drive. You cannot unmount your computer's main hard drive (e.g., the hard drive where your....
Method 1 of 3:
On Windows
-
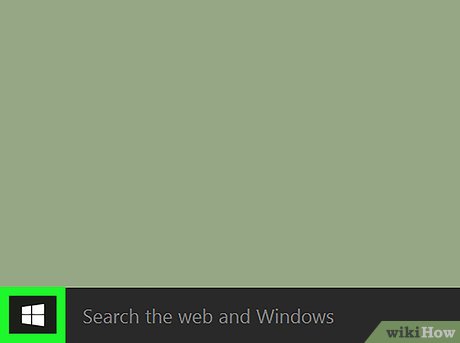 Open the Start menu. Click the Start (or
 ) button in the lower-left corner of your screen.
- Alternatively, press the ⊞ Win key.
-
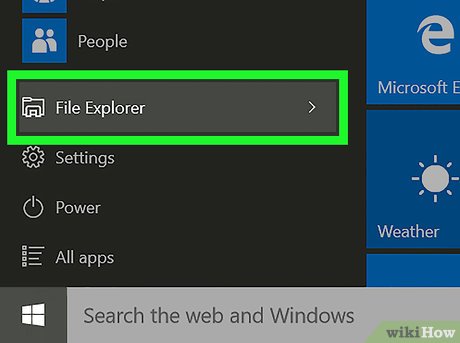 Open File Explorer. Click the File Explorericon. Older Windows 10 versions will have the name shown next to the icon as pictured above.
- Windows 7 and Vista: select Computer from the right column.
-
 Ensure you're on This PC, Computer, or My Computer. The option will be listed in the left pane.
- The names differ among Windows versions.
-
 Click on the drive you wish to unmount. A list of all currently active drives will be available under the "Devices and drives" heading towards the middle of the page.
- This drive must be either a removable hard drive (e.g., a flash drive or SD card) or a secondary internal drive.
-
 Click the Manage tab. It's in the ribbon at the top of the File Explorer window.
- In case your Windows version is missing the ribbon, simply right-click the drive instead.
-
 Click the ⏏ Eject button.
- You'll find this option in the "Media" section of the ribbon.
-
 Remove the drive from your computer. After clicking this button, you'll see the drive's icon disappear from the File Explorer window, and a notification letting you know that it's safe to remove the hard drive will appear.
- Gently disconnect the drive from your computer to complete the unmounting process.
Method 2 of 3:
On a Mac
-
 Open the Finder. This app, which resembles a blue and gray face, is usually found in the Dock at the bottom-left.
 -
 Locate your drive's name. It will be on the left-hand side of the Finder window below the "Devices" heading.
- This must be a removable drive (e.g., a flash drive, external hard drive, or a virtual mounted drive).
-
 Click ⏏. It's to the right of your drive's name. Doing so will "eject" the drive, which removes it from your Mac's available drives.
 -
 Remove the drive from your computer. Once the drive has been safely unmounted, you can remove the physical drive from your Mac computer.
Method 3 of 3:
On GNU/Linux
-
 Open a terminal and type 'df -h' to list all drives. Locate your drive, remember the path that it is Mounted on.
 -
 Unmount the drive by typing the command 'sudo umount' followed directory that it is mounted on. You must have superuser privileges to do this.