How to Format a Hard Disk
Formatting a hard drive allows you to use it on your computer to store files and install programs on. The format you choose for the drive determines the drive's compatibility. Formatting a drive will erase all of the data currently on the...
Table of Contents
Method 1 of 5:
Formatting a Secondary Hard Drive (Windows)
-
 Back up any data on the drive you want to save. Formatting a drive will erase all of the data on a drive, so make sure that everything you need to save is backed up to a safe location. You can then restore this data to your new drive.
- You cannot back up installed programs. These will need to be reinstalled on your new drive. You can, however, usually back up settings and preference files.
- See this guide for details on backing up your data.
-
 Install the hard drive. If you are formatting a new drive, it will need to be installed in your system. See this guide for instructions on installing an internal hard drive. If the drive is external, plug it into the computer via USB.
 -
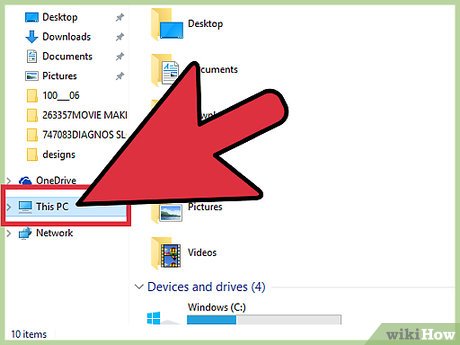 Open the Computer/My Computer/This PC window. This can be accessed from the Start menu, or by pressing ⊞ Win+E. This window displays all of the drives connected to your computer.
 -
 Right-click on the drive you want to format. Select Format... This will open the Windows disk formatting tool.
- Make sure you select the right drive. Everything will be deleted when the drive is formatted.
-
 Select the file system. The file system is the way that the hard drive stores and catalogs files. The file system will determine what the drive is compatible with. If the drive is internal and you are only using it with your Windows computer, select NTFS. If the drive is external, select FAT32 or exFAT.
- FAT32 and exFAT can be written to and read by all newer operating systems. FAT32 is an older system, and doesn't support files larger than 4 GB, but can be read by virtually any operating system. exFAT has no restrictions, but won't work with older operating systems like Windows 95.
- In general, exFAT will be the best option for an external drive. It is compatible with the most systems and can store the largest files.
-
 Give the drive a name. If you are primarily using the drive for one use, giving it a name will help you identify what's on it. For example, if you are using a second drive to store your music, movies, and pictures, naming it "Media" will quickly let you know what it contains.
 -
 Choose whether or not to Quick Format. A Quick Format will perform the format much quicker than a standard format, and is fine for most users. Only perform a regular format if you suspect that the drive may have errors. A regular format may be able to correct some of these errors.
- The Quick Format option does not affect how securely the data is erased. If you need to securely wipe the drive, see the last section of this article.
-
 Start the format. Click Start to begin the format. Click OK to confirm that you understand everything will be erased. If you selected Quick Format, the process should only take a few seconds.[1]
Method 2 of 5:
Formatting a Secondary Hard Drive (OS X)
-
 Back up any data on the drive you want to save. Formatting a drive will erase all of the data on a drive, so make sure that everything you need to save is backed up to a safe location. You can then restore this data to your new drive.
- In OS X your programs will be safe backed up when you use the built-in Time Machine (TM), so they don't need to be reinstalled manually – saving a lot of time. If your back up is a simple copy, your programs will – in many cases – actually still work, since a Mac program mostly is one big file and not a lot of small files everywhere in the system.
- Your settings and preference files can also be backed up, and using TM will replace them correctly without you having to think about placing.
- See this guide for details on backing up your data with TM
-
 Install the hard drive. If you are formatting a new drive, it will need to be installed in your system. See this guide for instructions on installing an internal hard drive. If the drive is external, plug it into the computer via USB, FireWire, or Thunderbolt.
 -
 Open Disk Utility. Click Go and select Utilities. If you don't have a Utilities option, select Applications and then double-click the "Utilities" folder. Open the Disk Utility program.
 -
 Select your drive from the list on the left. All of your connected drives will be listed in the left pane of the Disk Utility window. Make sure you select the correct drive.
 -
 Click the "Erase" tab. This will open the formatting options for your drive.
 -
 Choose your file system. The file system is the way that the hard drive stores and catalogs files. The file system will determine what the drive is compatible with. Use the Volume Format drop-down menu to select your file system. If the drive is internal or you are only using it in OS X, choose "Mac OS Extended (Journaled)". If the drive is external and also used with af PC, select "exFAT".
- FAT32 and exFAT can be written to and read by all newer operating systems. FAT32 is an older system, and doesn't support files larger than 4 GB, but can be read by virtually any operating system. exFAT has no restrictions, but won't work with older operating systems like Windows 95.
- In general exFAT will be the best option for an external drive. It is compatible with the most systems and can store the largest files.
-
 Give the drive a name. If you are primarily using the drive for one use, giving it a name will help you identify what's on it. For example, if you are using a second drive to store your music, movies, and pictures, naming it "Media" will quickly let you know what it contains.
 -
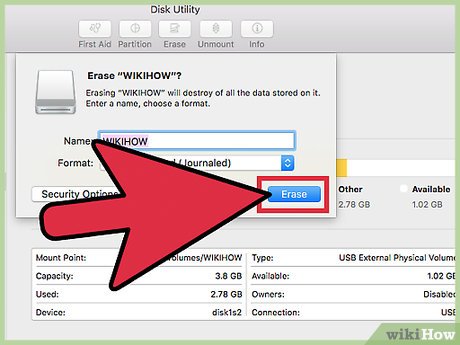 Start the format process. Click Erase to begin formatting the drive. The format process should only take a few seconds.
- Formatting your drive this way does not securely wipe the data. To ensure that your data is truly erased, see the last section of this article.
Method 3 of 5:
Formatting Your Boot Drive (Windows)
-
 Back up any data on the drive you want to save. Formatting your boot drive will erase your operating system and all the files stored on it, so be prepared to reinstall the operating system on the drive. Having a back up of your important files will make transitioning much easier.
- See this guide for details on backing up your data.
-
 Insert your Windows installation disc. You can also use a boot disk or LiveCD. This will allow you to boot to this disk instead of the hard drive, which will allow you to format it.
 -
 Set your computer to boot from the disc. You will need to set your boot order in the BIOS in order to boot from the disc. See this guide for details on setting your boot order.
- To open your BIOS, reboot your computer and press the setup key. this is usually F2, F10, or Del.
-
 Navigate through the installation screens. You will need to start the installer and navigate past the first few pages until you reach the screen with a list of your installed drives. You will be initiating a Custom Installation of Windows.
 -
 Select the drive you want to format. You will see a list of all your drives and the partitions they contain. Select the drive you want to format, and then click the "Format" button at the bottom of the list. The drive will be formatted as NTFS.
- You can only format your boot drive as NTFS.
-
 Reinstall Windows. Now that the drive has been formatted, you can reinstall Windows, or install Linux on it. You will need an operating system on your computer in order to use it.
- Reinstall Windows 7
- Reinstall Windows 8
- Install Linux
Method 4 of 5:
Formatting Your Boot Drive (OS X)
-
 Back up any data on the drive you want to save. Formatting your boot drive will erase your operating system, so be prepared to reinstall the operating system on the drive. Having a back up of your important files will make transitioning much easier.
- In OS X your programs will be safe backed up when you use the built-in Time Machine (TM), so they don't need to be reinstalled manually – saving a lot of time. If your back up is a simple copy, your programs will – in many cases – actually still work, since a Mac program mostly is one big file and not a lot of small files everywhere in the system.
- Your settings and preference files can also be backed up, and using TM will replace them correctly without you having to think about placing.
- See this guide for details on backing up your data.
-
 Ensure you are connected to the internet. You will need an internet connection to reinstall your operating system at the end of the process. Check this guide for details on how to connect your Mac to the internet.
 -
 Restart your computer. Click the Apple menu and select Restart. Hold ⌘ Command+R while the computer reboots. This will open the boot menu.
 -
 Select "Disk Utility" from the boot menu. This will open the boot version of the Disk Utility program.
 -
 Select your hard drive from the list on the left. All of your disks will be listed in the left frame of the Disk Utility. Make sure that you select the right drive, because a format will delete everything on it.
 -
 Choose your file system. The file system is the way that the hard drive stores and catalogs files. The file system will determine what the drive is compatible with. Since this is your boot disk, select "Mac OS Extended (Journaled)".
 -
 Give your drive a name. For example, if you are installing your operating system back onto the disk, label it "OS X" or something similar.
 -
 Format the drive. Click Erase to format the drive. Formatting should only take a few seconds.
 -
 Close Disk Utility. This will return you to the boot menu.
 -
 Reinstall OS X. Select "Reinstall OS X" to begin reinstalling your operating system.
Method 5 of 5:
Securely Wiping Your Hard Drive
-
 Back up any data on the drive you want to save. When securely wiping your hard drive, there is absolutely no way that you can recover it. A properly wiped hard drive would take a government supercomputer days to potential recover a fragment of a file. Because of this, ensure that you have everything saved that you need.
- See this guide for details on backing up your data.
-
 Download DBAN. DBAN is a hard drive formatting program that is designed to securely wipe the data from the drive by overwriting it multiple times. This will prevent the data from being restored using a data recovery program.
- DBAN does not work for solid state drives (SSD). You will need to use a different program, such as Blancco.
-
 Burn DBAN to a disc. DBAN is downloaded as an ISO file, which is a disc image. Burning the ISO to a disc will allow you to boot directly into the DBAN interface.
- See this guide for details on burning ISOs to DVD.
-
 Boot from the DBAN disc. Insert the DBAN disc into your computer and reboot. Select the disc drive as your primary boot device.
- Windows - You will need to set your optical drive as the boot drive from the BIOS menu. See this guide for details on setting your boot order.
- OS X - Press and hold C while your computer is rebooting. After a little while DBAN will boot.
-
 Select your hard drive. Press ↵ Enter on the DBAN main screen, and then select your drive with the arrow keys. Be sure to pick the correct drive if you have multiple available.
 -
 Choose your wiping method. "DoD" will securely erase your data, and is a good enough wiping method for the majority of users. If you have extremely sensitive information, select the "8-Pass PRNG Stream". This will wipe your hard drive eight times with random numbers, completely eradicating your data.
 -
 Start the format. Once you've selected your wiping method, the formatting process will begin. Wiping with DBAN can take several hours to several days, depending on the wiping method and size of the hard drive.
Was this article helpful?
Your feedback helps us improve.
Related Articles
 What is a disk signature? Fix disk signature conflict error9 minutes read
 Hard Disk Sentinel - Download Hard Disk Sentinel here3 minutes read
 Dissection of hard drive components8 minutes read
 Here's how to create a Virtual Hard Disk on Windows 104 minutes read
 How to download and install Hard Disk Sentinel on your computer3 minutes read
 How to Format a Linux Hard Disk to Windows1 minutes read
Reader Comments 0
Sign in with email or Google to join the discussion.