How to Automatically Turn On a Computer at a Specified Time
Method 1 of 2:
Using a PC
-
 Reboot your PC into the BIOS. The option to start your PC on a particular schedule is available in the BIOS, which you can access by pressing a specific key at boot time. This key is usually Del, F8, or F12, or F10. If you're using a newer Windows 10 PC, try using these steps to enter the BIOS:[1]:
- Right-click the Start menu and select Settings.
- Click Update & Security.
- Click Recovery.
- Click Restart Now under "Advanced Startup."
- When the computer comes back up, click the Troubleshoot menu.
- Click Advanced Options
- Click UEFI Firmware Settings and click Restart.
-
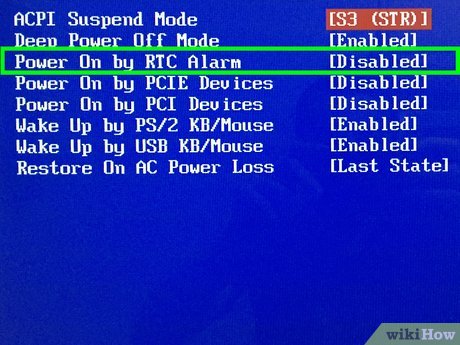
 Navigate to Power on Alarm or RTC Alarm option. The name of this menu varies by manufacturer and may be in a menu called Advanced.[2]
 -
 Select a schedule frequency. The steps to do this vary by PC, but you'll usually use the arrow keys on the keyboard to highlight the day of the week on which you want the computer to start at a certain time, then press a key to toggle on Enable or Disable for that day.
- Depending on the BIOS, you may have the option to choose a broader option like Every Day.
-
 Enter the time you want the PC to power on. You'll usually use the arrow keys to select an option called Time, though some BIOS settings require you to enter the hour, minute, and second separately.[3]
 -
 Save your changes and exit the BIOS. If your BIOS has a menu running along the time of the screen, you can usually save an exit by selecting the File menu and choosing Save Changes and Exit. If not, the Save or Save and Close key should be clearly marked on the screen. Once you've exited the BIOS, the PC will restart as normal and your changes will be saved.
Method 2 of 2:
Using a Mac
-
 Click the Applemenu. It's in the menu bar at the top-left corner of the screen.
-
 Click System Preferences. It's near the middle of the menu.
 -
 Click Energy Saver. This is a light bulb-shaped icon.[4]
 -
 Click the Schedule button. It's in the bottom-right corner of the window.
 -
 Check the box next to "Start up or wake." This option is at the top of the Schedule window.
 -
 Select a schedule frequency. To do so, click the drop-down box to the right of "Start up or wake", then select a frequency (e.g., Every Day, Weekends, etc.).
 -
 Set the start-up time. You'll do this by adjusting the time in the box in the top-right side of the Schedule window.
 -
 Click OK. It's at the bottom of the window. Your Mac will now start itself at your specified time.
4 ★ | 2 Vote


 How to Format a Hard Disk
 How to Format a Pendrive if Windows is Unable
 How to Format FAT32
 How to Find or Change My Computer's Administrator
 How to Change Computer BIOS Settings
 How to Clean Up a Slow Performing Computer