How to Partition a Hard Drive in Windows 8
Partitioning divides a hard drive into two or more smaller, separate drives. The larger a drive is, the longer it can take for the computer to retrieve data on that drive. Partitioning a large drive can speed up the drive access time....
Table of Contents
Part 1 of 2:
Setting Aside Disk Space for a Partition
-
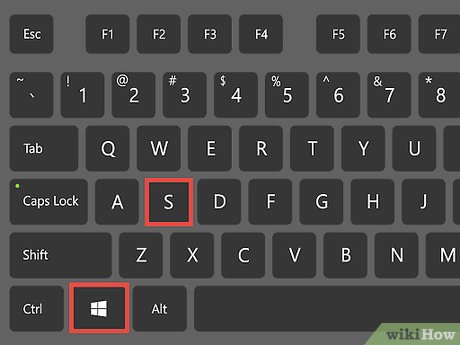 Open Search. Press the Windows + S buttons to open Search.
 -
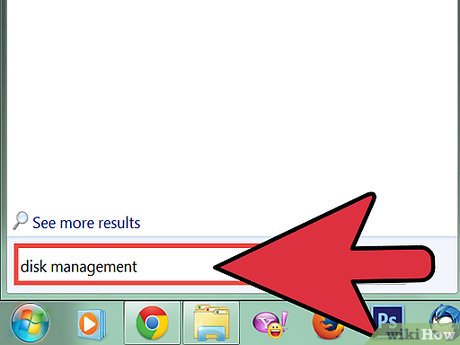 In the Search field, type disk management, and then press Enter.
 -
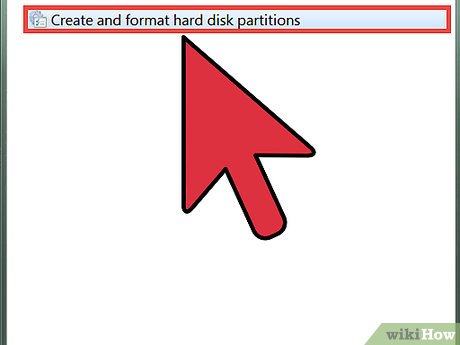 Click Disk Management.
 -
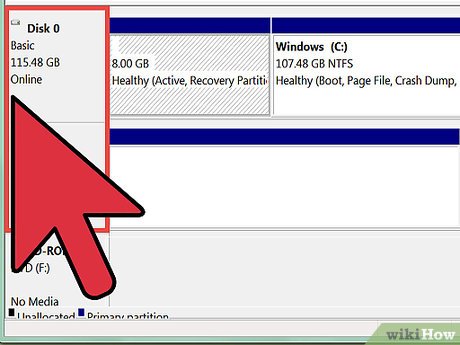 Review your drives. In the Disk Management window, in the Volume column, review your hard drives. The (C:) drive is usually set aside as the Windows boot drive, containing the Windows system files. The Capacity column lists the total space on each drive, and the Free Space column lists the available space on the drive.
- If more than 90% of a hard drive's space is being used, it's not a good candidate for partitioning, because it's effectively full at that point.
-
 Shrink the drive. Before you can partition a drive, you need to shrink the drive. This sets aside the empty space on a drive for partitioning. Right-click the drive you want to partition, and then click Shrink Volume.
- The computer begins to review the amount of space available to shrink. While doing so, it displays a Querying Shrink Space message.
- When it's done, it will open the Shrink dialog box.
-
 Choose the amount of hard drive space to shrink. Shrink space is the amount of hard drive space, in megabytes, you'd like to use for the partition. In the Enter the amount of space to shrink in MB, type the number in megabytes of space you'd like to shrink.
- If you want to use all the available space in the hard drive for the new partition, copy the number in the Size of available shrink space in MB to the Enter the amount of space to shrink in MB field.
- The numbers in the Shrink dialog box are in megabytes. 1000 megabytes equals 1 gigabyte.
- Your hard drive partition should be larger than what you need it for, because of the way that hard drive sizes are calculated and because it's better to have more space than you need than too little.
-
 Click Shrink. The shrunk hard drive space becomes unallocated space in the Disk Management window.
Part 2 of 2:
Partitioning Your Hard Drive
-
 Partition the unallocated disk area. Right-click the Unallocated area, and then click New Simple Volume.
 -
 Choose the size of the new partition. In the New Simple Volume Wizard, in the Simple volume size in MB field, enter the size in megabytes of the new partition. Click Next.
- If you want to use the maximum size, use the number listed on the Maximum disk space in MB line.
-
 Assign a drive letter to the new partition. Click the Assign the following drive letter radio button to select it. Click the dropdown menu, and then click the drive letter you'd like to use. Click Next.
 -
 Choose the partition formatting options. Click the Format this volume with the following settings radio button. Click Next.
- You can safely choose the default options.
- File system is the structure of the hard drive. NTFS, or New Technology File System, is the file system used by Microsoft. Unless you have a reason not to, you should choose this option. The other options are FAT32 and FAT. The main reason to use these is if you're wanting to run Windows 95, 98, or ME.
- Allocation unit size (AUS) is how large blocks of memory on your hard drive are. A smaller AUS uses space more efficiently. Unless you have a reason not to, choose the Default allocation size. If you're using your partition to store large media files, you may want to choose the largest AUS.[2]
- The Volume label is the name of the hard drive partition. You can put anything you want in that field to describe the partition.
-
 Click Finish. The final screen displays the options you selected. When you click Finish, the formatting process begins.[3]
 -
 Review your new partition. In the Disk Management window, make sure that the Unallocated space has been renamed with the new drive letter.
Was this article helpful?
Your feedback helps us improve.
Related Articles
 Instructions for dividing hard drives right in Windows 103 minutes read
 How to partition a hard drive in Windows 11, 10, 8, and 7 without losing data.5 minutes read
 How to partition a hard drive on Windows 11 and 103 minutes read
 Instructions to mount the hard drive into a folder on Windows 105 minutes read
 How to split the hard drive, merge the partition on Windows XP without worrying about losing data7 minutes read
 How to merge a hard drive in Windows 10 does not lose data with MiniTool Partition Wizard4 minutes read
Reader Comments 0
Sign in with email or Google to join the discussion.