How to Uninstall All Windows Updates
While it's generally not recommended to remove Windows Updates, sometimes they cause performance problems or privacy concerns. Microsoft will generally fix problematic updates in a timely fashion, but you can remove them manually if you'd...
Table of Contents
Method 1 of 2:
Uninstalling Updates
-
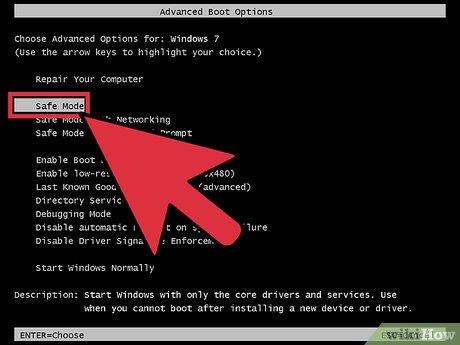 Boot into Safe Mode. You'll have the best success removing Windows updates if you are running Safe Mode:
- Windows 7 and earlier - Reboot your computer and hold F8. Select "Safe Mode" from the menu that appears.
- Windows 8 and later - Click the Power button in the Start menu or screen. Hold ⇧ Shift and click "Restart." Select "Troubleshoot" → "Advanced options" → "Windows Startup settings" and then click "Restart." Select "Safe Mode" from the menu.
-
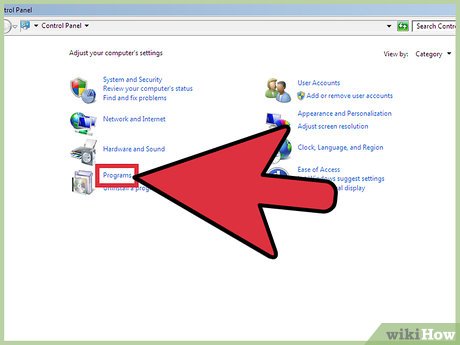 Open the "Programs and Features" window. Once you're in Safe Mode, you'll need to open the Programs and Features window from the Control Panel:
- Windows 7 and earlier - Open the Start menu and select "Control Panel." Select "Programs" or "Programs and Features" (depending on your view settings).
- Windows 8 and later - Right-click on the Windows button and select "Programs and Features."
-
 Click the "View installed updates" link. This can be found in the left menu. A list of installed updates will be displayed.
 -
 Find the update you want to remove. The "Installed on" column can help you find the update that started causing your computer troubles. Windows updates are listed in the "Microsoft Windows" section towards the bottom of the list.
 -
 Select the update and click "Uninstall." You'll be prompted to confirm that you want to remove the update. After confirming, the update will be removed. You can repeat this for any other updates you want to get rid of.[1]
- If Windows is set to update automatically, the updates you delete will likely download and install on their own again. You'll need to disable automatic updates in Windows Update to prevent installing these specific updates.
Method 2 of 2:
Using System Restore to Roll Back
-
 Open the System Restore tool. You can use System Restore to roll your system back to a point before the update was installed. You won't lose any personal files, but any programs installed or uninstalled in the interim will be reverted.
- Open the Control Panel and select "Recovery." If you don't see the "Recovery" option, select "Large icons" or "Small icons" from the "View by" menu.
- Select "Open System Restore" to open the System Restore utility.
-
 Select the restore point you want to roll back to. Restore points are created automatically when new programs or updates are installed. Depending on your System Restore settings, you may have many restore points or just a few. Old restore points are deleted automatically to make room for new ones.
- You may be able to check a box in the lower-left corner to view all available restore points.
-
 Click "Scan for affected programs." This will generate a list of all of the programs, drivers, and updates that will be removed or restored when rolling back. Programs and drivers that are restored may need to be re-installed to function properly.
 -
 Confirm that you want to perform the restore process. Once you click "Finish," your computer will reboot and roll back to the restore point. This may take a little while to complete. After your computer successfully rolls back, Windows will start and a dialog will appear indicating that the restore is complete.
 -
 Test your computer. After restoring, see if getting rid of the update file fixed your problems. You'll likely need to re-install or uninstall any programs or drivers that were restored during the roll back process.
 -
 Undo the system restore if problems occur. If the system restore process doesn't work, or makes things worse, you can undo it and revert your computer to how it was before restoring. Open the System Restore tool again and select "Undo System Restore" to undo the last system restore you performed.
Was this article helpful?
Your feedback helps us improve.
Related Articles
 How to Uninstall Updates on Android15 minutes read
 Steps to uninstall updates on Windows 10 and Windows 112 minutes read
 How to completely uninstall WSL on Windows 10/114 minutes read
 How to stop Windows updates on your PC9 minutes read
 4 ways to return to the previous version of Windows 10 without losing data7 minutes read
 3 ways to quickly remove applications on Windows 11 from your computer2 minutes read
Reader Comments 0
Sign in with email or Google to join the discussion.