Table of Contents
This practical guide explains how to completely uninstall wsl on windows 10/11 with clear steps and useful context. It also covers common requirements, potential problems, and the details that can help you get better results.
Remove All Linux Distributions Installed on Windows
This step won't be required for everyone, but if you have any Linux distributions installed, you should remove them first. This helps ensure that there are no files associated with the Linux installation on your computer when you uninstall WSL.
1. You can find your installed Linux distributions listed along with other installed applications in Settings > Apps > Installed Apps .
2. Uninstall each Linux distribution, such as Ubuntu, in exactly the same way you would uninstall any other Windows application.
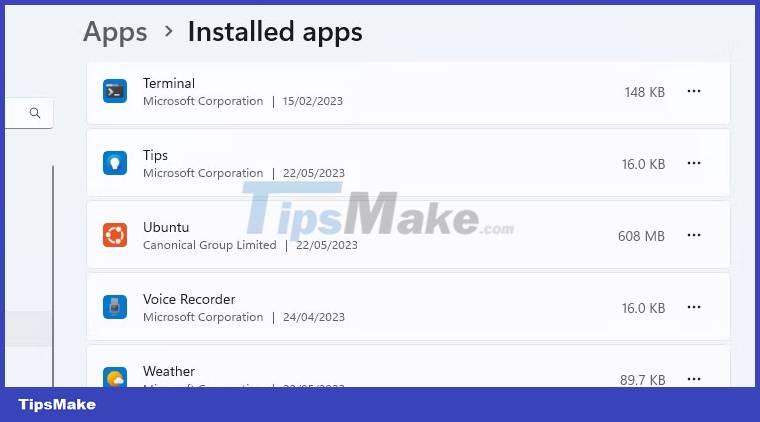
3. If your computer arrives with pre-installed applications, you may not know which is a Linux distribution and which is not. Here are some of the most popular Linux distributions, but you can also simply Google the name of the app you're not sure about.
Once all Linux versions have been uninstalled, you can move on to the next step in the process.
Uninstall WSL Components
With all versions of Linux removed, you can delete the WSL application and its associated components. As with the previous step, you can remove WSL the same way you would remove any other application.
Go to Settings > Apps > Apps & Features . Scroll to the bottom of the application list to find Windows Subsystem for Linux. Click the More button and select Uninstall . On Windows 10, click on the application name and then click Uninstall .
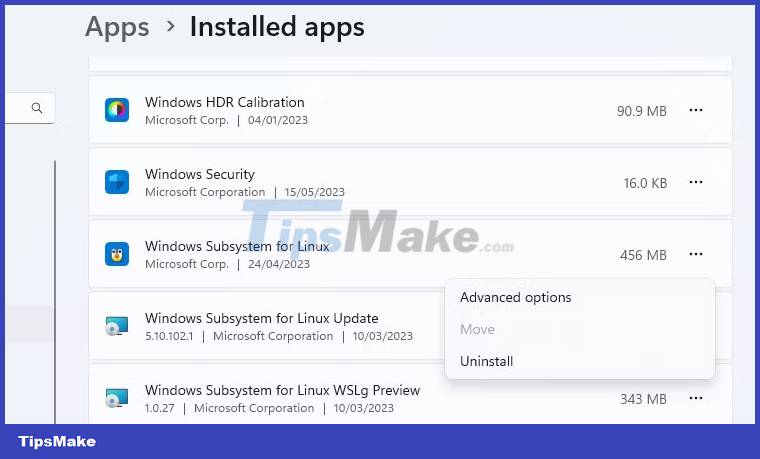
If you see any additional WSL components, such as WSL or WSLg Preview updates, uninstall them in the same way.
Uninstall WSL and Virtual Machine Platform
The final part of the process is to uninstall the WSL core files and disable the option in the Windows Optional Features panel.
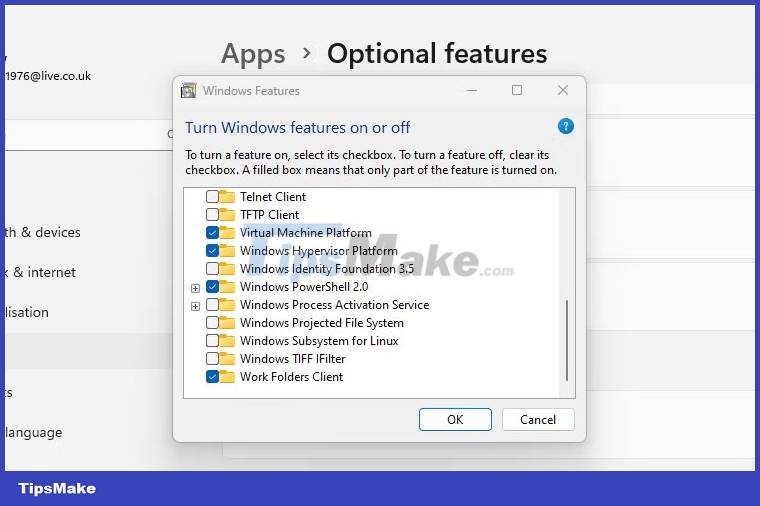
- Open the Windows Features panel by going to Settings > Apps > Optional Features > More Windows Features . You can also search for Windows Features and click Turn Windows features on or off .
- Scroll down the list of features to find and uncheck the Windows Subsystem for Linux option.
- If you don't need to run any other virtual environments, you can also uncheck the Virtual Machine Platform option.
- Click Ok , then restart your computer.
Now, WSL will be completely removed from your computer. It will not receive automatic updates and you will not be able to interact with it in any way. If you need it in the future, here's how to install WSL through the Microsoft Store on a Windows PC.
Conclusion
Understanding WSL makes it easier to compare options, avoid common mistakes, and apply the information in this guide more effectively. Review the relevant requirements before making changes or choosing a solution.
FAQ
How do you completely uninstall wsl on windows 10/11?
Follow the steps in this guide in order, confirm the required settings or tools, and verify the result before making additional changes.
Is it safe to completely uninstall wsl on windows 10/11?
It is generally safe when you follow the recommended instructions, use trusted tools, and avoid changing settings you do not understand.
What should you do if the process does not work?
Recheck the requirements, restart the device or application when appropriate, and review each step for missed settings or compatibility issues.
Related Articles
 How to Uninstall the Driver Completely on Windows4 minutes read
 minutes read
 How to Uninstall LinkiDoo6 minutes read
 How to Completely Uninstall Sopcast 3.53 minutes read
 How to Completely Uninstall Microsoft Teams on Windows 103 minutes read
 How to Delete iTunes, Completely Uninstall iTunes from Your Computer5 minutes read
Reader Comments 0
Sign in with email or Google to join the discussion.