How to turn off Shared Experience feature in Windows 10
As we know, Microsoft introduced the Shared Experience feature in the Creators Update (v1703) update.This feature allows users to share web links, messages, application data . with other Windows 10 PCs or Android phones connected to Windows.In addition, this experience sharing feature also allows you to share or transfer videos, photos and documents with other Windows 10 devices via Bluetooth or Wi-Fi connectivity.
Admittedly, this feature is quite useful for many Windows systems because it allows for easier sharing of information data.However, if you don't want to make your Windows 10 system detectable by other devices on the same network or simply just that you don't want to use this feature, here's how you get it. can disable Shared Experience feature in Windows 10.
Turn off Shared Experience from the Settings App
If you only want to disable the Shared Experience feature under a user account on a Windows system, you can do so from Settings.The benefit of this method is that all other users on your system can still access and use the sharing experience.
1. First, search and access the Settings application in the Start menu. You can also use the Win + I shortcut
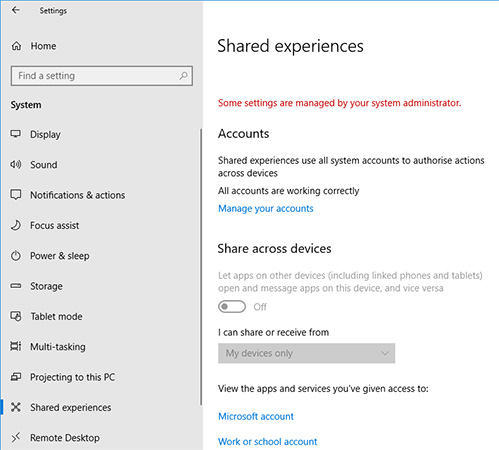
2. In the Settings application, navigate to the System section, select Shared Experience . On the right panel, switch the switch to the bottom of the Share Across Devices section to turn it off .

Yes, now the Shared Experience feature on your Windows has been disabled.
Turn off Shared Experience from Group Policy
If you want to disable the Shared Experience feature for all user accounts on your Windows system, the best method is to use Group Policy Editor Group Policy Editor.In addition, this method is particularly useful for network administrators.
1. Search for gpedit.msc in the Start menu, right-click it and select Run as administrator to open the Group Policy Editor with administrative rights. Now, navigate to Computer Configuration -> Administrative Templates -> System -> Group Policy.
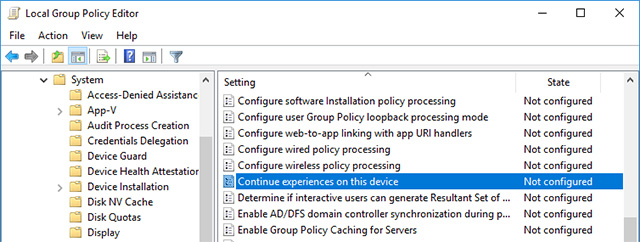
2. On the right panel, find and double-click the item with contents Continue experiences on this device. This is a policy that allows you to control the status of Shared Experiences on Windows systems.
3. In the policy info section, select the Disabled option and click the Apply button and the O button to proceed to save changes.
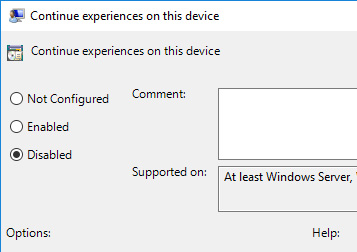
To make the changes take effect, restart your system or open Command Prompt with administrator privileges and execute the gpupdate / force command to force the system to update changes in Group Policy .

If you want to enable Shared Experience again, select the Enabled or Not Configured option . More specifically, if you choose Enabled, you are asking Windows to enable the Shared Experience feature. If you select Not Configured , Windows will return to its default operation.ie Shared Experience is turned on by default.
Turn off Shared Experience from the Registry
If you do not have access to the Group Policy Editor Group Policy Editor, you can completely disable Shared Experience by editing the Windows Registry.This is not difficult, but you need to create a key and a value.Therefore, to be safe, please back up the registry before proceeding to edit.
1. Search for the keyword regedit in the Start menu, right-click it and select Run as administrator .This action will help you open the Registry with administrator privileges.Now, proceed to create the key.To save time, simply copy and paste the link below into the address bar.
HKEY_LOCAL_MACHINESOFTWAREPoliciesMicrosoftWindows

2. Here, in the left panel, you will find a key called System.If not, right-click Windows, select New -> Key and name the new key System .
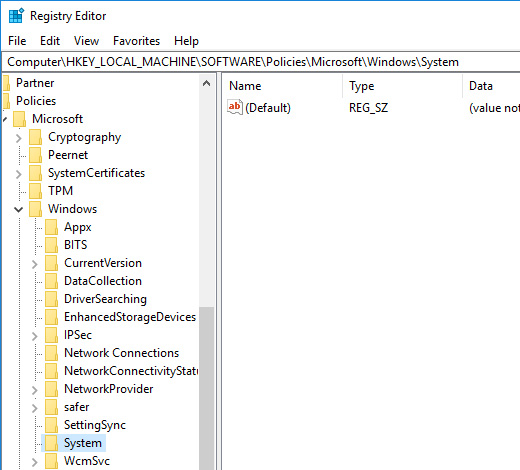
3. On the right panel, right-click and select New -> DWORD (32-bit) Value and name the value EnableCdp.

4. Now, double click on the value and make sure the value data has been set to 0.
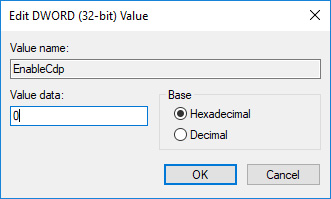
At this point, you have disabled the shared experiences feature for all user accounts in your Windows 10 system.
If you want to re-enable shared experiences , delete the value EnableCdp or change the value data to 1.
Good luck!
see more
- Cut, merge video clips with the utility available in Windows
- 6 quick ways to clean up storage space for Gmail
- The easiest way to reclaim disk space on Windows
- Check that the connection is being made in the system
You should read it
- ★ How to turn off album sharing on iPhone
- ★ 'AirDrop' for Windows: How to Use Nearby Sharing in Windows 11
- ★ What is the 'Windows Feature Experience Pack' on Windows 10?
- ★ How to turn off the GeForce Experience notification when playing a game
- ★ How to experience Windows 11 online for free directly on your computer
