How to Transfer Pictures from Android to Computer
This article shows you how to transfer photos from your Android phone or tablet to your computer. You can do this on Windows and Mac computers, via Google Photos and a USB cable. If you use a USB cable on Mac, you need to use the Android File Transfer program.
Table of Contents
Use Google Photos
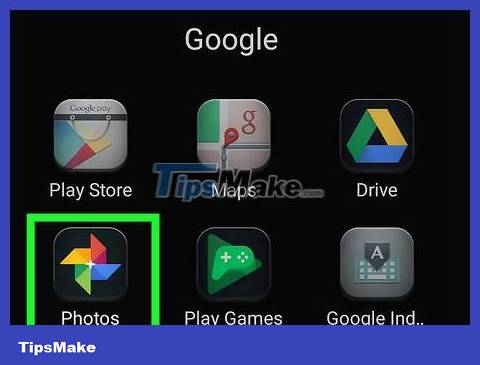
Open Google Photos on your Android device. This is an application with a red, yellow, green and blue four-pointed star icon. This will show you your Android device's photos that are saved on Google Photos.
If you're not signed in to Google Photos, first enter your email address and password when asked.

Tap ☰ . This option appears in the upper left corner of the screen. You will see a menu appear here.
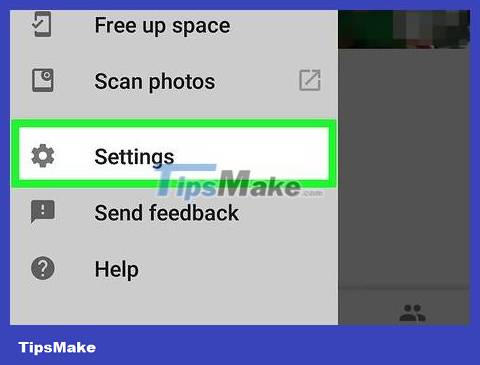
Tap Settings . This is an option near the bottom of the menu that appears.

Tap Back up & sync . This option is at the top of the Settings menu .

Make sure the slide button is in the "On" position. If this button is in the off position, you will touch it to turn on photo backup mode. Thus, Android photos will be uploaded to Google Photos.

Open the Google Photos page on your computer. You need to visit https://photos.google.com/. This will show you a page with your Android's photos if the photos have been backed up.
Similar to Android, you will have to sign in to your Google account with your email address and password if this is the first time you open Google Photos.
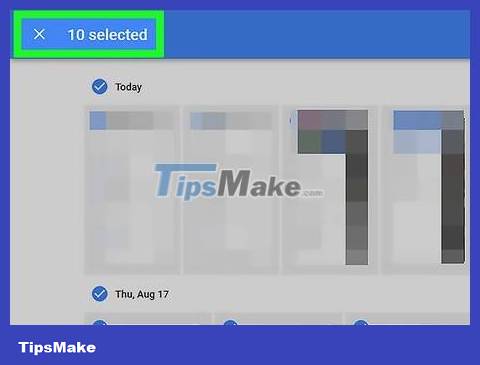
Select photos to download. Click the check mark in the upper left corner of each photo you want to select, or click an individual photo if you don't want to download multiple photos.
You can also click the check mark to the left of the month or album name.
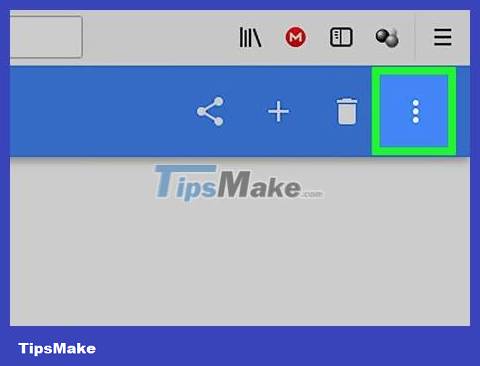
Click ⋮ . This is the option in the top right corner of the Google Photos page. You will see a menu appear here.
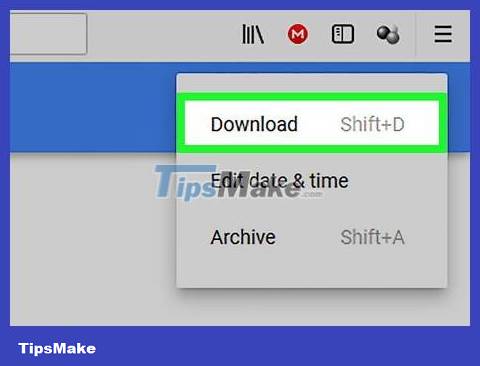
Click Download . This selection is at the top of the currently displayed menu. The photo you have selected will be downloaded to your computer after a click.
Once the photo download is complete, you can delete it on your Android device.
On Windows

Connect Android to computer. You will use your Android's charging cable to connect your Android to one of your computer's USB ports.
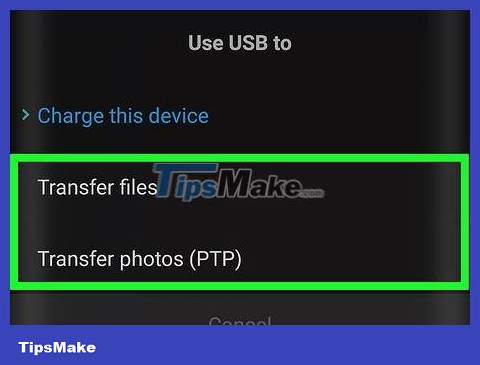
If Android asks you to choose a connection type, select Media device (MTP) on the screen before continuing.

Open Start . Click the Windows icon in the bottom left corner of the screen.
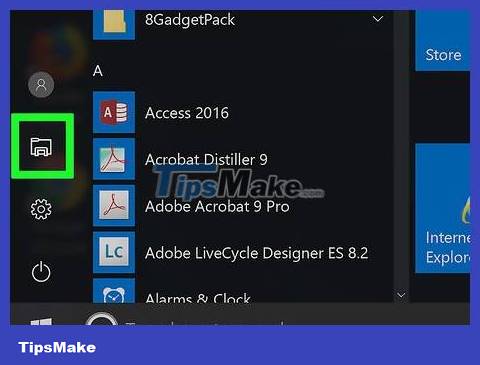
Open File Explorer. Click the folder icon in the lower left corner of the Start window. With this operation, the File Explorer window will appear on the screen.
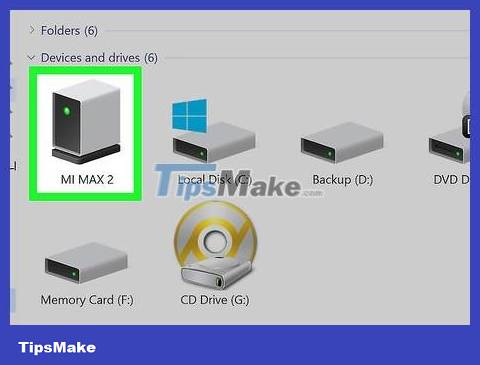
Click your Android's name. This is the information displayed in the selection list on the left side of the File Explorer window. You may have to pull down the scroll bar on the left side of the File Explorer window to see Android's name.
You can also click This PC in the drop-down list on the left, then double-click your Android device's name below the "Devices & drives" heading in the middle of the window. book.
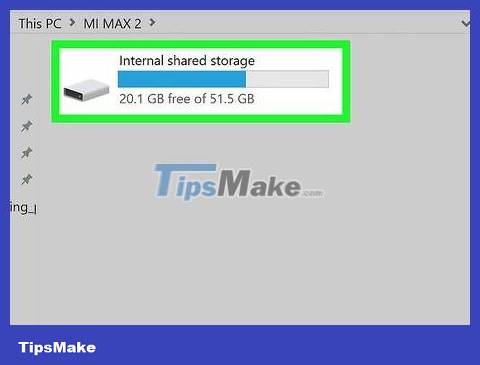
Double-click the "Internal storage" or "SD card" folder. The folder you open may vary depending on where the photos to be transferred are saved and the type of storage available on your Android device.
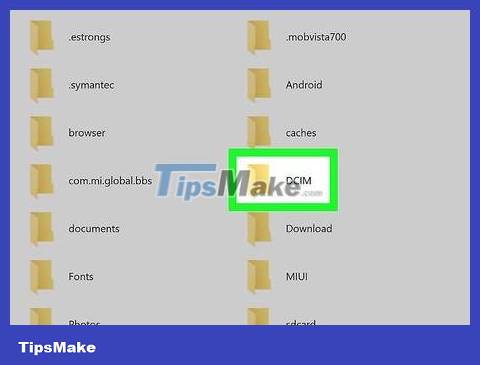
Double-click the "DCIM" folder. You will see another folder here.
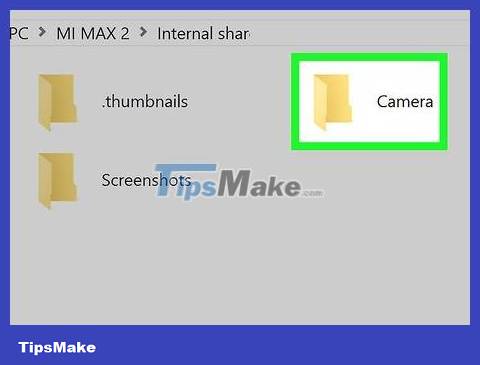
Double-click the "Camera" folder. This is where Android's photos are stored. This will show you a list of photos saved on Android.
If the photos are saved in an album, you'll have to open another folder before continuing.

Select photos on Android. Click and drag over the photos you want to transfer to your computer to select them. You can also hold down the key Ctrlwhile clicking each photo to select multiple individual photos.
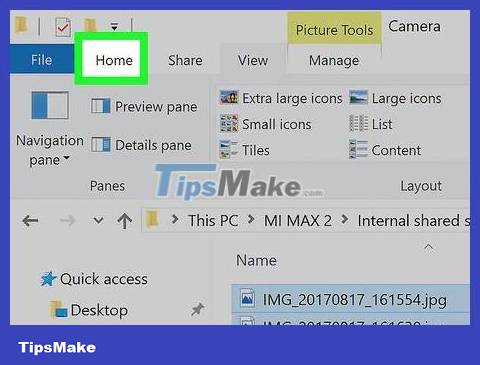
Click Home . This is the tab in the upper left corner of the File Explorer window. A toolbar will appear below the Home tab after your action.
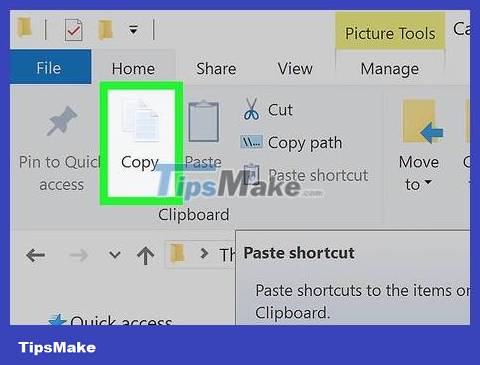
Click Copy . This option has a two-sheet icon in the "Clipboard" section of the Home toolbar . The selected photos will be copied immediately after you perform the operation.
You can also click Cut next to the scissors icon to delete the photo on Android after it's been transferred.

Select the save folder. Click a folder on the left side of the File Explorer window. This will be the folder you use to save photos.
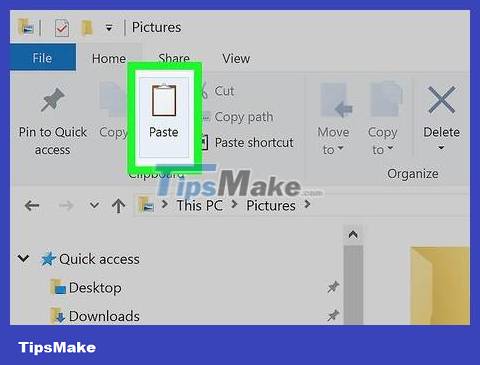
Click Home again, then select Paste . The Paste option has an icon that looks like a clipboard and appears next to the Copy icon . This will move the copied photos to the selected folder.
If you click Cut instead of Copy , your photo will be deleted from Android.
On Mac
Connect Android to Mac. You will use an Android charging cable to connect your Android device to one of your computer's USB ports.
If your Mac doesn't have a USB port, you'll need to buy a USB-C to USB-3.0 adapter.
If Android asks you to choose a connection type, tap Media device (MTP) on the screen before continuing.
Open a web browser on Mac. Because Android doesn't automatically sync with Mac computers, you'll need to download an official program to connect Android to Mac.
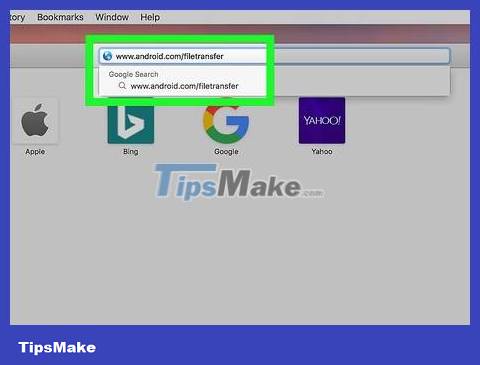
Open the Android File Transfer page. You need to visit http://www.android.com/filetransfer/. This will open the program download page.
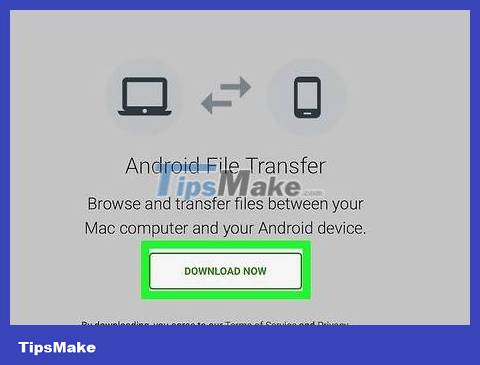
Click DOWNLOAD NOW . This is the green button in the middle of the page. The Android File Transfer installation file will be downloaded to your computer after this operation.
Depending on your browser settings, you may first have to confirm the download or select a download folder.
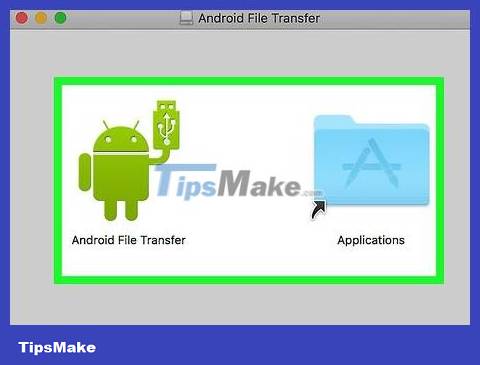
Install Android File Transfer . On MacOS Sierra and newer, you'll double-click the DMG file, verify the file in System Preferences, then click and drag the Android File Transfer icon to the "Applications" folder icon. ".
On MacOS versions lower than Sierra, simply click and drag the Android File Transfer icon to the blue icon of the "Applications" folder.
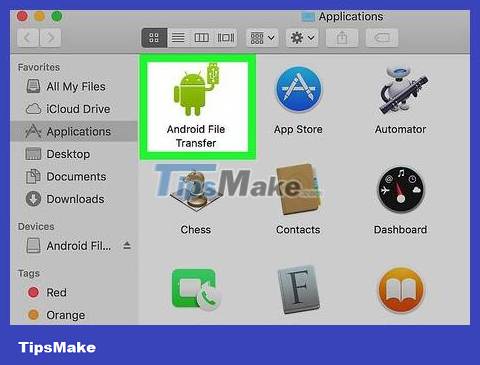
Open Android File Transfer. If Android File Transfer doesn't open automatically, you'll click Launchpad's spaceship icon, then click Android File Transfer, which looks like a green Android model.
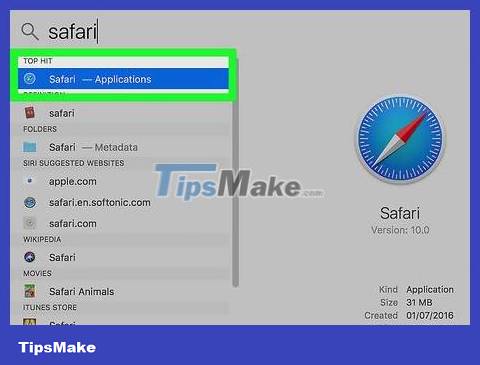
You can also click Spotlight in the top right corner of the screen, type android file transfer, then click the Android File Transfer icon.
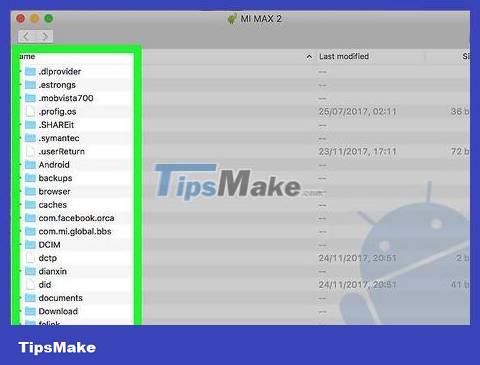
Double-click the "Internal storage" or "SD card" folder. The folder you open will vary depending on where the photos to be transferred are saved and the type of storage available on your Android device.
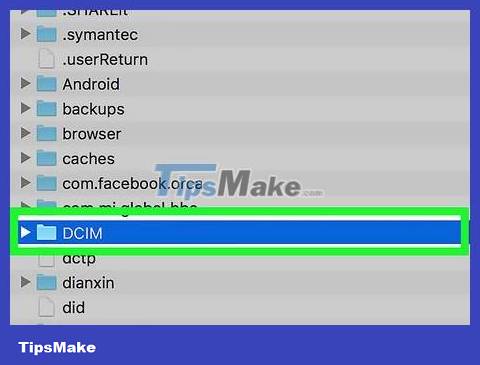
Double-click the "DCIM" folder. You will see another folder here.
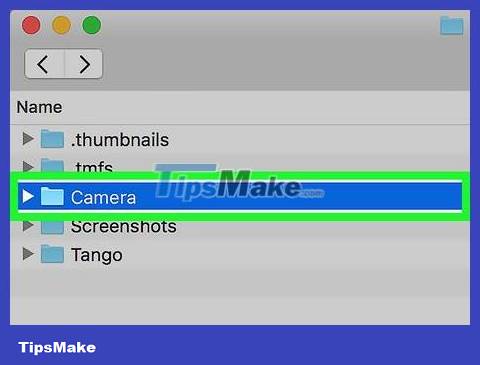
Double-click the "Camera" folder. This is where Android's photos are stored. This will show you a list of photos saved on Android.
If the photos are saved in an album, you'll have to open another folder before continuing.
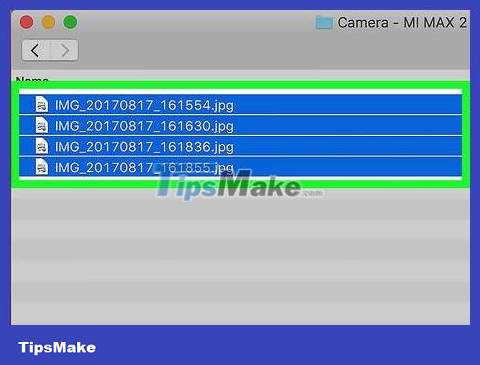
Select photos on Android. Click and drag over the photos you want to transfer to your computer to select them. You can also hold down the key ⌘ Commandwhile clicking each photo to select multiple individual photos.
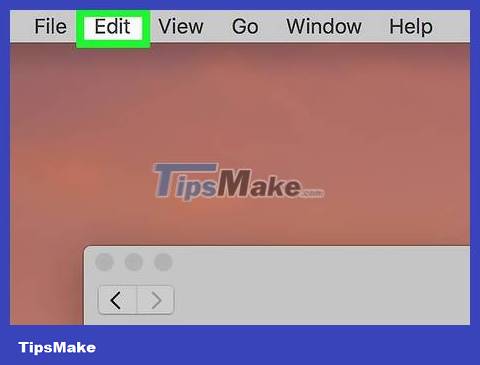
Click Edit . This is the menu in the top left corner of your Mac screen. You will see a menu appear here.
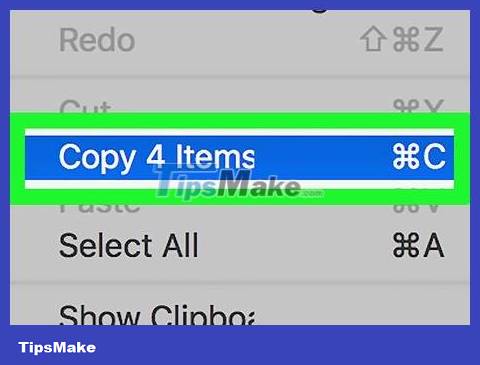
Click Copy . This option is near the top of the Edit menu . The selected photos will be copied after you perform the operation.
If you want to delete files on Android while transferring data to Mac, click Cut .
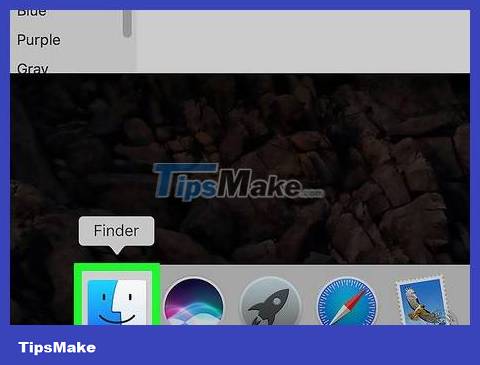
Open Finder. Click the blue face app in your Mac's Dock. A new window will appear on the screen.
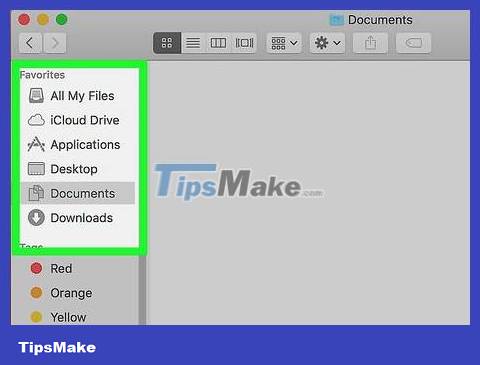
Select the save folder. Click a folder (such as All My Files ) on the left side of the Finder window to select it as the folder to save your photos.
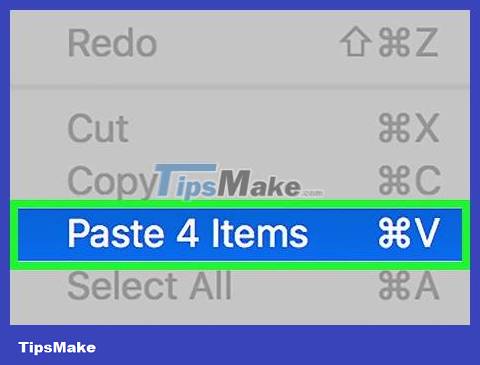
Click Edit , then select Paste Items . Thus, your photos will be copied from Android to Mac.
If you choose Cut instead of Copy , your photo will be deleted on Android.
Was this article helpful?
Your feedback helps us improve.
Related Articles
 How to transfer files from Mac to Android without Android File Transfer7 minutes read
 How to Transfer Pictures from iPod to Computer8 minutes read
 How to Transfer Pictures from Android to Memory Card8 minutes read
 How to Transfer Videos from Android to Computer5 minutes read
 How to transfer data from iPhone to Android?9 minutes read
 How to Connect Android Device to Mac Computer3 minutes read
Reader Comments 0
Sign in with email or Google to join the discussion.