How to split photos with Photoshop
In this article, we will show you how to display a photo as many collages, usually in different shapes and frame sizes, arranged on a background to create an interesting design. . Here, we will use Photoshop to create such a photo using a single image.
Table of Contents
In this article, we will show you how to display a photo as many collages, usually in different shapes and frame sizes, arranged on a background to create an interesting design. . Here, we will use Photoshop to create such a photo using a single image.
- How to sharpen images in Photoshop in 2 ways
- 3 tips to improve low-resolution image quality
- Tutorial to create a photo-crumbling image in Photoshop
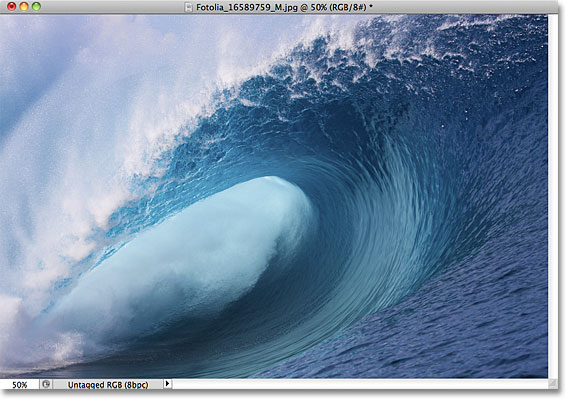
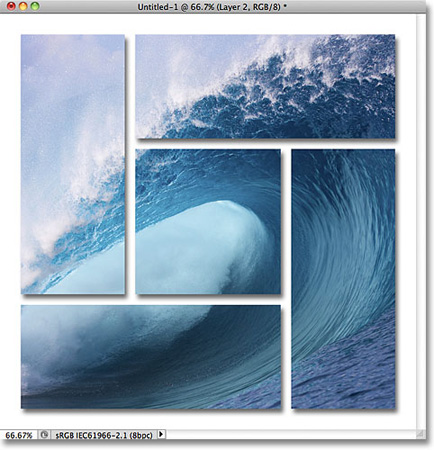
The end result will look like the picture below:

Let's start!
Instructions for splitting photos
Step 1: Create a new edit file
Start by creating a new file in Photoshop. Go to the File menu in Menu Bar along the top of the screen and select New:

This will open the New Document dialog in Photoshop. Edit the parameters in the New window, here I will set the file's Width and Height to 1000 pixels , and since I do not intend to print this image, I will set the Resolution to 72 pixels / inch . The dimensions and resolutions you need may be different, especially if you create images to print out. Set the Background Contents to White, then click OK to close the dialog box. A new file with a white background will appear on the screen.

Step 2: Change the grid size in Photoshop options.
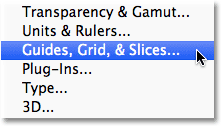
We will use Photoshop's grid to support image cropping, but first, we need to change the grid size in Preferences. On the PC, go to the Edit menu at the top of the screen, then select Guides, Grid, & Slices . On a Mac, go to the menu in Photoshop, select Preferences, then select Guides, Grid, & Slices .
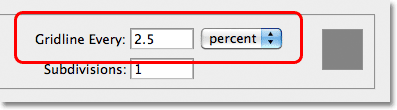
This will open the Preferences dialog box set for Guides, Grid and Slices options. In the Grid section , set Gridline Every option to 2.5 percent . Set other options as default. Click OK when you're done and close the dialog.
Step 3: Turn on Grid
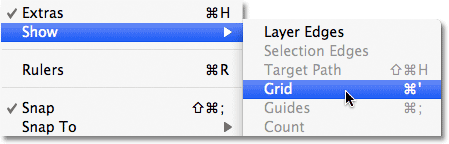
We have changed the grid size, but still have to enable grid mode in the file. To do that, go to the View menu at the top of the screen, select Show, then select Grid.
The grid is displayed in the edit file. The effect of the mesh is to make our cutting work more convenient.

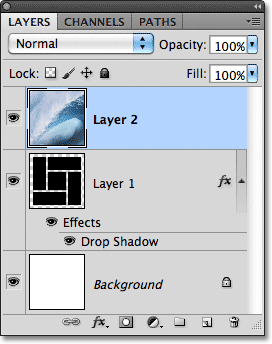
Step 4: Add new layer
Click the New Layer icon at the bottom of the Layer panel.
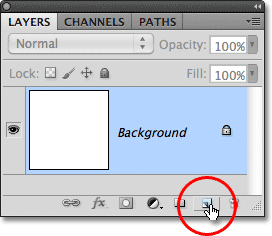
This will add a new blank layer named Layer 1 above the Background layer.

Step 5: Select Rectangular Marquee Tool
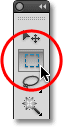
Select the Rectangular Marquee Tool on the Tools panel .
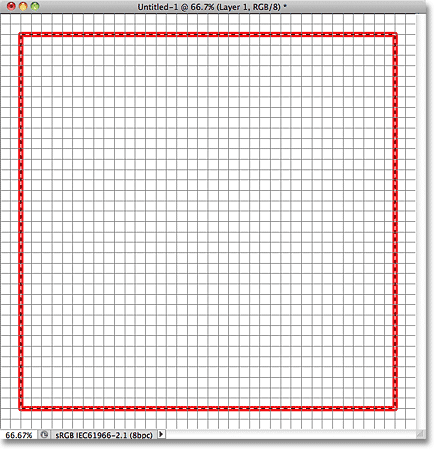
Step 6: Create a selection around the grid
With the Rectangular Marquee Tool, draw an initial selection around the grid, but leave a space of two squares for both horizontal and vertical. The selection border may be a bit difficult to see in the photo, so I highlighted it in red to make it easier to see.
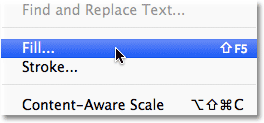
Step 7: Fill the selection with black
Go to the Edit menu at the top of the screen and select Fill.
This will open the Fill dialog box. Change the Use option at the top of the dialog to Black.
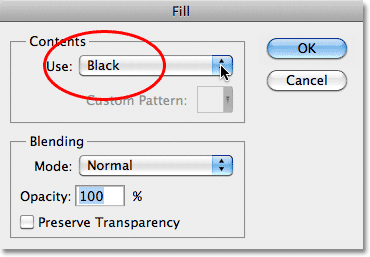
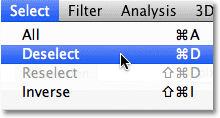
Click OK to close the dialog box. Photoshop will fill the selected area with black. We do not need the file border anymore, so to cancel, go to the Select menu at the top of the screen and select Deselect. You can also press Ctrl + D if you use PC or Command + D if you use a Mac to quickly deselect it with the shortcut.
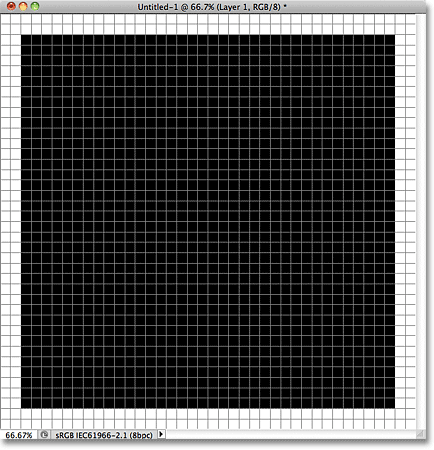
Now, you will have a large square filled with black in the file. No matter what color it is, the image will eventually cover up. Here, I choose black simply because it is easy to see in front of white background and easy to see the mesh contours.
Step 8: Create narrow rectangular selections to crop the image
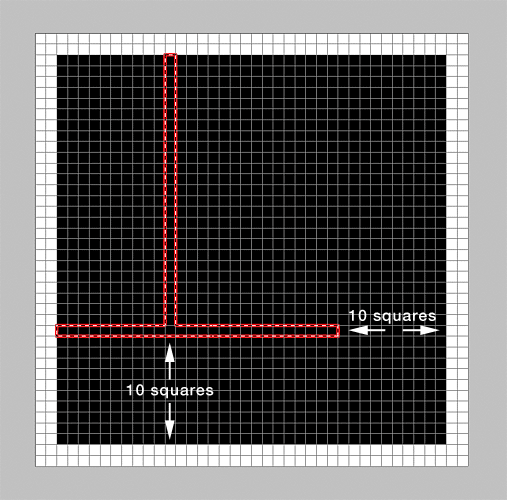
We will divide the original image into smaller shapes. We will do that by deleting some small parts. First, we need to select the areas to delete. We will still use the Rectangular Marquee Tool, starting from the left side of the image, counting to the right of 10 vertical columns and counting from bottom to 10 rows, then start drawing from the top of the picture in column 11 down to leave 10 lines and 10 columns. It sounds confusing, so here I highlighted the outline by painting red.

When you have finished painting the first selection, hold down Shift to temporarily switch to Photoshop's Add to Selection mode, the second selection will be less than 10 lines below the margin and 10 columns to the right as shown below. By holding down the Shift key, this second selection has been added and now we have a column and a row of selected squares.
Similar to the first two regions, continue holding down the Shift key , then create a third selection 10 columns away from the right margin and 10 lines above the margin.
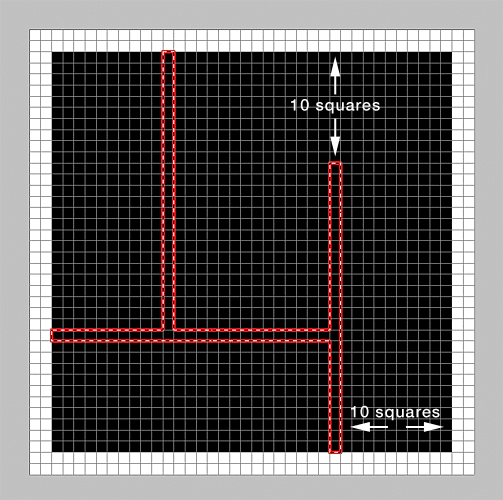
Finally, continue holding down the Shift key and create the final selection 10 columns from the left margin and 10 lines above the margin. When you're done, you'll have two rows and two rectangular columns selected as shown below.

Step 9: Delete the selected areas
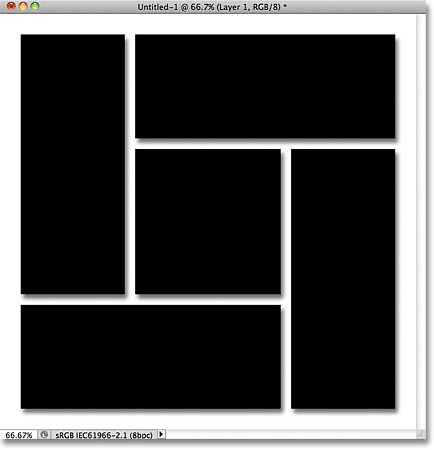
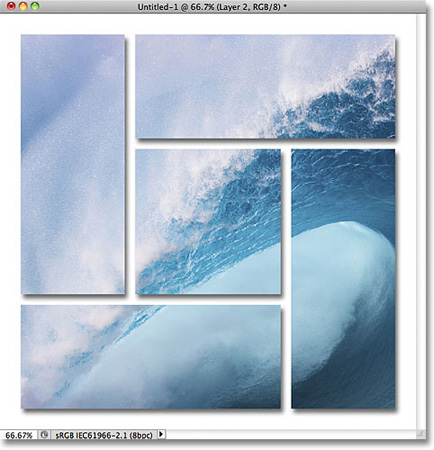
Press the Backspace key if you use Windows or Delete if you use the Mac to delete the selected areas in the image, it will immediately split the original image into 5 smaller images. Press Ctrl + D (if using Win) / Command + D (if using Mac) to quickly delete the selection outline in the picture. We do not need the grid displayed in the file anymore, so go back to the View menu to turn off Grid mode . You can also use the shortcut Ctrl + ' (Win) / Command +' (Mac) to turn off Grid. Below is the file after removing the selection outline and turning off Grid.

Step 10: Add shadow effect
Click the Layer Styles icon at the bottom of the Layers panel .
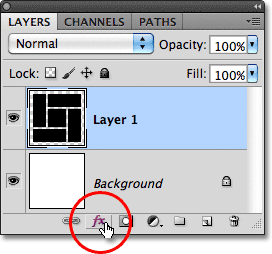
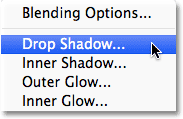
Select Drop Shadow from the list of layer styles that appear.
This option will open the Layer Style dialog box. I will set the Shadow Angle to 120 °, Distance and Size to 12 px . You can use other values for Distance options and Size if creating a file larger than the size I am using in this tutorial. Finally, to reduce the shadow intensity, I will lower the Opacity value to 60% .
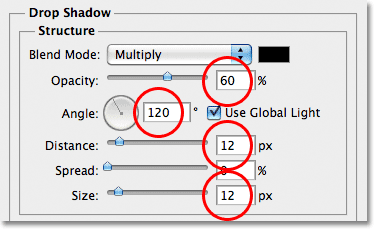
Click OK to close the Layer Style dialog box. Shadow effect has been added and we are shown below.
Step 11: Open the image
Open the image you want to place within the image you just created. It will be opened in a separate window. This is the image I will use.
Step 12: Copy and paste the image into the edited image
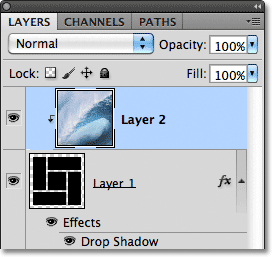
Press the shortcut Ctrl + A (Win) and Command + A (Mac) to quickly select the entire image, then press Ctrl + C (Win) or Command + C (Mac) to copy it to the clipboard. Switch to your image file, press Ctrl + V (Win) or Command + V (Mac) to paste the image into the file. It will appear on its own layer (Layer 2) above the cut layer (Layer 1) in the Layers panel .
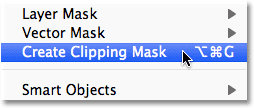
Step 13: Create Clipping Mask
Go to the Layer menu at the top of the screen and select Create Clipping Mask .
With this operation, you will see your picture is almost complete.
If you look at the Layers panel, we will see that Layer 2 has been indented right with a small arrow on the left pointing down to the Layer 1 preview thumbnail. Here's how Photoshop says Layer 2 has been cut. reduce to fit Layer 1's frame.
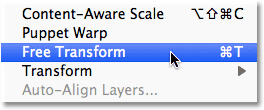
Step 14: Move and resize the image with Free Transform
To resize and reposition the image inside the images, go to the Edit menu at the top of the screen and choose Free Transform or press Ctrl + T (Win) or Command + T (Mac) to quickly select it.
If the image is too large and gets out of the viewable area of the file, you can go to the View menu at the top of the screen and select Fit on Screen . You can also press the shortcut Ctrl + 0 (Win) or Command + 0 (Mac) to quickly select.
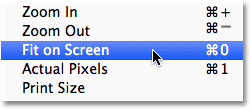
Photoshop will minimize it so that all images are displayed in the frame. To resize an image, hold down Shift to adjust the aspect ratio when resizing, then drag any corner of the four corners (small squares). To move the image, just click anywhere in the Free Transform box and drag the image around with the mouse.
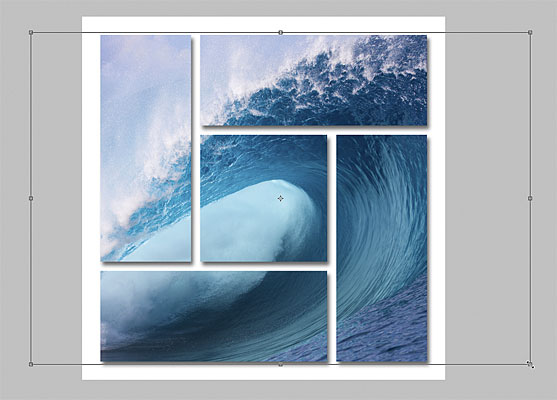
When you are satisfied with the final image, press Enter (Win) or Return (Mac) to accept the changes and exit Free Transform. So we are done. Below is the final result.
Above is how to create a cluster of images from a single image. Let's do it to have a good photo!
Was this article helpful?
Your feedback helps us improve.
Related Articles
 How to turn on 2 windows in Photoshop to collate images3 minutes read
 How to split the background in standard Photoshop2 minutes read
 How to cut circular images in Photoshop4 minutes read
 Photoshop CS: Decorate photos5 minutes read
 Super photos will make you admire the ability of humans to Photoshop3 minutes read
 How to resize photos in Photoshop3 minutes read
Reader Comments 0
Sign in with email or Google to join the discussion.