How to crop photos in Photoshop
A bad photo can be processed right in Adobe Photoshop with a simple trick like the Crop tool. Learn the tricks to crop photos, create frames, focus on an object and even change the perspective through the following article.
Thanks to the latest versions of Adobe Photoshop CC, you can even straighten an inclined image without removing any content. See how to use the Crop tool in Photoshop CC 2018.
How to crop photos in Photoshop
- How to perform a basic crop operation in Photoshop
- How to straighten an image with Content Aware
- How to cut two images with the same size
- How to crop images using the Shapes tool
How to perform a basic crop operation in Photoshop
Photoshop CC Crop Tool 2018 provides more options, although its basic function (changing the size of the image) remains the same. The basic crop operation has three steps:
1. Select the Crop tool from the toolbar. The cut border is displayed on the edges of the image. You can also use C as a keyboard shortcut.

2. Drag the corners to crop the image or simply click and drag anywhere in the image to position the cut border. You can also specify the Crop option on the Control bar .

3. Press Enter to end the crop operation.
Note: In the Options bar , you can turn on the Delete cropped pixels option to delete any pixels outside the crop area. These pixels will be permanently lost and unable to perform any editing operations in the future. Therefore, do not select this option when you want to keep the pixels to adjust further.
But the power of the Crop tool in Photoshop doesn't stop there. Photographers can apply some other modifications to this option.
How to straighten an image with Content Aware
Fill in the missing gaps when you straighten the image, enlarge the image to its original size or rotate the image slightly.
1. Select the Crop tool > Options bar> Content Aware . Crop rectangle now includes the entire image.
2. Use the handles around the image (symbols in the corners of the image) to straighten, rotate or expand the area of the image. Click the check mark to the right to make changes. Smart Photoshop will fill in the blanks or extra areas in the image.

How to cut two images with the same size
You can cut two images with different aspect ratios into one size quickly using the Crop tool. This is the fastest way, regardless of the size of the two photos.
1. Open two images side by side and zoom them to the same percentage. The image on the left is the target size in this example.
2. Select the Crop tool . Select Front Image from the list in Width - Height - Resolution . This step helps set the width, height and resolution of the image into the options bar.
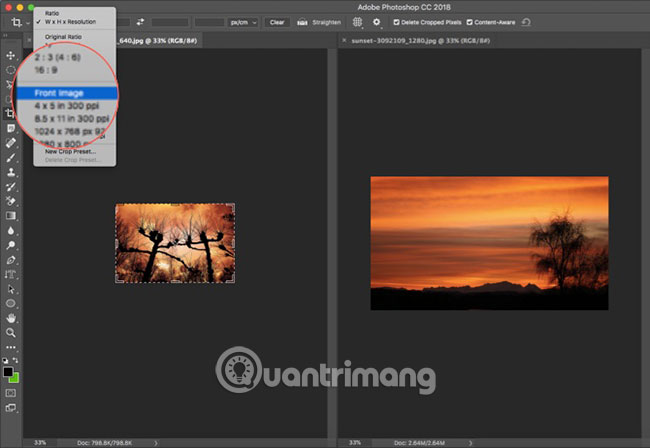
3. Then select the second image with one click. Reset the crop location as desired and press Enter. Two images will be the same size.
How to crop images using the Shapes tool
One of Photoshop's most handy tools is Clipping Mask. Deep inside a complex program like Photoshop, you can use this tool to create a frame for an image, exposing only a portion of the image you want to display.
This can be a great way to crop an image in your Photoshop project without affecting the original image.
The first step is to create the shape you choose. The easiest way to do this is to use Photoshop's Shapes tool found in the Tools bar on the left. You can choose from rectangles, ellipses, rectangles with rounded corners, polygons or create custom shapes.

This tutorial will use ellipses. After selecting the shape, you can draw the shape in one of two ways. You can drag the cursor on the canvas to create an ellipse.
Holding Shift will allow you to create a perfect circle using an ellipse, or perfect square when using a rectangle. Alternatively, you can simply click anywhere on the canvas and enter the exact size of the shape you want to create.
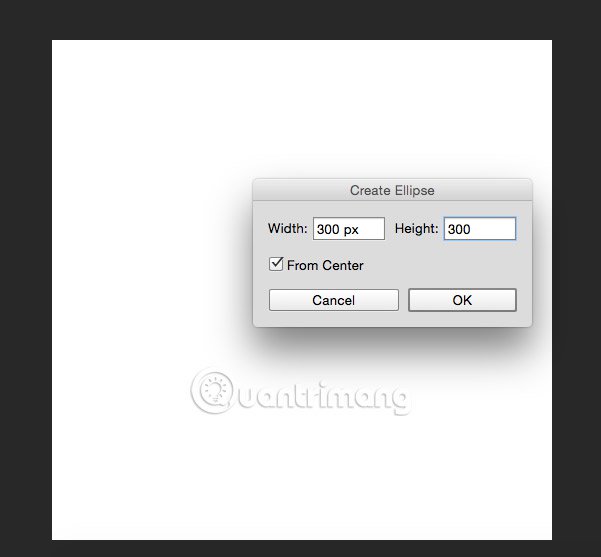
For example, create a black circle to make it easier to see on canvas. The shape is more important than color because it will be completely covered by the image.
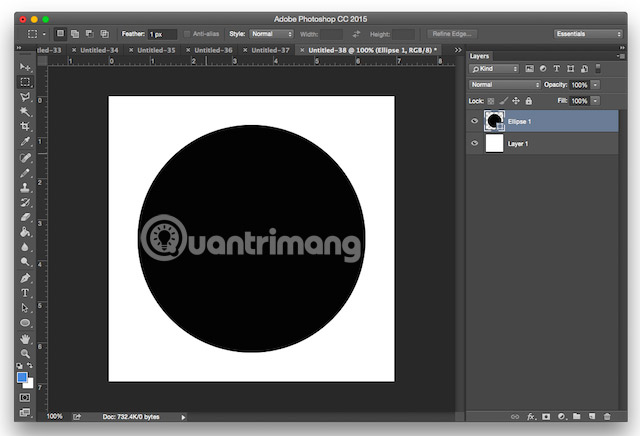
Next, you'll have to insert the image you want to frame with the shape you just drew. To do this, go to File> Place Embedded and navigate to where the file is saved on your computer.
In this way, instead of copying and pasting, it allows you to manipulate images in Photoshop without making irreversible changes to the original file.

This example is using this image from Pixabay, downloaded in 1920 × 1524 px size. After navigating to the location of this image on the computer, it will look like this when you open in Photoshop. Just press Enter and it will create a new layer on your canvas.
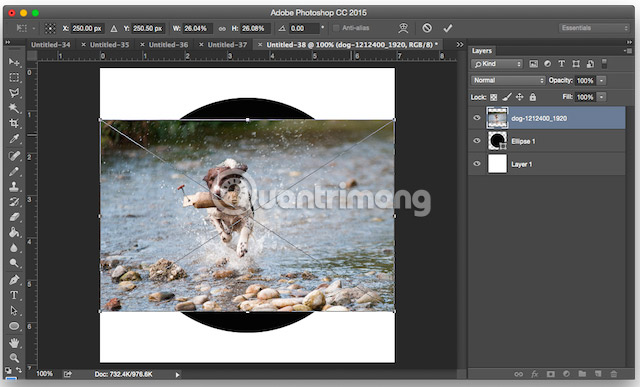
You will notice that it has limited the size of the image to the boundaries of a 500-pixel wide canvas, although the actual size of the image is much larger. To make sure that the image will lie entirely in the circle, right-click on the image and select "Free Transform".
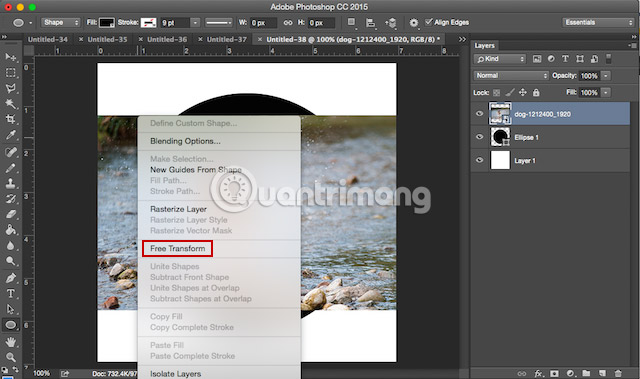
You will see the same diagonal lines on the image. Drag the image from an angle, while holding down the Shift key to keep the aspect ratio, enlarge the image until it surrounds the circle.
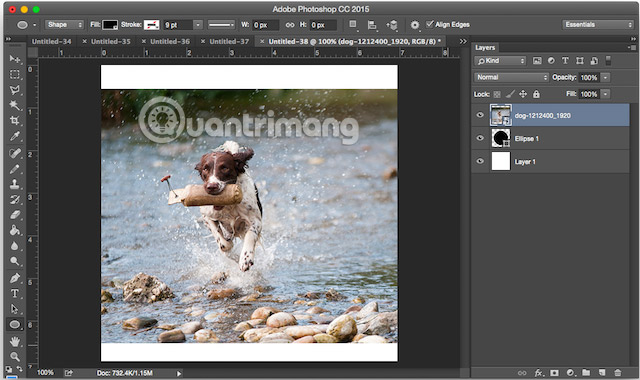
Then, go to the Layers panel , right-click on the dog image layer and click 'Create clipping mask'.
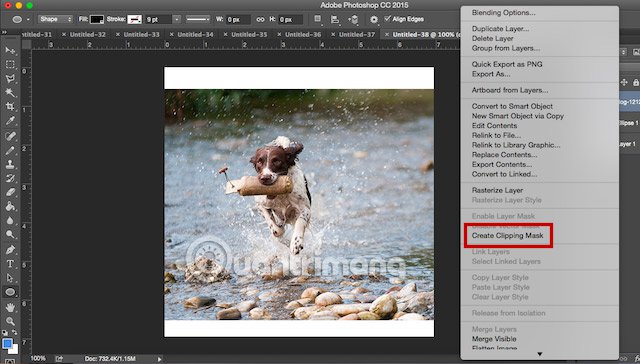
At that point you will see the outline of the image limited by the circle. You can move your shape around, make it bigger or smaller with the Free Transform tool and only show exactly the parts of the image you want to display.

There are other Photoshop tips related to the Crop tool. They will help you quickly resize and crop any image in Photoshop. Do additional options make it easier to edit your photos? Let us know in the comments section below!
Good luck!
See more:
- How to design a simple logo in Photoshop
- 3 tips to manage layers in Photoshop
- GIMP or Photoshop is the right tool for you?