5 easy ways to handle low-light photos in Photoshop
Today's article will show you five ways to handle low-light images in Photoshop. All of these methods are very fast, but some of them will give you more control than the rest of the options.
Table of Contents
We've all taken photos of low-light. If you are shooting in low light or high contrast, it is inevitable. Fortunately, it's easy to fix this in Photoshop.
Today's article will show you five ways to handle low-light images in Photoshop. All of these methods are very fast, but some of them will give you more control than the rest of the options.
Is your photo underexposed?
It sounds like a silly question because if your photo is too dark, then it is missing light. But you should calibrate the screen first. A poorly calibrated screen will make the image look too bright or too dark.
For more accurate results, familiarize yourself with the Histogram light chart. This is a graph showing the color tone range of the image, from 100% black on the leftmost edge of the x axis, to 100% white on the right side. Not always, but ideally, you should distribute the data evenly across the chart. If the data is concentrated on the left side of the graph, it is often a sign that the image is underexposed.
Professional tips: Use Adjustment Layers
The first 4 options that the article describes below can be applied directly to images or used Adjustment Layers. You should use Adjustment Layers for most situations. It allows editing without destroying the original image, allowing you to tweak or even completely remove an edit later.
This is how you do it. Click the Adjustment Layers button at the bottom of the Layers panel . Then select the tool you want to use, such as Brightness / Contrast or Curves.
5 easy ways to handle low-light photos in Photoshop
1. Brightness / Contrast
When you need to lighten an image, the most obvious place to start is to go to Image> Adjustments> Brightness / Contrast , or to select this tool on an Adjustment Layer.
Brightness / Contrast is a good option, simple to use if the overall image is too dark. The Brightness setting primarily targets midtons (the center between shadow and highlight), so it does not affect the darkest and brightest points of the image.
Be sure to select the Preview box , then move the slider to the right until the image reaches the desired brightness.
Adjusting the color tone can sometimes effect the flattening of the image layer, so you may need to increase the Contrast slightly to compensate.
Exposure
Another setting you'll see right below Brightness / Contrast is Exposure. This can be an effective way when you want to edit the exposure of the image.
While setting the Brightness for midtone, Exposure increases or decreases all negative values in the image. It will highlight highlights with the same value as it does with shadow points. This can make them clipped, turning them into white areas without any details.
Thus, Exposure settings are best used to fix errors caused by cameras or for very small adjustments. Ideally, it only keeps RAW files.
- Instructions for creating double exposure images in Photoshop
2. Shadows / Highlights
When you shoot in scenes with very high contrast, darker areas will often suffer from low light. The Shadows / Highlights tool is a quick way to fix this.
Go to Image> Adjustments> Shadows / Highlights , or create a new Adjustment Layer. A dialog box will open and automatically apply the default settings.

There are two sliders. Shadows lighten the darkest parts of the image. And Highlights darkens the brightest parts. With the Preview box selected, drag the Shadows slider to the right until the details in the darker areas of the image are at your liking.
Next, move the Highlights slider, if necessary. This is a good way to clarify details in bright areas, such as the sky.
3. Levels
The first two settings in the article allow you to adjust your image with the naked eye. The next two sections will allow you to edit more accurately based on light charts. Rest assured because both are very easy to use.
Levels is a tool to control the range of tones and colors in your images. Open it by pressing Ctrl + L on Windows, Cmd + L on the Mac or apply it on an Adjustment Layer, as the article mentioned above.

The main part of the Levels screen is the light chart with three sliders below. The left and right sliders set the corresponding black and white points in the image.
But we only care mainly about the slider in the middle, this affects midtone. Just click and drag the slider to the left to lighten your image.

If the brightest parts of the image are also underexposed, brighten them by dragging the slider to the right to the left. Try and locate the slider equal to the edge of the right group of pixels in the chart. Don't be too 'greedy', otherwise everything on the right side of the slider will be 100% white and no details will be seen.
4. Curves
Curves is similar to Levels, but gives you more precise control over the color tone range of the image. It is an indispensable part when processing images in Photoshop and it is extremely powerful. However, for quick tweaking of exposure, it is also very easy to use.
Open the Curves tool by pressing Ctrl + M or Cmd + M , or open it on an Adjustment Layer.
As with Levels, Curves is based on charts. This time, instead of a slider, there is a diagonal that you need to manipulate to adjust the color tone range of the image. The left end of this diagonal represents the shadow points, and the right end represents highlights.
To brighten the image, click on this line and drag it upwards. If the overall image is underexposed, you can click somewhere near the middle of the line.
If you are trying to brighten up shadow points, select about a quarter from the left. Try and select an area with a large amount of data on the chart.
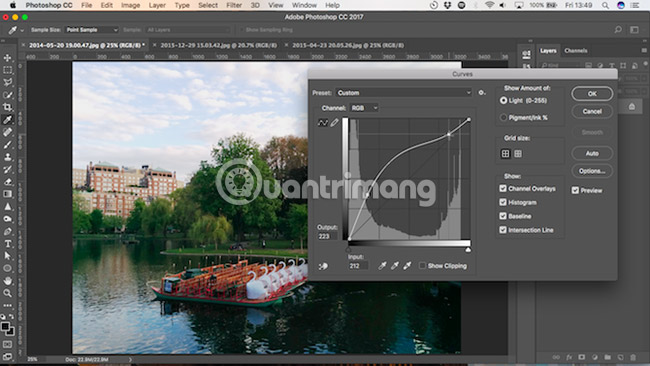
The advantage of Curves tool is that you can repeat this process many times depending on your needs. If you lighten the shadows, the highlighting points will become too bright, then click the quarter position from the right edge and drag down to darken them again.
Each click adds a new point to this diagonal, and it is currently a curve. To delete any points you don't need, select that point and click the Backspace key .
5. Blend Mode
The last way to handle low-light images is to use layers and Blend Mode.
Duplicate your photo layer by pressing Ctrl + J or Cmd + J. On the new layer, set the blend mode to Screen. Images will be instantly brighter.

If you want more, you can create additional layers. Fine-tune the effect by reducing the opacity of the top layer.
Blend mode is quick, easy and flexible. It works well on completely underexposed images and is also great for making local exposure adjustments. For example, you can use Mask to select specific areas that you want to adjust or protect from changes that will be applied.
Final editing steps
Brightening an underexposed image can sometimes make it look 'flat' or faded. Some final editing steps will fix this error.
Use the Brightness / Contrast or Levels tools to increase the contrast and make your image a bit sharper. Next, use Vibrance or Hue / Saturation tools to restore a bit of lost color, if needed. Now you will have a picture that looks bright and beautiful.
As always with Photoshop, there are many ways to edit everything and often it doesn't matter which method you choose. Just choose what you feel most comfortable with, or give you the control you need.
What is the method you choose to fix photos that are underexposed? Share your favorite tips and advice with everyone in the comment section below!
See more:
- How to fix common color problems in Photoshop
- How to crop photos in Photoshop
- How to design a simple logo in Photoshop
Was this article helpful?
Your feedback helps us improve.
Related Articles
 3 tips to improve low-resolution image quality4 minutes read
 Guide to change Background beautiful, detailed and easy to learn2 minutes read
 How to cut circular images in Photoshop4 minutes read
 Photoshop CS: Decorate photos5 minutes read
 5 easy ways to improve Photoshop skills8 minutes read
 How to use Photoshop CS5 - Part 17: Batch image processing with Photoshop Actions6 minutes read
Reader Comments 0
Sign in with email or Google to join the discussion.