How to Restore Windows 7 to Its Normal State
Method 1 of 4:
Boot in Safe Mode to Combat Viruses
-
 Use Safe Mode. Safe Mode is the best place to start to fix your computer when it is malfunctioning. This mode can be used to combat certain types of viruses, as well as a diagnosis tool if you are unsure of why the computer is not functioning. If the computer boots and functions in Safe Mode, then you know that the problem is with a program, driver or other file, rather than with the computer itself.
 -
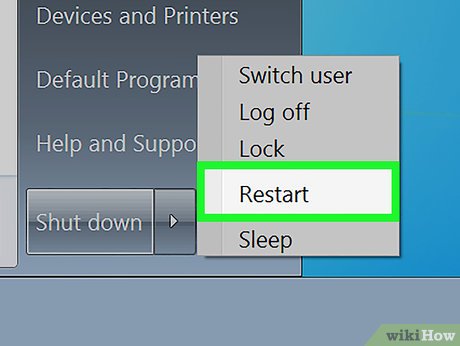
 Reboot in Safe Mode. Reboot in Safe Mode from the Shutdown menu, if accessible.
 -
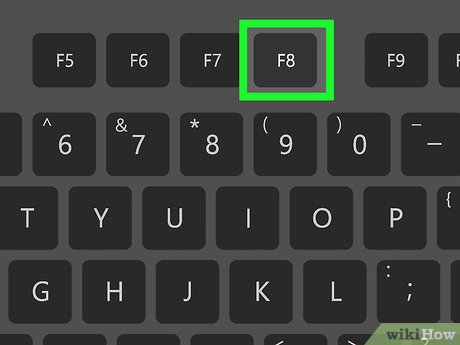
 Hit F8. If the Shutdown menu is inaccessible, you can restart the computer and repeatedly press F8 while it is loading. This should give you access to the Boot Menu.
 -
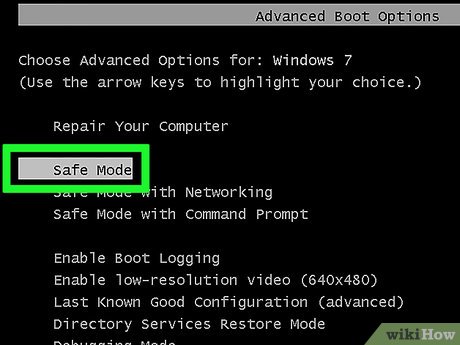
 Select Safe Mode and hit enter. Press the down key to access the Safe Mode option and hit enter.
 -
 Begin fixing your computer. Once the program starts, you can begin attempting to fix your computer. There are a number of different methods you can try to which you use will largely depend on what kind of problem you are having.
- Delete files associated with a known virus in your system that the virus would normally make inaccessible.
- Download or run anti-virus software that a virus would normally make inaccessible. This may require you to boot in Safe Mode with Networking.
- Uninstall recently installed programs which you suspect may be causing problems.
- Update drivers if you suspect that severely outdated drivers may be the problem.
- Do a System Restore, which is similar to the Last Known Good Configuration below. Do this by searching System Restore from the start menu and following the prompts. Don't forget to scan for affected programs.
Method 2 of 4:
Change Configuration to Fix Driver Issues
-
 Use Last Known Good Configuration. This is a good method to use if you believe that a bad driver or system update is the cause of your problems. It may also combat certain types of viruses.[1]
 -
 Remove all disks from the computer. Remove all CDs, DVDs, USBs and floppy disks from the computer.
 -
 Restart the system.
 -
 Press and hold the F8 key as the system restarts.
 -
 Press down key to select Last Known Good Configuration.
 -
 Hit enter.
 -
 Let the system boot. It may take a minute or two longer than normal, since the system will roll itself back. You're done!
Method 3 of 4:
Erase the Computer with the Installation Disk
-
 If possible, back up your most important data first. If you can't fix it any other way, the next step would be to wipe the computer and start from scratch. This procedure reinstalls the operating system, so you will need to back up data before doing this or risk losing it.
 -
 Locate an installation disk. Get a Windows 7 Installation disk. Your PC may have come with one. If you don't have one, buy one from your nearest computer store.
 -
 Open the tray. Open the PC disk tray and while the disk tray is open, shut the PC down. The computer should now be shut down and the disk tray open.
 -
 Insert the Windows 7 installation disk.
 -
 Start the computer.
 -
 Press a key to start. A Message should soon pop-up reading "Press Any Key to Boot from CD". Press a key to proceed.
 -
 Follow the simple, on-screen instructions.
Method 4 of 4:
Wipe Your Computer as a Last Resort
-
 Backup all of your data. If possible, you will want to backup your data before wiping the computer, as all data will be completely erased.
 -
 Have a replacement OS. You will need a Windows 7 installation disk or alternative OS (such as Linux, which is free) as the OS will also be wiped and you will need a new one if you wish to use the computer again.
 -
 Download Darik's Boot and Nuke (DBAN). You will need to download a program for securely wiping your computer. DBAN is a common program but there are also others, like Active@KillDisk. Be sure to download the program from a reputable source. [2]
 -
 Put the program on a CD or USB. You will need the program on some kind of storage device from which your computer can load.
 -
 Turn off the computer.
 - Plug in or insert the wipe program disk or USB.
-
 Boot the computer from the disk or USB. This should occur automatically. If it doesn't, you may need to enable this in your BIOS settings. Start the computer and as it is loading press F10 or F12 (depending on your system and keyboard) to access the Boot menu. From there you can specify to boot from a USB or CD first. Turn the computer off and when you reboot it should start from the specified device.
 -
 Type 'dodshort'. Once the computer boots from the disk, the fastest method to wipe the computer will be to type in 'dodshort'. You can also open the interactive mode if you want more options.
 -
 Hit enter. Hit enter and it will start wiping.
 -
 Reinstall your operating system. Once it is done, reinstall your operating system and your computer should once again be functional. You will only need to restore files from your backup.
5 ★ | 1 Vote


 How to Change Windows 7 Into Windows Vista
 How to Permanently Pin a Program to the Windows 7 Taskbar
 How to Turn Off Bing Search on Internet Explorer 8
 How to Set Different Wallpapers on Dual Monitors on Windows
 How to Fix Muddy Sound With Real Tech Audio and Windows 7
 How to Turn Off User Account Control in Windows 7