Table of Contents
This updated guide examines How to Reset and Re-register Windows Spotlight on Windows 10 and organizes the essential facts, background, and practical takeaways in clear American English.
For example, Windows Spotlight will display different backgrounds every day you choose. You can also preview other Windows features and experiences.
Sometimes you might find Windows Spotlight not working or stuck on an image. This article will show you how to reset and re-register Windows Spotlight when it is inactive or stuck on the same image in Windows 10.
- How to download Windows 10 lock screen image from Spotlight to your device
- How to use Spotlights wallpapers to download Windows Spotlight
- How to automatically change Bing wallpaper on Windows 10
How to reset and re-register Windows Spotlight in Windows 10
Step 1 . First, make sure you enable Microsoft Edge and Settings in the Background apps they run the background for Windows Spotlight images.
Step 2 . Open Settings , click on the Personalization icon.
Step 3 . Click on Lock screen on the left, choose to use Picture or Slideshow as the temporary lock screen background instead of Windows Spotlight in the Background drop-down menu on the right and close Settings .

Step 4 . Download the.bat file according to the link below.
https://www.tenforums.com/attachments/tutorials/130522d1492408303-reset-re-register-windows-spotlight-windows-10-a-reset_and_re-register_windows_spotlight.batNote: The.bat file will delete all files in the two folders below to reset Windows Spotlight and register again with the current account.
Code
:: Reset Windows Spotlight DEL /F /S /Q /A "%USERPROFILE%/AppDataLocalPackagesMicrosoft. Windows. ContentDeliveryManager_cw5n1h2txyewyLocalStateAssets" DEL /F /S /Q /A "%USERPROFILE%/AppDataLocalPackagesMicrosoft. Windows. ContentDeliveryManager_cw5n1h2txyewySettings":: Re-register Windows Spotlight PowerShell -ExecutionPolicy Unrestricted -Command "& {$manifest = (Get-AppxPackage *ContentDeliveryManager*). InstallLocation + 'AppxManifest.xml'; Add-AppxPackage -DisableDevelopmentMode -Register $manifest}"Step 5 . Save the.bat file to your computer.
Step 6 . Unblock the.bat file and run it.
Step 7 . Restart the computer to apply changes.
Step 8. After logging back into Windows with your account, make sure you turn on Microsoft Edge and Settings in Settings> Privacy> Background apps .
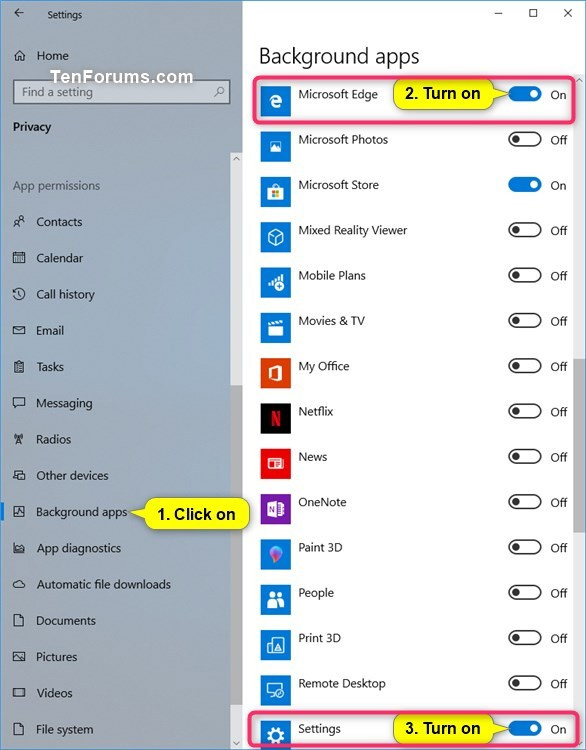
Step 9 . On the Settings page, click on the Personalization icon.
Step 10 . Click on the Lock screen on the left, choose to use Windows spotlight in the dropdown under Background on the right as your lock screen background again and close Settings .
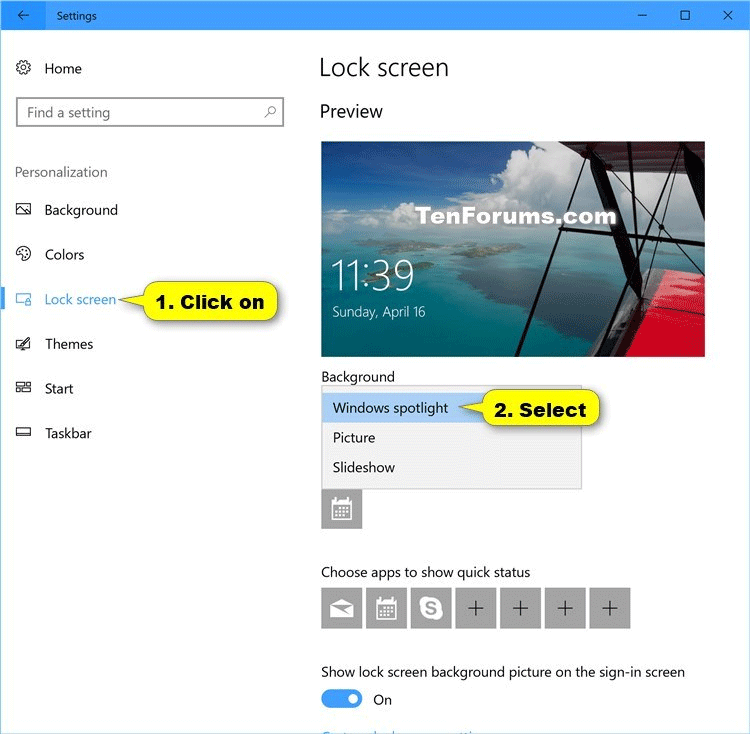
Step 11 . Lock the computer (Win+L) to see if Windows Spotlight is working normally again.
Note: Sometimes you need to wait 24 hours after resetting Windows Spotlight to sync again.
I wish you all success!
FAQ
What is How to Reset and Re-register Windows Spotlight on Windows 10 about?
It provides a structured overview of reset windows spotlight, explains the main context, and highlights practical takeaways for readers.
Why does this topic matter?
Understanding the main concepts helps readers evaluate the issue, avoid common mistakes, and make better-informed decisions.
How should readers use this information?
Use the guidance as a practical starting point, confirm details that may have changed, and follow current product, safety, or security recommendations.
Related Articles
 Windows Spotlight Does Not Work on Windows 10, This Is a Fix5 minutes read
 How to Enable Spotlight Collection on Windows 113 minutes read
 How to Use the Reset Feature on Windows 104 minutes read
 How to Reset the Settings App in Windows 103 minutes read
 What Is Spotlight? What Is Taking the Spotlight? Explained3 minutes read
 Summary of Some Simple Ways to Reset Windows 1013 minutes read
Reader Comments 0
Sign in with email or Google to join the discussion.