Table of Contents
This updated guide examines How to Bring Spotlight Search macOS to Windows 10 and organizes the essential facts, background, and practical takeaways in clear American English.
Instructions to bring Spotlight Search to Windows 10
Step 1:
We download the Jarvis tool following the link below and proceed to boot to use.
https://github.com/spectresystems/jarvis/releasesIn this interface, click Install to use and wait for the installation process to complete.

Step 2:
Once installed, click on the Jarvis icon in the system tray and select Settings in the interface displayed.

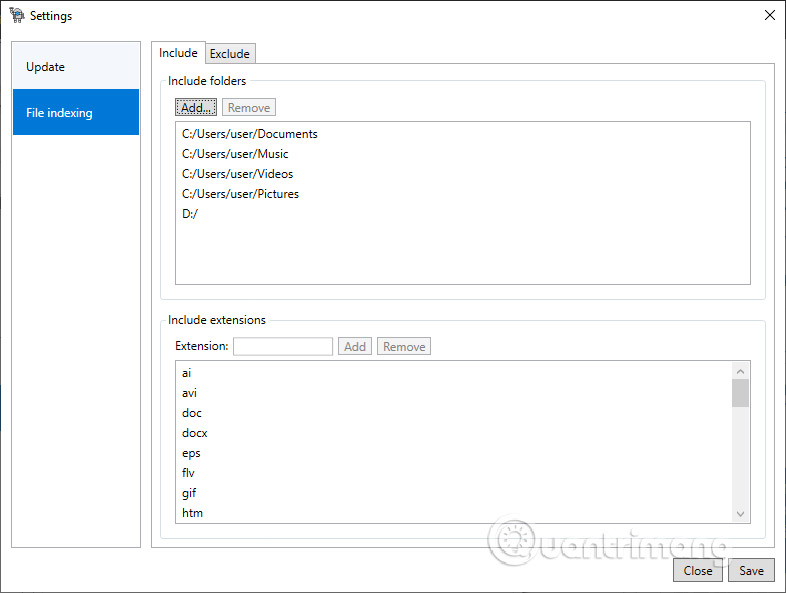
In the tool settings interface, click File Indexing to adjust the folder or files that you want to appear when searching on your computer.
If Jarvis wants to find files in any folder , click the Include tab and then click Add to add the folder. In contrast, the Exclude tab with folders, file formats that you do not want to appear in search results. Click Save to save when there are changes.
Step 3:
Finally, to open the Spotlight Search bar , users use the key combination Alt + Space . Now display the search bar for you to enter keywords. When you enter a keyword, the results shown below will be just files whose names match the keywords you entered. The search interface is also very simple, not much else like Windows Search.

FAQ
What is How to Bring Spotlight Search macOS to Windows 10 about?
It provides a structured overview of Spotlight Search macos, explains the main context, and highlights practical takeaways for readers.
Why does this topic matter?
Understanding the main concepts helps readers evaluate the issue, avoid common mistakes, and make better-informed decisions.
How should readers use this information?
Use the guidance as a practical starting point, confirm details that may have changed, and follow current product, safety, or security recommendations.
Related Articles
 How to Search on Spotlight on a Mac5 minutes read
 How to Open Spotlight Search Results in Finder on Mac3 minutes read
 How to Quickly Search on iPhone with Spotlight3 minutes read
 Windows Spotlight Does Not Work on Windows 10, This Is a Fix5 minutes read
 How to Search the Web from Spotlight on a Mac2 minutes read
 Apple Releases macOS Tahoe 26 with More Powerful Spotlight Search And11 minutes read
Reader Comments 0
Sign in with email or Google to join the discussion.