How to Install the JDK (Java Development Kit) on a Mac
Part 1 of 2:
Installing JDK
-
 Visit the JDK download page. Open your web browser and visit oracle.com/downloads/index.html.
 -
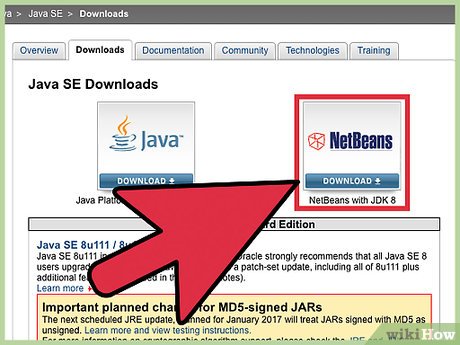
 Download the JDK installer. Once you're on the Downloads page, you'll need to navigate to the installer files:
- Click the "Java" option.
- Click "Java SE."
- Click the "Download" button next to "JDK 8 with NetBeans."
- Select "Accept License Agreement" and then click the download link for "Mac OS X" in the top section. This is the most recent release of the Java SDK with the NetBeans development environment.
- Double-click the downloaded installer. The installer is in .dmg format. Double-clicking it will open the installation interface.
- Follow the prompts to install the JDK. You'll be asked to enter your administrator password before installation can proceed.
- Delete the DMG file after installation (optional). This will help you save on disk space, since you don't need it after the JDK has been installed.[1]
Part 2 of 2:
Creating Your First Program
- Open NetBeans from the Applications folder. This is the development environment for Java, and will allow you to easily write and compile code.
- Click File and select "New Project." This will start a new project in NetBeans.
- Select the "Java" category and the "Java Application" project. This will set NetBeans to create Java files for this project.
- Give the project a name and click "Finish." For this example, call it "HelloWorld." This will open the code editor after the project is created.
- Find the "// TODO code application goes here" line. Your program code will go underneath this line.
- Enter your program code on a new line. Press ⏎ Return after the "// TODO code application goes here" line to create a new line with the same indentation. Type the following code:
System.out.println("Hello World!");
- Click the "Run Project" button. This looks like a green Play button, and can be found in the toolbar.
- Check the Output tab to see your project in action. This frame will appear at the bottom of your screen after running the project.
- Fix any errors. If the project doesn't have any errors, you'll see "Hello World!" and "BUILD SUCCESSFUL" in the Output tab. If there are errors, you'll see which lines they occur on so that you can go back and fix them.[2]
- Continue learning Java. Now that you have the JDK installed and working, you can continue learning to program in Java. See Write Your First Program in Java for more beginner guides.
Update 04 March 2020
You should read it
- How to Add JARs to Project Build Paths in Eclipse (Java)
- Basic Java exercises, with sample decoding
- Write and run Java code on the computer for the first time
- 4 ways to write multi-threaded code in Java
- Latest Project XL code and how to enter Project XL code
- How to Compile a Java Program
- Basic Java syntax
- Oracle wants to turn Java EE into fully open source
- How to Download a Java Development Kit to Program on Android
- How to Update Java
- Download and install Java on the computer
- What is Java? Why choose Java?
Maybe you are interested
How to find other versions of the image on Google The strange forest area looks like a chessboard when viewed from above Impressive image: ISS International Space Station flies over the Sun. How to find unlicensed images on the internet Russian spacecraft 'resupply' successfully 3 tons of cargo for the ISS in just 3 hours How clean are astronauts keeping the space station?
