
How to install CPU into Mainboard properly, without bent pins
CPUs have many small pins that can easily bend if handled incorrectly. In this article, we will learn how to install the CPU properly, ensuring proper contact with the socket, along with how to use thermal paste to achieve optimal performance.
Installing a CPU onto a motherboard requires care to avoid bent pins or improper contact. This guide, TipsMake, will help you perform the steps easily and safely.
Instructions for installing CPU into Mainboard
Step 1: Place the motherboard on a flat surface if it is not installed in the case.
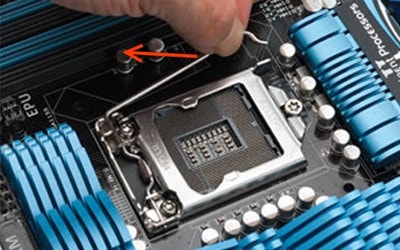
If the motherboard is in the case, make sure the area has enough light to work. Then, slide the large latch on the motherboard up.
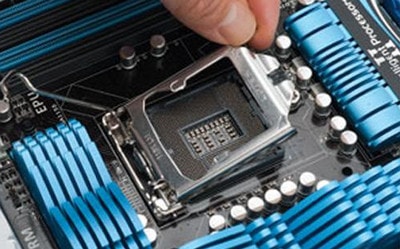
Step 2 : Lift up the CPU cover:
Step 3 : You will see the slots on the Main and you need to carefully observe the special positions on it.
Step 4 : You need to CPU up pay attention to 1 semi-circular anchor point on CPU to install correctly the semi-circular anchor point on Mainboard.
Step 5 You pick up the CPU and you will see a small yellow triangle in the right corner. This prevents you from inserting the CPU backwards.
Step 6 You will see a triangle on the Mainboard, you need to place it exactly in this position and then gently put the CPU into the Mainboard.
Step 7 When placing the CPU, you need to pay attention to the notched corner being placed in the correct position.
Step 8 Slide the 2 CPU retaining bars in as before.
Step 9 You need to pay attention to the locking pins are in the right place.
Install the CPU cooling fan on the motherboard
Step 10 After installing the CPU, you will see 4 pins around the CPU, this is where the fan is screwed in.
Step 11 You need a heatsink fan to mount which also has 4 legs.
Step 12 : Place the cooling fan on the Mainboard on the CPU.
Step 13 Press the fan down and screw the 4 legs tightly to the Mainboard.
Step 14 Next, plug the power cord into the cooling fan.
Step 15 Finish and reassemble the computer.
With the detailed instructions above, you can easily install the CPU on the Mainboard yourself without the need for a technician. Make sure the CPU and Mainboard are compatible, and handle gently to avoid bending the CPU pins. If you want to continue upgrading, you can refer to how to install a CPU heatsink to optimize performance and extend the life of the components.
You should read it
- Instructions for checking the mainboard model and motherboard manufacturer
- The terms you need to know when buying a motherboard
- Things to know when choosing to buy mainboard
- Leaked images of upcoming Lenovo gaming motherboards
- What is motherboard? Learn about the mainboard in the computer
- 5 best B760 motherboards in 2024
- How to find motherboard compatible RAM
- List of MSI motherboards that support TPM 2.0
- What is motherboard? What is a motherboard?
- List of Asus motherboards that support Windows 11
- MSI motherboards have serious problems and will be exchanged for free
- AMD A620 motherboard will make Ryzen 7000 CPUs a more affordable upgrade option