
How to delete a partition using the PowerShell command
Step 1. Open the PowerShell application with admin rights. To do that, right-click on the Start menu and select the option "Windows PowerShell (Admin)" .
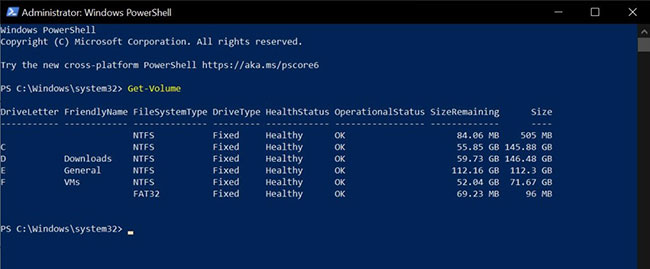
Step 2. Get the list of partitions using the "Get-Volume" cmdlet . This command will display a table in the PowerShell window with all available partitions.
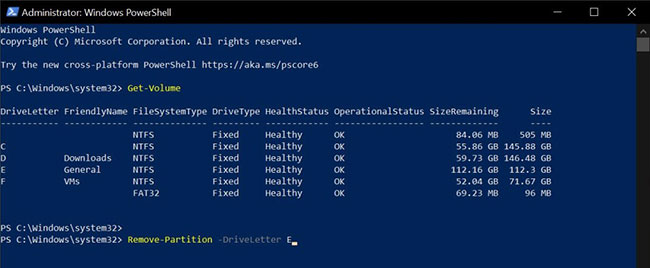
Step 3. To remove a partition, execute the command below. Replace "X" with the actual drive letter of the partition you want to delete. For example, to delete partition "E" , replace "X" with the drive letter.
Remove-Partition -DriveLetter X
Step 4. Type "Y" into the PowerShell window and press Enter. This action will confirm that you really want to get rid of the target partition.
As soon as you confirm the action, Windows PowerShell will delete the partition and mark it as unallocated.
Since the deleted space is marked as unallocated, you can use it to create a new partition or extend an existing one. If you want to extend the partition, we recommend first backing up all the files in the partition you want to extend.
Furthermore, use the partition manager GUI tool, like the built-in Disk Management tool. This is especially important if you've never done this through the command line.
You should read it
- PowerShell command in Windows
- About PowerShell
- Use PowerShell to download any file on Windows 10
- How are Command Prompt (cmd) and PowerShell different?
- How to install PowerShell 7.0 in Windows 10/8/7
- How to use PowerShell's default parameter to change the command behavior
- Instructions on how to use PowerShell in Windows Server 2012
- 10 PowerShell commands help you manage the remote computer most effectively
- What is PowerShell Basic commands in PowerShell
- How to check PowerShell version in Windows 10
- How to Install or Update PowerShell on Windows 11
- How to Run Powershell
Maybe you are interested
New study finds gold can significantly improve eyesight 8 Ways to Use ChatGPT's Deep Research Tool Instructions for using the gradient tool in Photoshop Instructions for using Sysprep on Windows 7/8/10 The best Mid-Autumn Photos for Facebook How to create event reminder notifications on the Messenger application