Table of Contents
This practical guide explains how to install or update powershell on windows 11 with clear steps and useful context. It also covers common requirements, potential problems, and the details that can help you get better results.
There are several ways to install or update PowerShell on Windows 11. In this article, we will look at all of them.
1. How to Install or Update Powershell Using the Winget. Command
Windows Package Manager (or Winget) is a command line program that you can use to install applications on Windows. This eliminates the need to search the app on the web and go through the tedious installation process.
Using the Winget command is one of the simplest ways to install or update PowerShell in Windows 11. Here are the steps you can follow.
1. Click the magnifying glass on the taskbar or press Win + S to open the search menu.
2. Type Command Prompt in the search box at the top.
3. Select Run as administrator to open Command Prompt with admin rights.
4. Select Yes when the User Account Control (UAC) prompt appears.
5. Paste the following command into the console and press Enter to see all available versions of the PowerShell application.
winget search PowerShell6. Record the ID associated with the PowerShell application that you want to receive.
7. Run the following command to install the PowerShell application.
winget install AppID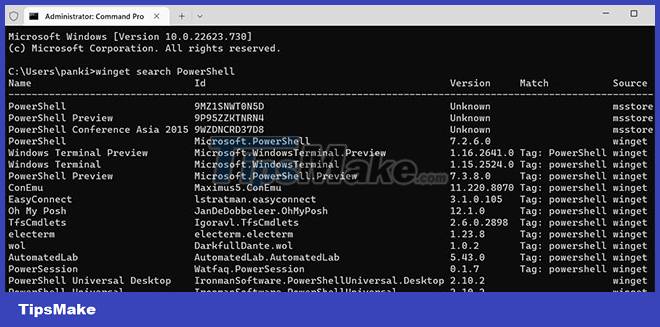
Replace the AppID in the command above with the actual App ID noted in the last step.
Wait for Winget to download and install PowerShell on your PC and then exit the terminal window. After that, the PowerShell application will be available to use.
The Winget command also allows you to install multiple applications at once.
2. How to Install or Update Powershell from Github
Another way to install or update PowerShell on Windows is to download its installer package from the GitHub website. Here's how you can do it.
1. Open your favorite web browser and navigate to GitHub's PowerShell page.
2. Select the latest PowerShell version from the GitHub page.
3. Scroll down to the Assets section and download the MSI file on your PC.
4. Open the installation package and click Next.

5. Specify the installation directory and click Next.
6. Click Next again.
7. Check the boxes that say Enable updating PowerShell through Microsoft Update or WSUS and Use Microsoft Update when I check for updates . Then click Next.
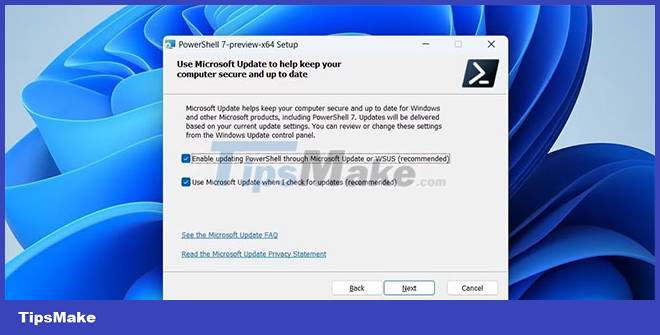
8. Click the Install button and follow the on-screen instructions to complete the process.
Once you complete the steps above, you should have the latest version of PowerShell at your disposal.
3. How to Install or Update Powershell Using the Microsoft Store
The PowerShell app is also available on the Microsoft Store. To install or update PowerShell apps using the Microsoft Store, follow these steps:
1. Open the Microsoft Store app on your PC.
2. Use the search bar at the top to find the PowerShell app on the store.
3. Click the Update button to update the PowerShell application. If you don't have the app yet, click the Install button to download it.

If you're having trouble opening Microsoft Store apps on Windows 11, fix the problem so you can update your apps easily.
Conclusion
Understanding Windows 11 makes it easier to compare options, avoid common mistakes, and apply the information in this guide more effectively. Review the relevant requirements before making changes or choosing a solution.
FAQ
How do you install or update powershell on windows 11?
Follow the steps in this guide in order, confirm the required settings or tools, and verify the result before making additional changes.
Is it safe to install or update powershell on windows 11?
It is generally safe when you follow the recommended instructions, use trusted tools, and avoid changing settings you do not understand.
What should you do if the process does not work?
Recheck the requirements, restart the device or application when appropriate, and review each step for missed settings or compatibility issues.
Related Articles
 How to Install Powershell 7.0 in Windows 10/8/73 minutes read
 Next Time, Microsoft Will Release Powershell Updates via4 minutes read
 How to Check Powershell Version in Windows 103 minutes read
 Microsoft Urges Admin to Patch Powershell Vulnerability on3 minutes read
 12 Most Useful PowerShell Commands for Windows8 minutes read
 About Powershell15 minutes read
Reader Comments 0
Sign in with email or Google to join the discussion.