Table of Contents
This updated guide examines How to Create System Information File in Windows 10 and organizes the essential facts, background, and practical takeaways in clear American English.
This tutorial will show you how to create an MSINFO.nfo file to upload to forums, allowing other members to view system information in the same user interface as you see on your own PC.
The MSINFO.nfo file is usually included in the logs created by DM Log Collector. In case the file is missing, the person responsible for analyzing and handling errors BSOD will request.
If you are required to upload to your MSINFO.nfo file multiple times, follow these steps each time. The system may change between each upload, so it is important to make sure you capture the system status at the time of the request and do not upload old information.
Method 1: Create a. NFO file
1. Click on the Cortana icon or search on the taskbar and enter System in the search box. Click the System Information icon .

2. Once System Information is open, click File and then Save. from the context menu.
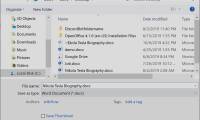
3. Select the save location (in this example, the desktop), name the file and make sure System Information File (*. NFO) is selected in the Save as drop-down box .

4. System Information will collect the requested information and create a file.
When the progress bar completes, the progress window will shut down and you can close System Information.
5. Locate the file where you have chosen.
The file itself will be too large to upload directly to the forums, you will need to compress the file.
Method 2: Create a. TXT file
1. Click on the Cortana icon or search on the taskbar and enter System in the search box. Click the System Information icon .
2. Once System Information is open, click File and then select Export. from the context menu.
3. Choose where to save the file, name the file and make sure the TextFile is selected in the Save as drop-down box .
4. System Information will now collect the requested information and create the file.
When the progress bar completes, the progress window will shut down and you can close System Information.
5. Locate the file where you selected it, then upload it where you need it.
FAQ
What is How to Create System Information File in Windows 10 about?
It provides a structured overview of Windows 10, explains the main context, and highlights practical takeaways for readers.
Why does this topic matter?
Understanding the main concepts helps readers evaluate the issue, avoid common mistakes, and make better-informed decisions.
How should readers use this information?
Use the guidance as a practical starting point, confirm details that may have changed, and follow current product, safety, or security recommendations.
Related Articles
 Create New Host File on Windows: How to Create a New Host File on4 minutes read
 How to Quickly Create New Blank Text Files on Windows, Mac and Linux11 minutes read
 How to Create New Files on Windows: Complete Guide9 minutes read
 3 Simple Ways to Enable // Disable the Encrypting File System4 minutes read
 4 Ways to Check Windows 10 System Configuration Details6 minutes read
 Instructions for Creating and Using BAT File on Windows9 minutes read
Reader Comments 0
Sign in with email or Google to join the discussion.