How to set up iCloud email and calendar access on Windows 10
If you own an iPhone and use Apple's email service, you can easily access those emails on your Windows PC. This guide shows you how to set up email and iCloud calendar access in Windows 10.
Table of Contents
If you own an iPhone and use Apple's email service, you can easily access those emails on your Windows PC. This guide shows you how to set up email and iCloud calendar access in Windows 10.
You don't need Apple software, to access iCloud-based calendar emails and events on Windows 10. Tools for accessing both applications are integrated into the operating system. All you need to do is add your iCloud account to the Mail app.
Remember that you will need to take an extra step if your iCloud account uses two-factor authentication. This basically prevents hackers from accessing your account if they get a password. Additionally, you must create an application-specific password. Without these passwords, you can't access your iCloud email account using basic Apple ID credentials.
Create an application-specific password (only for two-factor authentication)
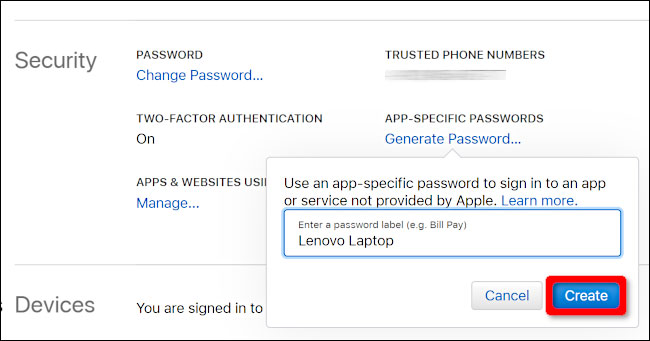
Open the browser on a Windows PC and log into the Apple ID account page. Once the page has finished loading, scroll down to the 'Security' section and click on the 'Generate Password' link set under 'App-Specific Passwords'.
Enter the password label in the pop-up windows and then click the blue 'Create' button. Take this password or write it somewhere because you cannot retrieve it later.
If you need to delete the password, go back to the 'Security' section and click on the 'Edit' button . You can see the 'View History' link to the right of 'App-Specific Passwords'. Click the X to the right of the password you want to delete, followed by the 'Done' button .
Add iCloud account to Mail
When you add your iCloud account to the Mail app, everything saved in your email, calendar and contacts accounts will be synchronized with Windows 10 by default.
First, open the Mail app and then click on the 'Accounts' heading in the left panel. This will open the 'Manage Accounts' panel on the right.
You can also click the gear icon at the top of the Accounts panel on the left. This will open the Mail application settings.
When the Settings menu appears on the right, select the 'Manage Accounts' option at the top of the list.
Click the '+ Add Account' option on the following menu.
A pop-up window appears. Select iCloud on the list.
On the following screen, enter the email address and password used to access the iCloud account. If the account uses two-factor authentication, enter the application-specific password you created in the previous section.
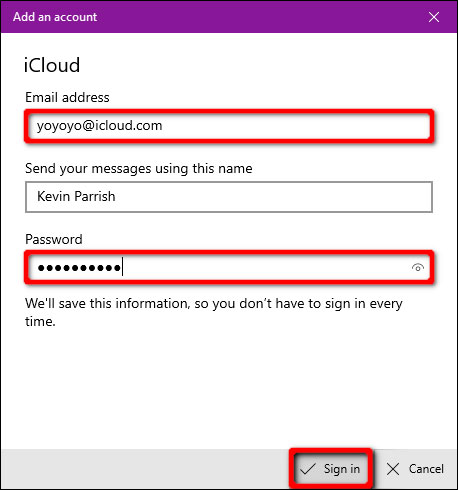
Click the Sign In button, then click the Done button on the next screen to finish.
If you need to delete the account or change the sync settings later, go back to the 'Manage Accounts' panel and click on the iCloud account.
On the 'Account Settings' window, click the 'Remove This Account from Your Device' link to remove iCloud account from Windows 10.
To change sync settings, click the 'Options for Syncing Your Content' link . On the following screen, you can change how and when the Mail app syncs with this account. You can also enable and disable syncing for iCloud-based email, calendar, and contacts.
Custom options for this account include:
- When to download new mail
- When to synchronize contacts and calendar
- Download email from # days / weeks / months ago
- Email by this name
Click Done> Save when done.
Was this article helpful?
Your feedback helps us improve.
Related Articles
 How to access iCloud on Android7 minutes read
 How to set up iCloud email, contacts and calendar on iPhone or iPad1 minutes read
 Apple launched a solution to overcome spam in iCloud Calendar3 minutes read
 Instructions for setting up iCloud email account for Android and Windows Phone4 minutes read
 How to Share Calendars on iPhone2 minutes read
 6 iCloud+ Features You Should Be Using6 minutes read
Reader Comments 0
Sign in with email or Google to join the discussion.