How to create Dev Drive on Windows 11
Starting with Windows 11 version 22H2 KB5030310 Build 22621.2361, Microsoft introduced Dev Drive. Dev Drive is a new form of storage available to improve performance for core developer workloads.
Table of Contents
Starting with Windows 11 version 22H2 KB5030310 Build 22621.2361, Microsoft introduced Dev Drive. Dev Drive is a new form of storage available to improve performance for core developer workloads. Dev Drive is built on Resilient File System (ReFS) technology, including file system features and optimizations that provide more control over storage settings and security, including assigning reliability, antivirus configuration, and administrative control over attached filters.
It is designed to meet developers' needs for project source code storage, working directory, and package cache. It is not designed for general consumer workloads such as document libraries, installing packaged applications, or non-developer tools.
This guide will show you how to create a Dev Drive using unallocated space on a new drive or virtual hard drive (VHD/VHDX) on Windows 11.
How to create a new Dev Drive using unallocated space on the drive
Note:
- This option requires you to have at least 50GB of unallocated space available on the drive to use for Dev Drive. If not, you can shrink the volume/partition on the drive to create unallocated space. The Dev Drive you create using this option will always be available as a drive in File Explorer > This PC.
- You can delete the Dev Drive created in this option to get rid of it permanently.
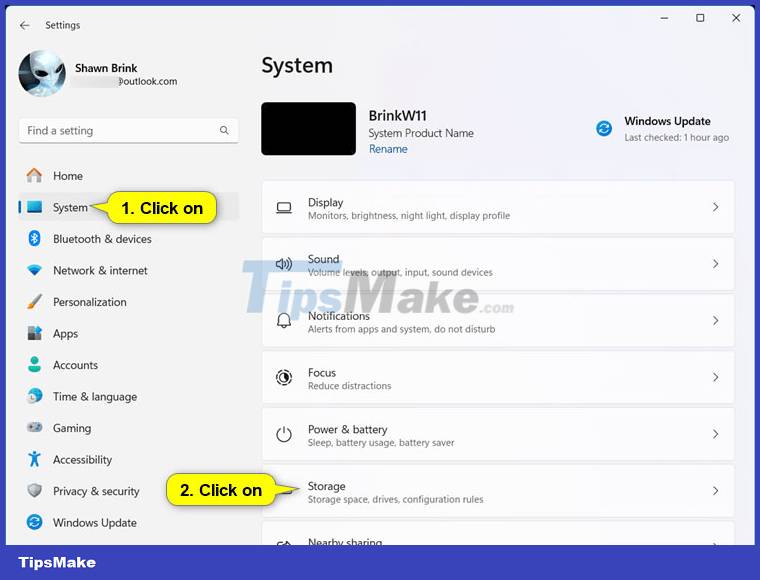
1. Open Settings (Win + I).
2. Click System on the left and click Storage on the right.

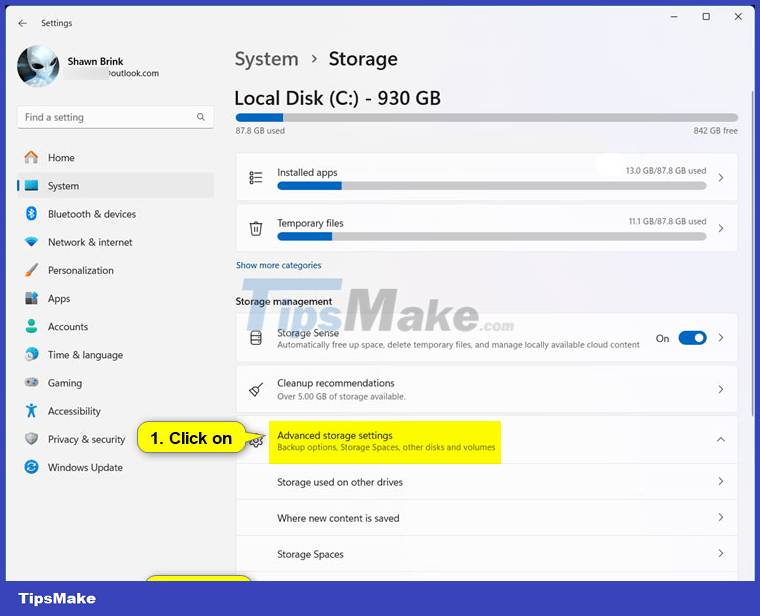
3. Click Advanced storage settings on the right to expand and click Disks & volumes.

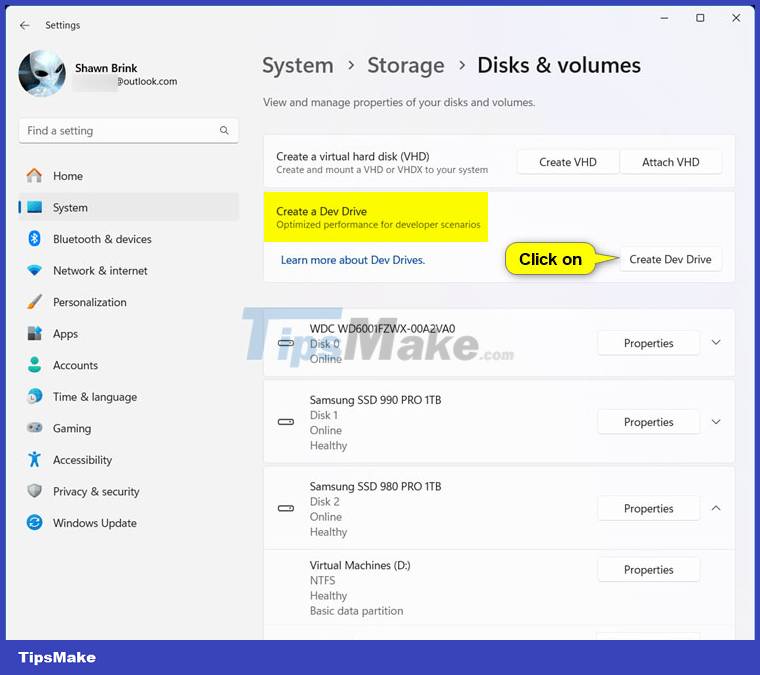
4. Click the Create Dev Drive button.

5. Select the unallocated space you want to use for Dev Drive and click Next.

6. Follow the steps below to create a Dev Drive:
- Enter the Label (drive name) you want for this Dev Drive.
- Select the available Drive Letter you want to assign to this Dev Drive.
- Enter the Size in MB of the unallocated space you want to use for this Dev Drive. Must have at least 50GB.
- Click Format.

7. When finished, you can close Settings if you want.
How to create a new Dev Drive with virtual hard drive (VHD/VHDX)
Note:
- This option will create a new virtual hard drive (VHD/VHDX), which is then used to create the Dev Drive.
- The Dev Drive you create using this option will only be available as a drive in File Explorer > This PC when its VHD/VHDX file is mounted.
- The virtual hard drive (VHD/VHDX) will automatically disconnect whenever you restart your computer. You will need to mount the VHD/VHDX file when you want the Dev Drive to be available as a drive in File Explorer > This PC again.
- You can disconnect and delete the virtual hard drive file (VHD/VHDX) created in this option to permanently delete the Dev Drive.
1. Open Settings (Win + I).
2. Click System on the left and click Storage on the right.
3. Click Advanced storage settings on the right to expand and click Disks & volumes.
4. Click the Create Dev Drive button.
5. Select Create new VHD and click Next.

6. Perform the steps below to create a new VHD/VHDX for Dev Drive:
- Enter the virtual hard drive name you want for this VHD/VHDX file.
- Browse to and select the Location drive or folder where you want to create this VHD/VHDX file.
- Specify the virtual hard drive size you want to assign to this VHD/VHDX file. Must have at least 50GB.
- Select the Virtual hard disk size you want to use.
- VHD: Supports virtual drives up to 2040GB in size.
- VHDX: Supports virtual drives up to 64TB in size and provides more flexible protection against unexpected IO errors due to problems such as power outages).
- Select the Virtual hard disk type you want to use.
- Fixed size - This virtual hard drive file is allocated at its maximum size when created (Recommended for efficiency).
- Dynamically expanding - Increases the maximum size when data is written.
- Click Create.

7. It will take some time to create and mount the new virtual hard drive.

8. Select GPT (default) or MBR for the partition type you want to use for VHD/VHDX and Click Initialize.

9. Follow the steps below to create Dev Drive on VHD/VHDX:
- Enter the Label (drive name) you want for this Dev Drive.
- Select the available Drive Letter you want to assign to this Dev Drive.
- Enter the Size in MB of the unallocated space you want to use for this Dev Drive. Must have at least 50GB.
- Click Format.

10. When done, you can close Settings if you want.
Was this article helpful?
Your feedback helps us improve.
Related Articles
 4 tools to create USB boot install Windows 104 minutes read
 How to create a bootable USB drive for installing Windows 10 with UEFI and LEGACY support.5 minutes read
 WinSetupFromUSB - a simple way to install Windows XP from a USB flash drive3 minutes read
 Instructions on how to create a RAM drive on Windows14 minutes read
 How to create a USB flash drive to install Windows 82 minutes read
 Why should you move games to Dev Drive in Windows?5 minutes read
Reader Comments 0
Sign in with email or Google to join the discussion.