How to enable/disable Diagnostic Data Viewer on Windows 11
The Diagnostic Data Viewer app lets you review the Windows diagnostic data your device is sending to Microsoft, grouping the information into simple categories based on how Microsoft uses it.
Microsoft uses diagnostic data to keep Windows secure and up to date, troubleshoot problems, and make product improvements as described in more detail below. Regardless of whether you choose to send optional diagnostic data, your device will remain secure and function properly. This data is transmitted to Microsoft and stored with one or more unique identifiers that can help identify each user on an individual device and understand device usage and service issues. bag.
The Diagnostic Data Viewer app lets you review the Windows diagnostic data your device is sending to Microsoft, grouping the information into simple categories based on how Microsoft uses it.
This guide will show you how to enable or disable Diagnostic Data Viewer for all users in Windows 11.
Note:
- You must download and install the app before you can use it to review diagnostic data on your device.
- Before you can use this tool to view Windows diagnostic data, you must enable data viewing mode.
- You must log in with admin rights to enable/disable Diagnostic Data Viewer.
- The Diagnostic Data Viewer application requires the Connected User Experiences and Telemetry (DiagTrack) service to run.
Enable or disable Diagnostic Data Viewer in Settings
1. Open Settings (Win + I).
2. Click Privacy & security on the left and click Diagnostics & feedback on the right.

3. Click View diagnostic data to expand that data.
4. Enable or disable (default) Turn on Diagnostic Data Viewer depending on what you want.


5. Now, you can close Settings if you want.
Enable or disable Diagnostic Data Viewer in Local Group Policy Editor
Note: Local Group Policy Editor is only available in Windows 11 Pro, Enterprise, and Education editions.
1. Open Local Group Policy Editor (gpedit.msc).
2. Navigate to the policy location below on the left side of the Local Group Policy Editor.
Computer Configuration > Administrative Templates > Windows Components > Data Collection and Preview Builds
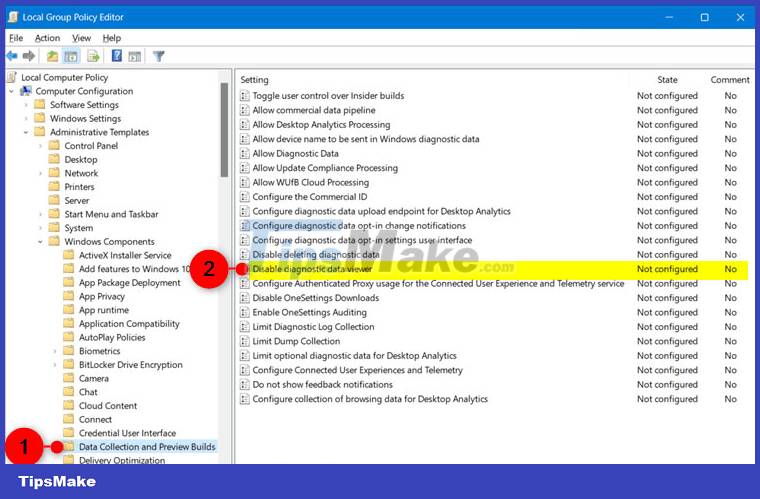
3. To the right of Data Collection and Preview Builds in the Local Group Policy Editor, double-click the Disable diagnostic data viewer policy to edit it.
4. Perform step 5 (turn on) or step 6 (turn off) below according to your preference.
5. Activate Diagnostic Data Viewer
- Select Not Configured.
- Click OK and go to step 7 below.

6. Disable Diagnostic Data Viewer
A) First turn off Diagnostic Data Viewer using method 1 above.
If you do not first disable Diagnostic Data Viewer, users can still view diagnostic data in the Diagnostic Data Viewer application.
B) Select Enabled.
C) Click OK and go to step 7 below.

7. Now, you can close the Local Group Policy Editor if you want.
- Guide to see which personal data has been collected by Microsoft on Windows 10
- How to add / remove XPS Viewer application in Windows 10
- How to access Event Viewer in Windows 10
- 15 diagnostic tools to check Windows PC health
- Steps to use Event Viewer in Windows 10
- Download the Indexer Diagnostic Tool for Windows 10
- How to use the DirectX Diagnostic Tool to troubleshoot problems.
- How to create a portable PC diagnostic USB with your favorite, open-source tools
- 8 tools built into Windows you may not know yet
- Get back Windows Photo Viewer on Windows 10 to help you see photos faster, Photos too slow!
- Steps to change Taskbar position on Windows 11
- Download Ghost Windows 11 Pro Full Soft v1.0 Best New Standard 2021
- How to report Windows 11 errors, suggest Windows 11 features for Insider Preview users
- List of MSI motherboards that support Windows 11
- Steps to open Local Security Policy on Windows 10, Windows 11
- How to use Explorer Patcher, a tool to bring Windows 10 Taskbar to Windows 11
- How to bypass TPM 2.0 requirement when installing Windows 11?
- Download Ghost Windows 11 Pro No Soft v1.0 2021
- How to disable Sleep mode on Windows 11
- How to open multiple images side by side for comparison on Windows 11
-
 Tips for creating professional documents, slides, and spreadsheets in Perplexity
-
How to block the use of personal data to train AI
-
Instructions for setting up Gmail in n8n
-
How to use the IMPORTRANGE function in Google Sheets
-
4 productivity tasks simplified thanks to local LLM.
-
The 'Upload' button on AI: A productivity gateway or a secret 'evaporation' trap?
 Tips for creating professional documents, slides, and spreadsheets in Perplexity
 How to block the use of personal data to train AI
 Instructions for setting up Gmail in n8n
 How to use the IMPORTRANGE function in Google Sheets
 4 productivity tasks simplified thanks to local LLM.
 The 'Upload' button on AI: A productivity gateway or a secret 'evaporation' trap?