Install Win 7 from your hard drive, no need for USB, install Win disk
There are many ways to install Windows 7 operating system on your computer, such as installing Win 7 using USB, installing with Windows disk. There is also another way to install Win 7 from the hard drive, this is how to install Windows 7 directly from the hard drive without the need for support from USB boot or Win install disc. Useful when you do not know how to create a USB drive that has Win or a computer that has an error / no drive, a USB connector.
However, when applying this method, it is worth noting that to be able to install Windows 7 by installing directly from the HDD, you need to have practical skills. Therefore, Today TipsMake.com will guide you how to install Windows 7 operating system from the most detailed HDD.
- Instructions on how to install Windows 7 from USB
How to install Windows 7 directly from the hard drive
Configuration requirements:
- Processor: 1 GHz or more.
- RAM: 1 GB or more (with 32 bit version) and 2 GB or more (with 64 bit version).
- Disk drive C capacity is over 20 GB.
The installed C drive partition is formatted as NTFS. You can refer to how to convert the FAT32 hard drive to NTFS in the article How to convert FAT32 hard drive to NTFS on Windows does not lose data.
Step 1:
First of all we will download the Windows 7 file according to the link below.
- Download Windows 7 Professional (32-bit)
- Download Windows 7 Professional (64-bit)
Step 2:
You need to exit all programs running on the system. Then, transfer the Windows 7 installation file just downloaded above to the drive partition other than the operating system partition to install. Next we proceed to extract this file .
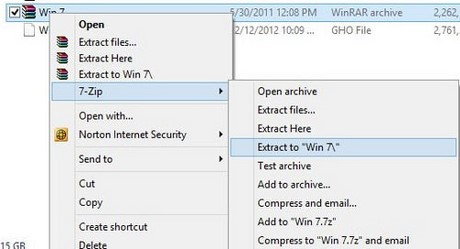
Step 3:
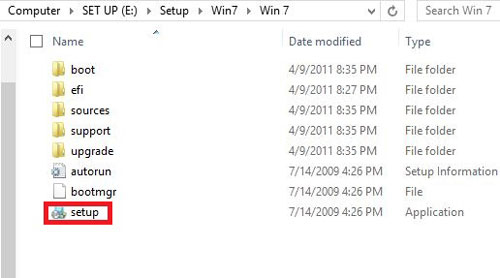
After decompressing the installation file successfully, the user accessing the unzipped folder will see the installation file as shown below. Click on the setup.exe file in this folder.
Step 4:
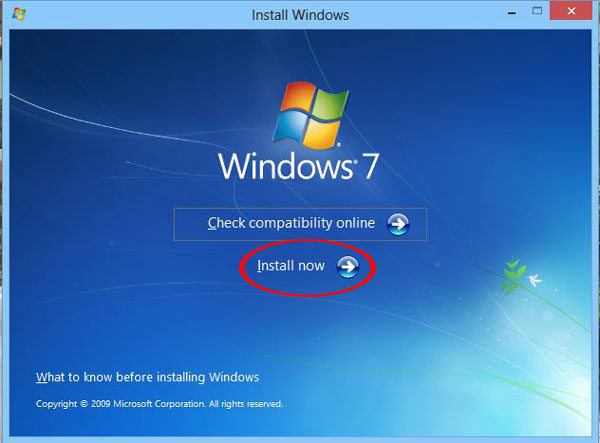
As soon as the file starts, the Windows 7 installation interface will look like the one below. Click on Install now .
Step 5:
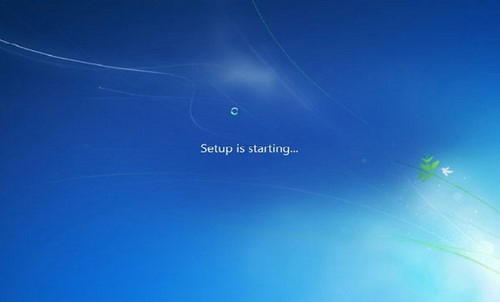
The installation process of Windows 7 system will proceed immediately.
Step 6:
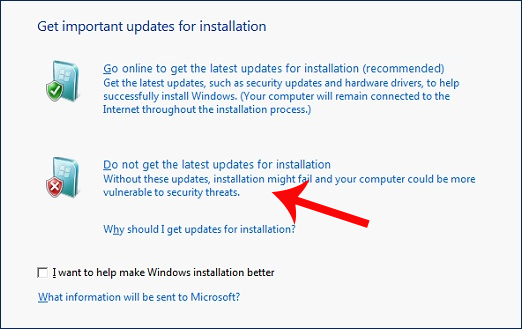
The user waits for a few minutes and then the Install interface appears as shown below. In this interface, two options will appear as follows:
- Go online to get the lastest updates for installation: allow installing Win 7 but the computer needs to have an Internet connection. The system installation time is relatively long.
- Do not get the latest updates for installation: install Win 7 from the hard drive even without an Internet connection.
So we will choose the option Don't get the latest updates for installation .
Step 7:
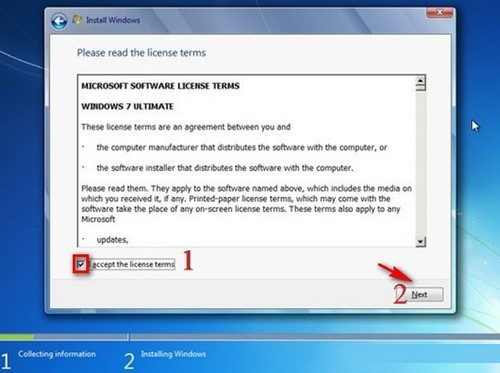
Next is the interface to install and use Microsoft terms. Click I accept the license terms to continue installing Windows 7. Click Next to continue.
Step 8:
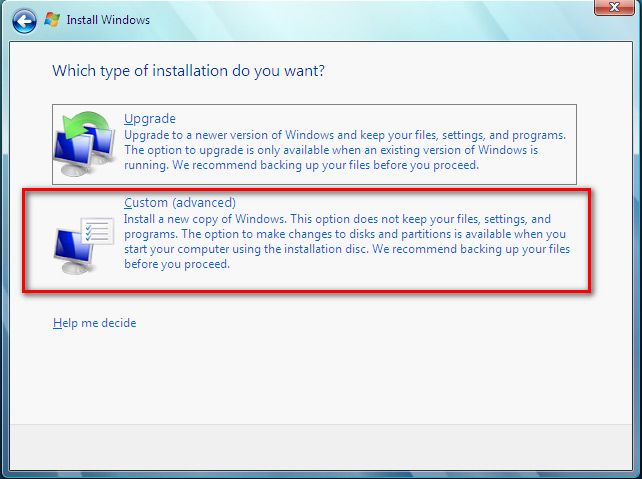
Then the system will ask users to choose which system to install according to the method, including:
- Upgrade: install the upgrade version.
- Custom (Advanced): advanced options.
Here we will choose the Custom (Advanced) installation method .
Step 9:
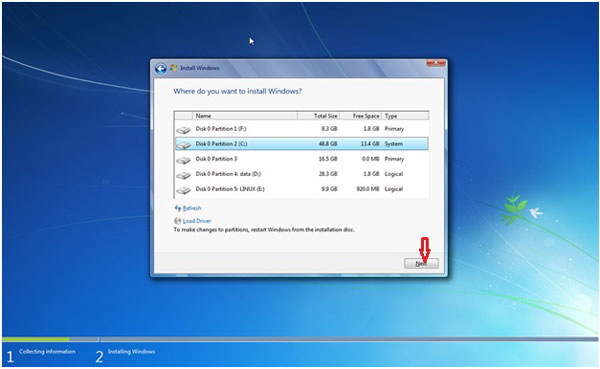
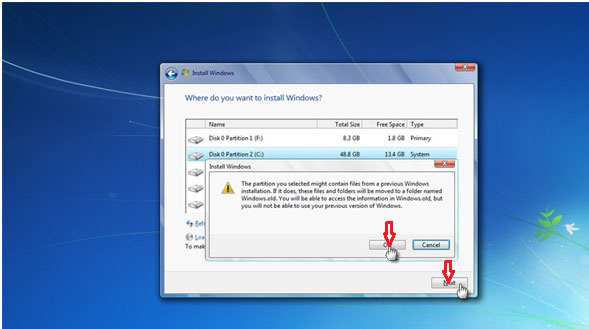
Next you will select the Windows 7 installation partition and click Next .
Step 10:
The system will notify the user who is proceeding to install over the version of Windows used on the computer. When we continue to install, all the data of the old Windows operating system will be transferred to the windows.old folder in the new Windows folder.
Click OK to agree and click Next to proceed to copy the data.
Step 11:
After the system will automatically copy and extract the file, Windows will restart the computer and continue the installation process until it is completed.

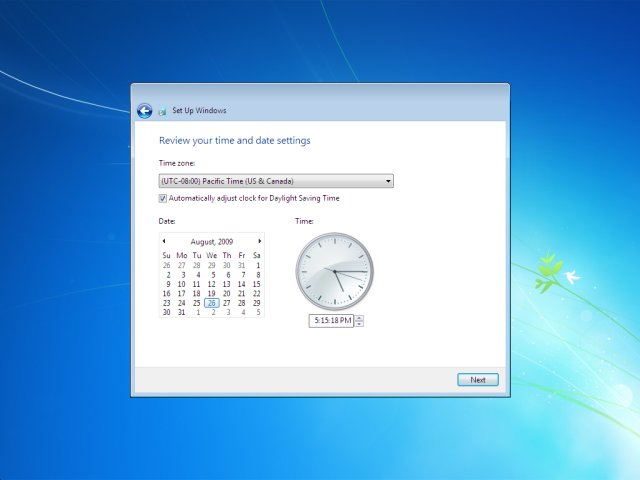
Then appear the setup interface including enter Username, password, time zone, Internet connection as when we proceed to set up Windows 7 installed from USB. So the installation of Windows 7 from the HDD is completed.
Step 12:
Finally, we will proceed to delete the old data installed over the windows.old folder. Before deciding to delete, you need to review all the old data of the operating system and press Shift + Delete .
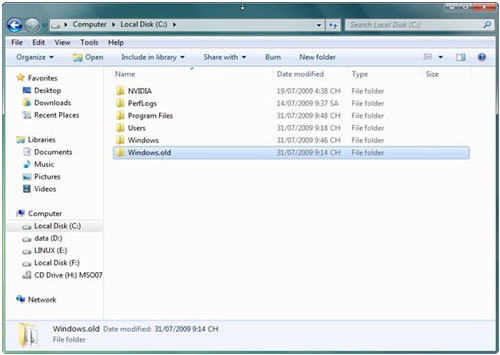
The operation to complete the installation of Windows 7 from the HDD is completed. The steps to set up the system after the installation is complete including entering user information, adjusting the time zone, . will be the same as when we set up in the article to create boot Windows 7 from USB.
I wish you a successful installation!