How to create data entry forms in Excel
It's a waste of work and boring to enter a pile of data in Excel, but with the data entry form, your productivity will increase faster.
Table of Contents
It is laborious, time consuming and sometimes there is an error when you have to import a pile of data in Excel, but with the data entry form, your productivity will increase faster and produce fewer errors.
When it comes to forms in Excel, most people will think to create VBA forms from scratch. But Excel provides a pre-created form that can import data quickly. Read the following article to learn how to create Excel data entry forms.
- How to create a drop list in Excel 2016
- Create forms (forms) in Access 2016
- How to create Google Spreadsheet automatically updates data
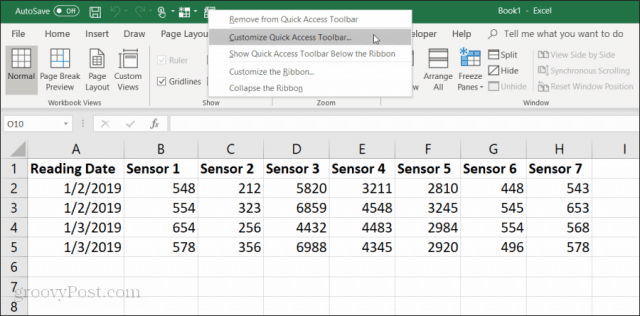
Before creating a data entry form, you need to add the data entry form feature to the Quick Access Toolbar bar.
Add Data Entry Form in the Quick Access Toolbar bar
You will not see the Data Entry Form in Excel's standard toolbar. This is a hidden feature you need to activate. To do this, right-click on the Quick Access Toolbar and select Customize Quick Access Toolbar .
In the Excel Options window, click Choose commands from and select All Commands .

Scroll down the list of commands and select Form . Then, select the Add button to add the Form to the Quick Access Toolbar.

Click OK and now you will see the data entry form in the Quick Access Toolbar. And now you are ready to use Data Entry Form on your Excel spreadsheet.

Create data entry form in Excel
Before you can use the data entry form in Excel, you will need to convert your spreadsheet into a table. You can do this by pressing Ctrl + T. You will see the data in your spreadsheet converted to the default table format.

After converting the worksheet into a table, select the Form icon in the Quick Access Toolbar to open the data entry form.
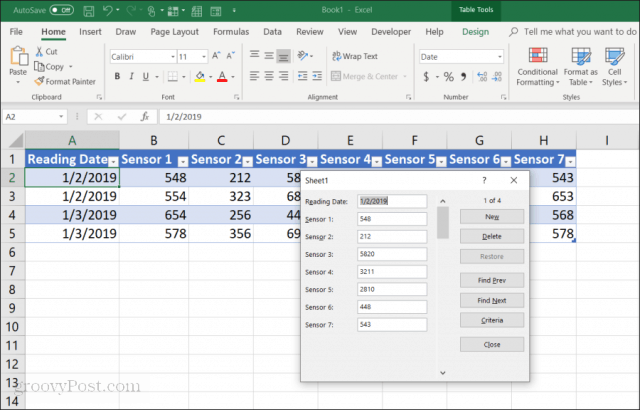
If you've ever used a data entry form in Access, you'll notice many similarities. The form provides a method for controlling data entry into spreadsheets. You do not need to click on another row when you are ready to import data into it. The buttons on the form allow you to focus on the current row and navigate through the worksheet with the form navigation buttons.
Functions of data entry form buttons:
- New : Add a new, blank row to the existing table.
- Delete : Delete the current row you are editing.
- Restore : Restore (reset) the data field you are editing to the original value.
- Find Prev : Move the record you are editing to the previous row.
- Find Next : Move the record you are editing to the next row.
- Criteria : Allows you to search for specific records in the table.
- Close : Close the data entry form.
Next, we will explore how to use each feature of the form to manage spreadsheet data.
Add and delete records
New and Delete buttons on the data entry form will work exactly as you expect. The New button adds a new record to the end of the table. In the data entry form, you will see blank fields to enter data by typing in that entry and clicking the tab to move to the next field.
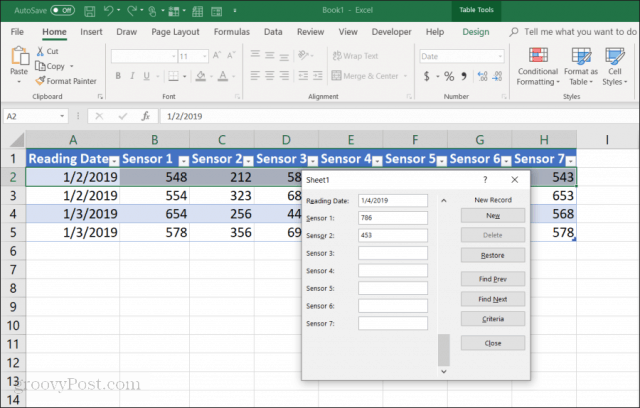
When filling out all fields, just select the New button again and you will see the new row added in the table. The form will delete the data you entered earlier, so you can continue to enter data into the new row if you want.

The advantage of this is:
- You can quickly add records by pressing the tab key.
- Less impact, change other records
- No need to use the mouse when entering data.
Deleting records from a table is easy. Just click on one of the records you want to delete. Just use the Find Prev or Find Next buttons to navigate to the record you want to delete. These buttons are similar to the up / down buttons in Excel developer tools. Click the Delete button to delete the record.

You will see a pop-up warning that the record will be permanently deleted. Select OK to confirm.
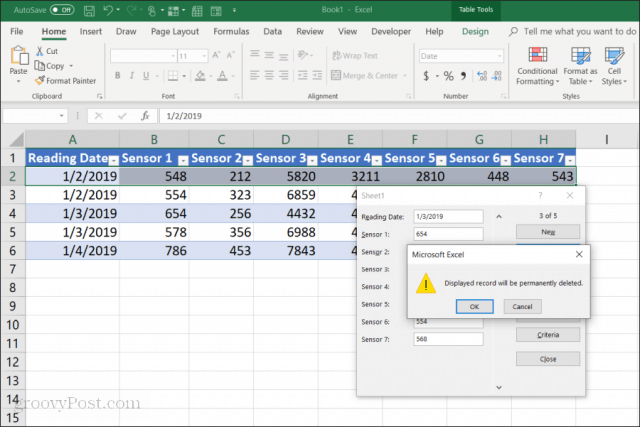
Note : This warning is not really correct because the record is not permanently deleted. If you change your mind that you don't want to delete the record, you can close the data entry form, press Ctrl + Z to undo the change. This will bring the deleted item back to the table.
Search for records
If you are working with a very large data set, the previous and next buttons won't work. Instead of working with thousands of records this way, you can press the Criteria button to browse the record you want.
In this example, if you only want to browse items from 1/3/2019 you need to click the Criteria button, it will change the data entry form to filter. Enter 1/3/2019 in the Reading Date school.
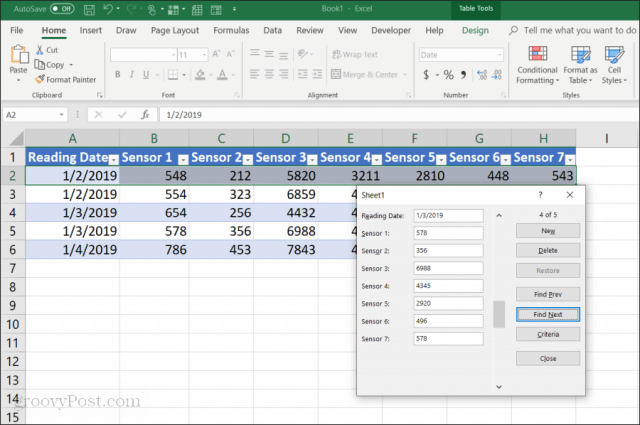
Now, when selecting Find Prev or Find Next , the form will only browse items that match the criteria you specified in the Reading Date field.
You can also use logical operators like > or < to narrow the scope of data. For example, if you want to see all records older than 1/4/2019, you will type '
As you can see, Data Entry Form makes data entry easier, less error-prone without the use of a mouse.
I wish you all success!
Was this article helpful?
Your feedback helps us improve.
Related Articles
 How to limit the value entered by Data Validation Excel4 minutes read
 Create forms (forms) in Access 201613 minutes read
 How to create duplicate data entry notifications on Excel3 minutes read
 Check data entry in Excel2 minutes read
 3 basic methods to avoid data entry errors in Excel5 minutes read
 How to create drop down lists in Excel5 minutes read
Reader Comments 0
Sign in with email or Google to join the discussion.