Table of Contents
This updated guide explains how to Create Charts in Excel 2007 Is Extremely Simple! through clear steps, practical examples, and important checks that help prevent common errors.
1. What Is the Graph in Exel
A graph inExcelis one way of presenting dry data intoeasy-to-understand vividimages. The graph is linked to its data in an Excel table, so when you change the data in the spreadsheet, the graph immediately changes accordingly.
- Open the workbook containing the data to create the chart
- Select the required data to create graphs such as headings by row, column and data illustration.
- From the Insert Menu in the Chart box, select the appropriate chart type that you may need to use to represent your data. When choosing a style, there will be a drop-down menu showing samples for you to choose

- From these templates, you can choose a template by clicking on it
*An example of creating a chart:
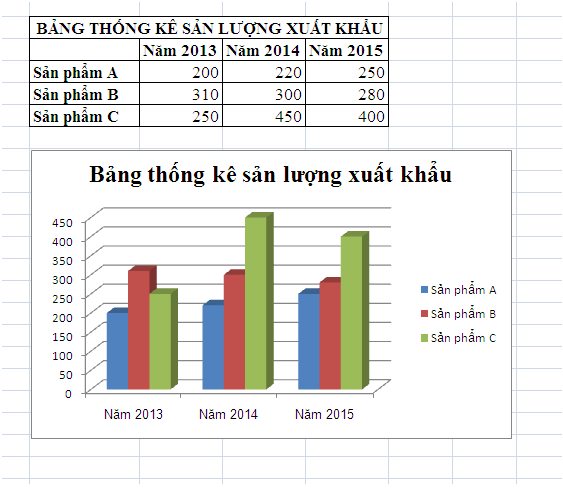
With Excel 2007 you will have more options in using the chart format because with this version Microsoft Office 2007 provides many beautiful and effective chart templates that are also very powerful in displaying and comparing numbers. Whether.
2. Typical Types of Excel 2007 Charts
- Column: Bar chart
- Bar: Bar chart
- Pie: Pie chart
- Scatter: XY chart (scatter)
- Area: Area chart
- Donut: Donut chart
- Radar: Radar chart (by ray)
- Surface: 3-D face chart
- Bubble: Pie chart
- Stock: Bar chart
- Cylinder: 3-D cylindrical chart
- Cone: 3-D cylindrical pie chart
- Pyramid: 3-D pyramid chart
3. Work with Charts
The job of creating charts is just one of many jobs that work with charts, with Excel 2007 making it easier to edit charts using the specialized Chart Tools.
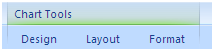
a.The main tool works with charts
The Chart Tools menu includes 3 submenu, Design , Layout , and Format which contain almost all the commands that work with the chart. Here we go through the details of these menus.
*Chart Tool / Design : Contains commands that help you design the chart style and format to suit your desired purpose and effect.

Type : choose a chart type
Data : The choice to work with your data for charting.
Chart Layouts : A form of chart display
Chart styles : Types of chart styles
Location : Move the chart to another location
After you select this item, the Move Chart dialog box will appear as shown below:
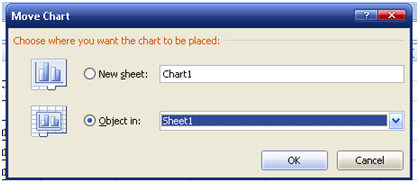
Select the location to export then Click OK.
*Chart Tool / Layout : Provides the detailed components of the selected chart. Users can edit the details of components based on this submenu.

* Chart Tool / Format : Provides options to edit detailed properties of the chart
Quick learning chart format.

b.Appointments are subjectto change
After creating the chart often the results are not as expected, so we need to adjust a few ineffective factors such as size of the chart, font, size of details on the chart. sometimes We also need to add or remove data.
c.To adjust dimension
When creating the chart, if the elements in the chart are not satisfactory, move it to another in the following way:
- Select objects to move.
- LEFT-click the object and drag it elsewhere, release the mouse button.
- To adjust the size of the whole chart: click the inner background of the chart, move the mouse on the small square buttons on the border of the inner background, when a double-headed arrow appears, left click the mouse to adjust the size ruler appropriate. The size of the wide chart is less than or equal to the size of the external background
- Move the whole chart: click the inner background of the chart to select, left-click the inner background of the chart again and move elsewhere, the elements located on the chart will move according to the chart.
d.Format the title of the chart
To format the chart title, follow these steps:
- Double click the title of the chart to change the content of the chart title.
e.Change, edit figures: for some reason you have to adjust the figures of the chart, please follow these steps:
+ Right click the chart and select Select Data.
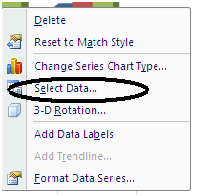
The dialog box appears as shown below:
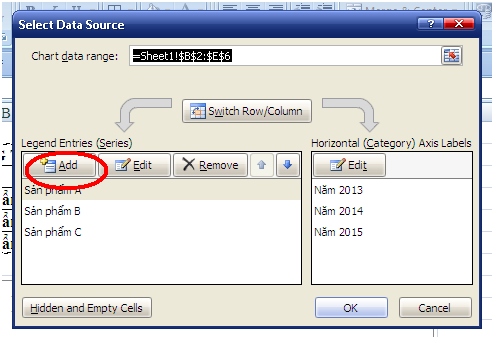
+ You can change the data area to draw a chart by entering the address in the Chart data range frame:
+ Reverse the X and Y axes by clicking the command button: Swich row / Column
+ Insert data, click the Add button.
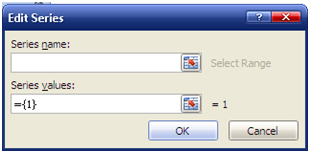
+ Edit the data, click the Edit button.
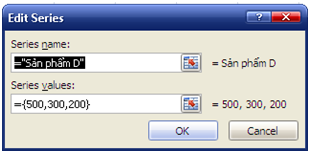
+ Remove the chart, click the Remove button.
After resetting the data, click OK to apply the changes to the chart.
Change chart type : You can change the chart type after you have finished drawing the chart by right-clicking on the chart and selecting Change Chart Type dialog box as shown below:
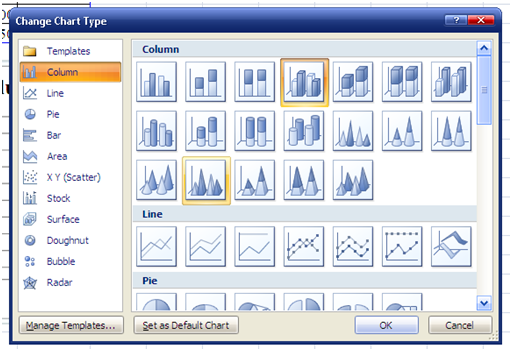
You select a chart type in the left pane, then select the chart in the right frame then click OK.
Format Chart Area: Right-click the chart, and then select Format Chart Area to open this dialog box.
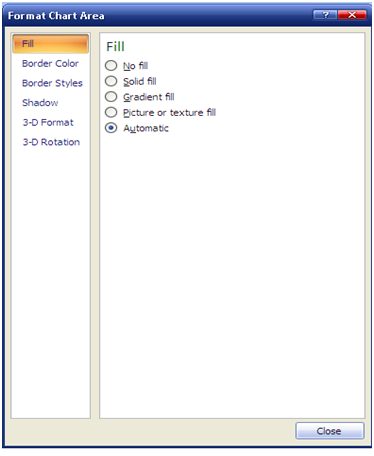
+ Fill: background color for the chart
+ Border Color: The color for the contour
+ Border Style: Style for the border border
+ Shadow: Options for shadows.
The change options for the chart are shown on the three menu areas you click the chart in a very detailed and intuitive way.
TipsMake wish you a successful reading!
social shareand social shareFAQ
What is the easiest way to Create Charts in Excel 2007 Is Extremely Simple!?
Start with the requirements in this guide, then follow each step in order. Check the result after every major change so problems are easier to identify.
Can beginners follow these instructions?
Yes. The process is organized into practical steps, and you can repeat any step before moving forward.
What should I check if the method does not work?
Confirm your software or device version, permissions, settings, file format, and internet connection when the task depends on online services.
Related Articles
 How to Draw a Map Chart on Excel: Excel Charts5 minutes read
 Instructions on How to Create Charts in Excel Professional8 minutes read
 How to Draw Charts and Graphs in Excel Simply and Quickly4 minutes read
 How to Create 2 Excel Charts on the Same Image: Draw an Excel Chart4 minutes read
 Instructions for Creating Interactive Charts in Excel with INDEX7 minutes read
 How to Draw a Pie Chart in Excel 20164 minutes read
Reader Comments 0
Sign in with email or Google to join the discussion.