Table of Contents
This updated guide examines How to Create a Powerpoint Handout and organizes the essential facts, background, and practical takeaways in clear American English.
Method 1
Format a Handout for a PowerPoint Presentation
 Choose a preformatted handout scheme for a PowerPoint handout.
- Open the View tab on the PowerPoint toolbar and click the Handout Master button located in the Presentation view group.
- Click the Themes button in the Edit Themes group and choose a theme from the selection available in the pull-down menu. Click the preferred theme to apply it to the Handout Master.
 Select a preformatted color scheme for a PowerPoint handout.
- Confirm that the Handout Master view is selected and locate the Edit Theme group in the toolbar.
- Click the Colors button and click to select 1 of several preformatted color schemes visible in the pull-down menu.
 Find a preformatted Effects theme. A number of preformatted effects themes can be applied to a set of Handouts. These effect themes include 3-D objects, gradients and background styles.
- Click the Effects button in the Edit Themes group to open the "Built-in" pull-down menu.
- Click on 1 of the available themes to apply it to the set of handouts.
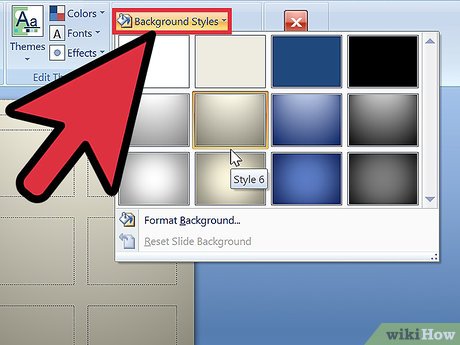 Format the handout background. Choose 1 of the preformatted background options available.
- Confirm that Handout view is selected and click the Background Styles option located in the Background group on the toolbar. A number of preformatted background options will be visible in the pull-down menu.
- Click on a background style to apply it to the set of handouts.
Method 2
Apply a Custom Background or Color Scheme to a PowerPoint Handout
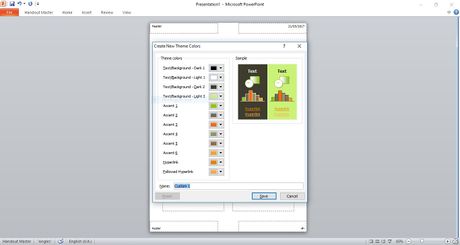 Create a custom color scheme for a PowerPoint handout.
- Open the View tab on the toolbar and click the Handout Master button located in the Presentation view group.
- Click the Colors button in the Edit Themes group and select the Create New Color Schemes option from the pull-down menu. The Create New Color Schemes dialog box will open.
- Use the menu boxes in the column on the right to choose different colors for each of the 8 categories listed in the column on the left. A preview of the new color will appear in the column on the left once a new color is selected in each category. Preview your custom color scheme in the display to the right of the Scheme Colors menu.
- Enter a name for the custom color scheme in the color scheme name field located at the bottom of the dialogue box.
- Click save to exit the dialog box.
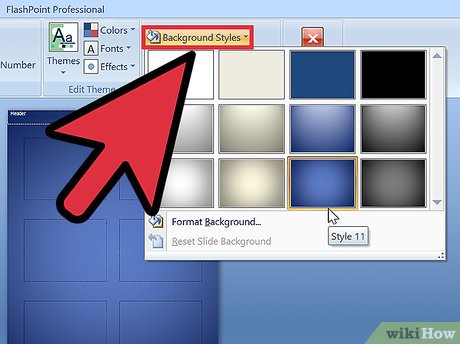 Apply a custom background to a PowerPoint handout.
- Confirm that Handout view is selected and click the Background Styles option located in the Background group on the toolbar.
- Click the Format background option located near the bottom of the pull-down menu. The Format Background dialog box will appear.
- Choose Solid fill to fill the background with a single, solid color.
- Select the Gradient fill option to create a custom gradient fill for the handout background.
- Click the Picture fill option to use an image saved to your computer's hard drive as a background fill for a PowerPoint handout.
- Click the Apply to all button to apply your custom background fill to the PowerPoint handout.
 Adjust the number of slides to appear on a single page of a PowerPoint handout.
- Confirm that the Handout Master view is selected.
- Click the Slides Per Page button located in the Page Setup group on the toolbar. Select the desired number of slides per page from the options listed in the pull-down menu. The number of slides that will appear on each page has been adjusted.
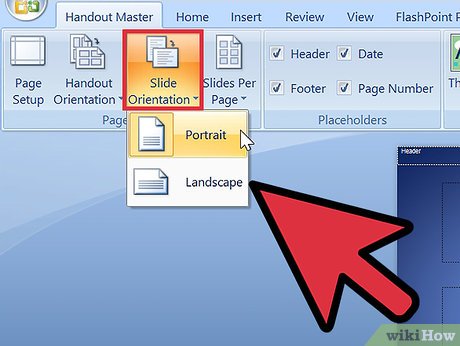 Adjust the handout orientation of a PowerPoint handout.
- Confirm that the Handout Master view is selected from the View tab.
- Click the Handout Orientation button located in the Page Setup group on the toolbar. Choose from portrait or landscape.
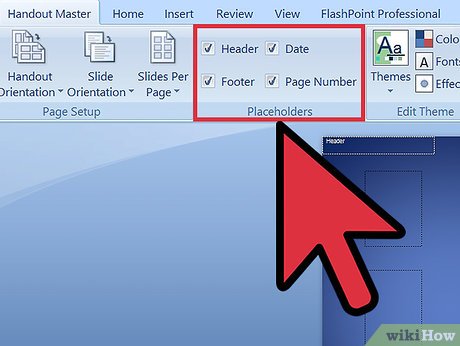 Add or remove a header, footer, page number or date from a PowerPoint handout.
- Confirm that the Handout Master view is selected and locate the Place Holders group in the toolbar.
- Place or remove a check from the checkbox labeled Header to add or remove a header from the handout.
- Place or remove a check from the checkbox labeled Footer to add or remove a footer from the handout.
- Place or remove a check from the checkbox labeled Date to add or remove the current date from the handout.
- Place or remove a check from the checkbox labeled Page number to add or remove page numbering from he handout.
FAQ
What is How to Create a Powerpoint Handout about?
It provides a structured overview of handout, explains the main context, and highlights practical takeaways for readers.
Why does this topic matter?
Understanding the main concepts helps readers evaluate the issue, avoid common mistakes, and make better-informed decisions.
How should readers use this information?
Use the guidance as a practical starting point, confirm details that may have changed, and follow current product, safety, or security recommendations.
Related Articles
 How to Create Bottom-up Scrolling in Powerpoint?2 minutes read
 PowerPoint 2019 (Part 1): Getting Started with PowerPoint: Explained7 minutes read
 How to Create a Powerpoint File Password4 minutes read
 How to Create a Roadmap in Powerpoint4 minutes read
 How to Create a PowerPoint with Microsoft Copilot15 minutes read
 How to Create GIF Animations with PowerPoint3 minutes read
Reader Comments 0
Sign in with email or Google to join the discussion.