How to Create a Bootable Windows XP ISO from a Folder
If your computer came installed with Windows XP, but didn't come with a disc, you may be wondering how to go about reinstalling in case something happens. Luckily, you can create a Windows XP installation disc with the files on your hard...
Table of Contents
Method 1 of 2:
Create the Folder
-
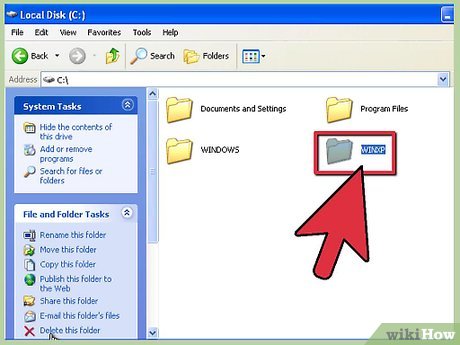 Create a new folder. For simplicity, name it WINXP and place it in the root directory of your hard drive. You will need to create a folder 'C:WINXP'. This folder will temporarily house the Windows installation.
 -
 Copy the installation files. In order to create a bootable disc from your Windows folder, you will need to have an i386 folder on your computer. You can find it at the root of your Windows installation hard drive. The typical location is C:i386.
- Copy the folder to the WINXP folder you created in the first step. Make sure that you copy and not move the files. To ensure this, right-click on the i386 folder and select copy. Navigate to the WINXP folder, right-click, and select Paste. The files will begin copying. Depending on the speed of your computer, this could take a few minutes.
- After copying, you should have an i386 folder in your WINXP folder. The directory should look like C:WINXPi386.
-
 Create the Windows text file. Navigate to the WINXP folder and right-click in the window. Select New, and then Text Document from the submenu. This will create a new text document in the WINXP folder. In the text document, type 'Windows' without the quotes, and add a single space after it. Hit the Enter key once.
- Click Save and set the filename as 'WIN51'. Include the quotes to make sure that the file is saved without an extension.
-
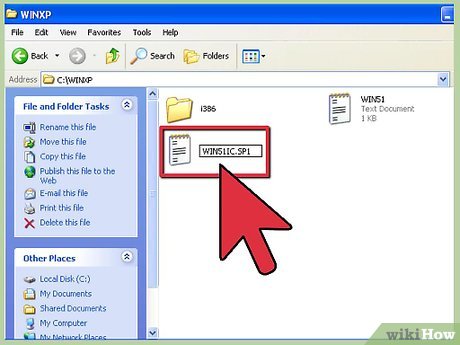 Create the appropriate copies. Depending on which version of Windows you originally installed, you will need to make specific copies of the file you just created. All the files that you create should be located in the WINXP folder.
- XP Home: Make a copy of the file named WIN51IC.
- XP Home SP1: make the above file plus one named WIN51IC.SP1
- XP Home SP2: make the above files plus one named WIN51IC.SP2
- XP Home SP3: make the above files plus one named WIN51IC.SP3
- XP Pro: Make a copy of the file named WIN51IP.
- XP Pro SP1: make the above file plus one named WIN51IP.SP1
- XP Pro SP2: make the above files plus one named WIN51IP.SP2
- XP pro SP3: make the above files plus one named WIN51IP.SP3
-
 Slipstream the latest SP update. If you have ever upgraded your Windows XP installation with a Service Pack, then you will need to upgrade your installation. This is because even though the system is upgraded when a Service Pack is installed, the installation file is not.
- Download the Service Pack installation file from Microsoft. Make sure to download the pack that was last installed. This guide will assume you are slipstreaming to SP3. Rename the downloaded file to XPSP3.EXE and place it at the root of your C: drive for easy access.
- Open the command prompt. Click start and select Run… Enter 'cmd' into the field and press enter. This will open the command prompt. Type the following command and press Enter:
C:XPSP3.EXE /integrate:C:XPSETUP
Method 2 of 2:
Burn the Disc
-
 Download the Windows boot sector. You can download the Windows boot sector legally and for free from various places online. Be sure that you are downloading from a trusted source, and that you are downloading a Windows XP boot sector in the correct language.
- Place the boot image in the root of your C: drive. It is typically called w2ksect.bin. This will be required during the burning process.
-
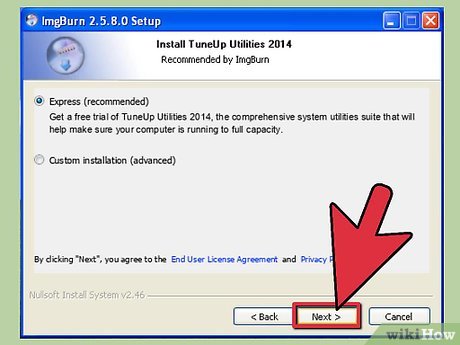 Download and install ImgBurn. There are a variety of free programs available that can create bootable discs. This guide will assume you are using ImgBurn. You will need to make adjustments to the program's settings before you begin burning.
 -
 Adjust your settings. Open ImgBurn and switch to Build mode. In the output menu, choose whether you are burning to a blank disc or creating an image on your hard drive.
- Drag and drop your WINXP folder into ImgBurn.
- Select the Options tab. Change File System to ISO9660. Make sure that Recurse Subdirectories is checked.
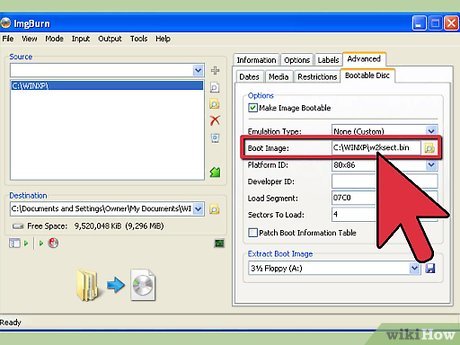
- Select the Advanced Tab and then select the Bootable Disc tab. Check the box for Make Image bootable. Select None (Custom) from the Emulation Type dropdown menu. Click the Folder icon and select the w2ksect.bin file that you downloaded earlier. Change the Sectors To Load value from 1 to 4.
-
 Click the Write/Build button. Confirm the changes you've made to the settings above. Enter any label you'd like for the disc. The burn process will commence. The time this takes will vary depending on the speed of your CD burner. Once the process is complete, your CD will work just like a typical Windows XP bootable installation CD.
Was this article helpful?
Your feedback helps us improve.
Related Articles
 4 tools to create USB boot install Windows 104 minutes read
 Guide to quickly creating a bootable USB drive with Hiren's BootCD.10 minutes read
 Use CMD to create an 'undeleted' folder on Windows3 minutes read
 How to create a Hiren's BootCD bootable USB drive for Windows rescue.3 minutes read
 How to quickly create a UEFI bootable USB using Rufus3 minutes read
 How to create USB Boot with Command Prompt4 minutes read
Reader Comments 0
Sign in with email or Google to join the discussion.