How to Change the Language of Your Computer (Windows XP)
If you want to use a different language in Windows XP, there are a few different ways you can go about it. Changing the display language can be a little complicated, as it can be difficult to change after Windows is already installed. You...
Table of Contents
Part 1 of 2:
Display Language
-
 Try a Language Pack. The Microsoft website offers a variety of Language Packs that you can install without having to reinstall Windows. You'll need to have Service Pack 3 installed in order to use these language packs.
- Click here and look for your language in the list. If the language you want is listed, and you are currently using the required base language, click the "Get it now" link to download the pack. If your desired language is not listed, or you aren't using the right base language, see the next step.
- Run the downloaded installer and follow the prompts to install the pack. Once the installation is complete, you'll see your changes take effect after restarting.
-
 Understand the process. While it is not technically possible to change the base language without reinstalling Windows, you can use a workaround to change the majority of the interface to your desired language. This requires downloading the Service Pack 3 update (even if you already have it installed) as well as changing a few registry values.
 -
 Download the Service Pack 3 update in the language that you want to change to. Visit the Service Pack 3 download page here. Use the drop-down menu to select the language that you want to change to. Once you've selected the language, click the "Download" button and then select the second option in the window that appears. Ignore the additional options and click the blue button in the lower-right corner to download the file.
- Do not start installing the SP3 update yet. It won't work until you've changed the registry.
-
 Open the Registry Editor. To change your language, you'll need to make a small change to your system registry. The registry is what controls Windows, so be careful when making changes here.
- To open the Registry Editor, press ⊞ Win+R, type regedit, and press ↵ Enter.
-
 Use the tree on the left to navigate. you can expand the folders to see subfolders. Selecting a folder will display any keys it contains in the right frame.
- Navigate to HKEY_LOCAL_MACHINE/SYSTEM/ControlSet001/Control/NIs/Language.
-
 Double-click the "(Default)" key. This should be at the top of the list. A new window will appear, allowing you to change the value.
 -
 Enter in the code for the language you want to use. Each language has a four-digit code that you'll need to enter into the "Value data" field. Refer to the list below to find the language you want to change to and enter the proper code. Make sure that it is the same language you selected for the SP3 file.[1]
Language Codes
- 0436 = 'af;Afrikaans'
- 041C = 'sq;Albanian'
- 0001 = 'ar;Arabic'
- 0401 = 'ar-sa;Arabic (Saudi Arabia)'
- 0801 = 'ar-iq;Arabic (Iraq)'
- 0C01 = 'ar-eg;Arabic (Egypt)'
- 1001 = 'ar-ly;Arabic (Libya)'
- 1401 = 'ar-dz;Arabic (Algeria)'
- 1801 = 'ar-ma;Arabic (Morocco)'
- 1C01 = 'ar-tn;Arabic (Tunisia)'
- 2001 = 'ar-om;Arabic (Oman)'
- 2401 = 'ar-ye;Arabic (Yemen)'
- 2801 = 'ar-sy;Arabic (Syria)'
- 2C01 = 'ar-jo;Arabic (Jordan)'
- 3001 = 'ar-lb;Arabic (Lebanon)'
- 3401 = 'ar-kw;Arabic (Kuwait)'
- 3801 = 'ar-ae;Arabic (you.A.E.)'
- 3C01 = 'ar-bh;Arabic (Bahrain)'
- 4001 = 'ar-qa;Arabic (Qatar)'
- 042D = 'eu;Basque'
- 0402 = 'bg;Bulgarian'
- 0423 = 'be;Belarusian'
- 0403 = 'ca;Catalan'
- 0004 = 'zh;Chinese'
- 0404 = 'zh-tw;Chinese (Taiwan)'
- 0804 = 'zh-cn;Chinese (China)'
- 0C04 = 'zh-hk;Chinese (Hong Kong SAR)'
- 1004 = 'zh-sg;Chinese (Singapore)'
- 041A = 'hr;Croatian'
- 0405 = 'cs;Czech'
- 0406 = 'the;Danish'
- 0413 = 'nl;Dutch (Netherlands)'
- 0813 = 'nl-be;Dutch (Belgium)'
- 0009 = 'en;English'
- 0409 = 'en-us;English (United States)'
- 0809 = 'en-gb;English (United Kingdom)'
- 0C09 = 'en-au;English (Australia)'
- 1009 = 'en-ca;English (Canada)'
- 1409 = 'en-nz;English (New Zealand)'
- 1809 = 'en-ie;English (Ireland)'
- 1C09 = 'en-za;English (South Africa)'
- 2009 = 'en-jm;English (Jamaica)'
- 2809 = 'en-bz;English (Belize)'
- 2C09 = 'en-tt;English (Trinidad)'
- 0425 = 'et;Estonian'
- 0438 = 'fo;Faeroese'
- 0429 = 'fa;Farsi'
- 040B = 'fi;Finnish'
- 040C = 'fr;French (France)'
- 080C = 'fr-be;French (Belgium)'
- 0C0C = 'fr-ca;French (Canada)'
- 100C = 'fr-ch;French (Switzerland)'
- 140C = 'fr-lu;French (Luxembourg)'
- 043C = 'gd;Gaelic'
- 0407 = 'de;German (Germany)'
- 0807 = 'de-ch;German (Switzerland)'
- 0C07 = 'de-at;German (Austria)'
- 1007 = 'de-lu;German (Luxembourg)'
- 1407 = 'de-li;German (Liechtenstein)'
- 0408 = 'el;Greek'
- 040D = 'he;Hebrew'
- 0439 = 'hi;Hindi'
- 040E = 'hu;Hungarian'
- 040F = 'is;Icelandic'
- 0421 = 'in;Indonesian'
Language Codes
- 0410 = 'it;Italian (Italy)'
- 0810 = 'it-ch;Italian (Switzerland)'
- 0411 = 'ja;Japanese'
- 0412 = 'ko;Korean'
- 0426 = 'lv;Latvian'
- 0427 = 'lt;Lithuanian'
- 042F = 'mk;FYRO Macedonian'
- 043E = 'ms;Malay (Malaysia)'
- 043A = 'mt;Maltese'
- 0414 = 'no;Norwegian (Bokmal)'
- 0814 = 'no;Norwegian (Nynorsk)'
- 0415 = 'pl;Polish'
- 0416 = 'pt-br;Portuguese (Brazil)'
- 0816 = 'pt;Portuguese (Portugal)'
- 0417 = 'rm;Rhaeto-Romanic'
- 0418 = 'ro;Romanian'
- 0818 = 'ro-mo;Romanian (Moldova)'
- 0419 = 'ru;Russian'
- 0819 = 'ru-mo;Russian (Moldova)'
- 0C1A = 'sr;Serbian (Cyrillic)'
- 081A = 'sr;Serbian (Latin)'
- 041B = 'sk;Slovak'
- 0424 = 'sl;Slovenian'
- 042E = 'sb;Sorbian'
- 040A = 'es;Spanish (Traditional Sort)'
- 080A = 'es-mx;Spanish (Mexico)'
- 0C0A = 'es;Spanish (International Sort)'
- 100A = 'es-gt;Spanish (Guatemala)'
- 140A = 'es-cr;Spanish (Costa Rica)'
- 180A = 'es-pa;Spanish (Panama)'
- 1C0A = 'es-do;Spanish (Dominican Republic)'
- 200A = 'es-ve;Spanish (Venezuela)'
- 240A = 'es-co;Spanish (Colombia)'
- 280A = 'es-pe;Spanish (Peru)'
- 2C0A = 'es-ar;Spanish (Argentina)'
- 300A = 'es-ec;Spanish (Ecuador)'
- 340A = 'es-cl;Spanish (Chile)'
- 380A = 'es-uy;Spanish (Uruguay)'
- 3C0A = 'es-py;Spanish (Paraguay)'
- 400A = 'es-bo;Spanish (Bolivia)'
- 440A = 'es-sv;Spanish (El Salvador)'
- 480A = 'es-hn;Spanish (Honduras)'
- 4C0A = 'es-ni;Spanish (Nicaragua)'
- 500A = 'es-pr;Spanish (Puerto Rico)'
- 0430 = 'sx;Sutu'
- 041D = 'sv;Swedish'
- 081D = 'sv-fi;Swedish (Finland)'
- 041E = 'th;Thai'
- 0431 = 'ts;Tsonga'
- 0432 = 'tn;Tswana'
- 041F = 'tr;Turkish'
- 0422 = 'uk;Ukrainian'
- 0420 = 'your;Urdu'
- 042A = 'vi;Vietnamese'
- 0434 = 'xh;Xhosa'
- 043D = 'ji;Yiddish'
- 0435 = 'zu;Zulu'
-
 Repeat the process for the "InstallLanguage" key. This can usually be found at the bottom of the list of keys. Use the same code that you used for the "(Default)" key.
 -
 Close the Registry Editor and restart your computer. You must restart before you proceed, or the Service Pack 3 installation will not work.
 -
 Run the Service Pack 3 installer after restarting. Once you have rebooted your computer, run the Service Pack 3 installation. It doesn't matter if you already have Service Pack 3 installed, as the installer will just overwrite the system files with the new ones in the correct language. Follow the prompts to install the Service Pack.
 -
 Reboot your computer again after installing Service Pack 3. After the installation is complete, you'll need to reboot your computer for the changes to take effect. Once the computer has rebooted, you should be able to see the changes to your display language.
- You may notice that some elements are still in the original language. This is a limitation of the workaround. The only way to completely display a different language is to reinstall Windows XP and select the correct language during installation.
-
 Download a Language Pack after changing your base language (optional). If you performed the above steps to change your base language in order to install a Language Pack, you can download and install it now. See Step 1 of this section for details.
Part 2 of 2:
Input Language
-
 Open the Control Panel. You can find this in the Start Menu. For older versions of Windows XP, select "Settings" to see the Control Panel option.
 -
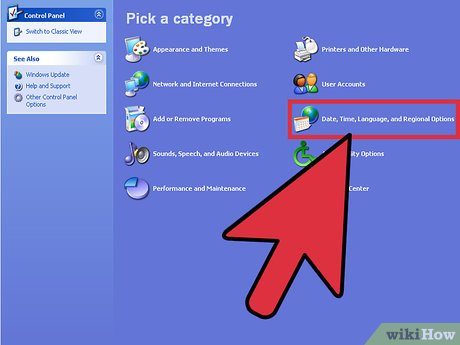 Select "Date, Time, Language, and Regional Options". If you are using Classic View, select "Regional and Language Options".
 -
 Click the "Languages" tab. This will allow you to change the options for your input language.
- If you are switching inputs to an East Asian language or a complex script language, check the appropriate boxes and click "Apply" to download the required extra files.
-
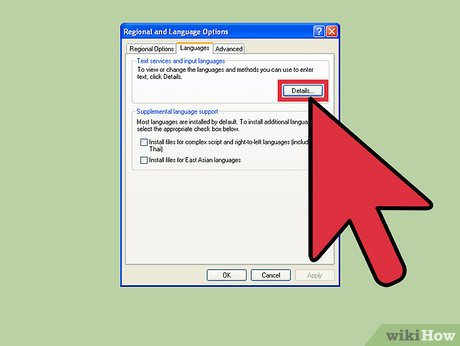 Click the "Details" button. This will open the Text Services and Languages Input menu.
 -
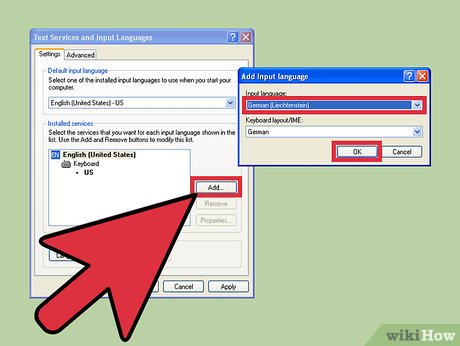 Click the "Add" button. Select your desired input and language and keyboard layout from the drop-down menus. Click "OK" when you're satisfied.
 -
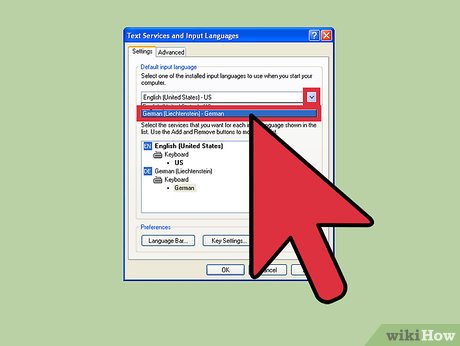 Select your new default language from the drop-down menu. Your newly-added language will appear as an option in the "Default input language" drop-down menu. Select it if you want to change your input language now. Click "Apply" to save your changes.
 -
 Use the Language Bar to switch between installed input languages. The Language Bar will appear automatically when you have more than one input language installed. You can find it in your taskbar, next to the system tray. Click the active language to see a list of all your installed input languages.[2]
- You can also press Left-Alt+⇧ Shift to cycle between your installed languages.
Was this article helpful?
Your feedback helps us improve.
Related Articles
 How to Change the Language on Your Computer4 minutes read
 How to convert Windows 8 / 8.1 keyboard language3 minutes read
 How to change language on Windows 10 computer7 minutes read
 How to change the language system in Windows 109 minutes read
 How to Change Language in Windows 78 minutes read
 How to change Facebook language on computer2 minutes read
Reader Comments 0
Sign in with email or Google to join the discussion.