Create surreal fire fire effect in Photoshop
In this tutorial, TipsMake.com will explore the great Flame Filter in Adobe Photoshop. This filter creates a fire effect around any custom shape.
In this tutorial, TipsMake.com will explore the great Flame Filter in Adobe Photoshop. This filter creates a fire effect around any custom shape. The article will also add some real sparks with a manual tip brush in Photoshop. Find out how to do it right away!
Step 1: Select the appropriate wallpaper
Open a suitable wallpaper where you want to create a fire-burning text effect. This example used an old metal structure of 800 × 600 pixels, but any suitable dark background texture could apply the same approach.

Step 2: Create a low key effect
Add some adjustments to the nuances and colors to create a low key effect on the selected background (low key is the effect that uses the main black tones to highlight the main object). Select the Elliptical Marquee tool (M) and draw a large oval in the center of the background.
Step 3: Reverse the selection
Use the key combination Cmd / Ctrl + Shift + I to reverse the selection in the document:

Step 4: Darken the background
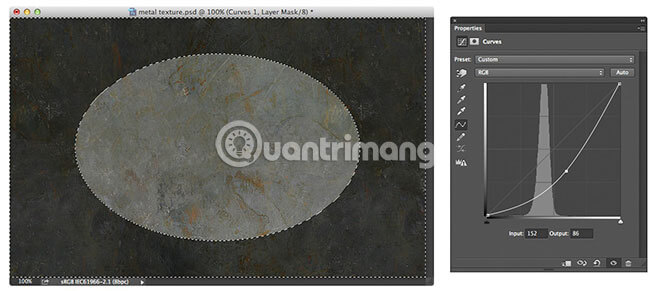
Go to the Layer menu , select New Adjustment Layer , and then click the Curves command . Click to add a custom midtone point on the Curve line and drag down to darken the image:
Step 5: Soften the edges
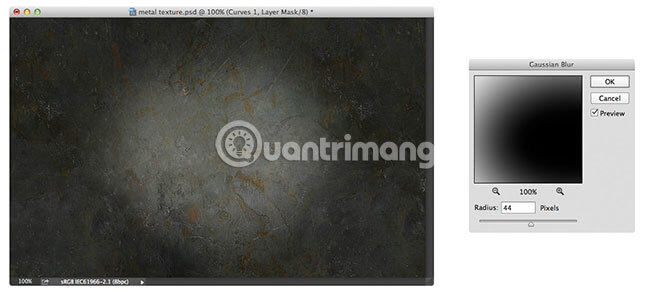
To soften the edges of the texture, add a blur effect to the Adjustment Layer Mask . Go to menu Filter> Blur> Gaussian Blur . Increase the Radius value to the extent necessary to make the edge of the ellipse soft.
Step 6: Adjust the values
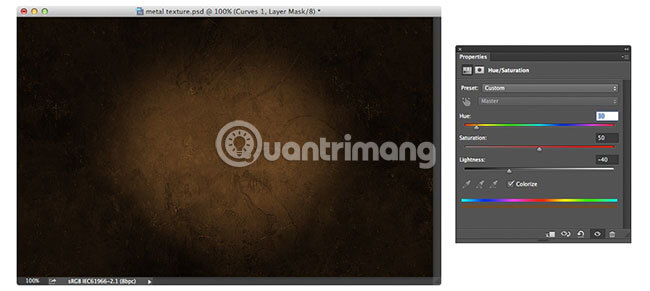
Go to menu Layer> New Adjustment Layer> Hue and Saturation . Check the Colorize box and apply the following values: Hue (30), Saturation (50), Lightness (-40).
Step 7: Enter the text
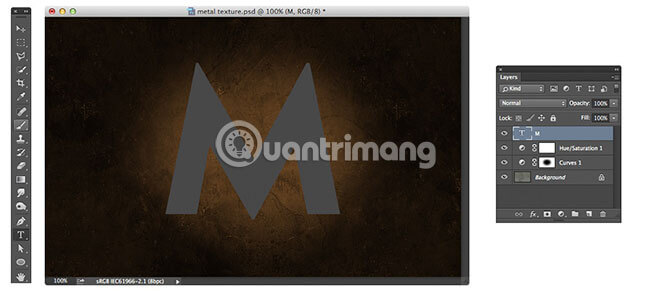
Select the Text tool (T) and click on the canvas to create a Type layer . Use the Options bar to set the font size and color, then enter the desired text content.
This example used the following values for the text:
- Font: MetroBlack LT Two Regular
- Size: 400px
- Color: 474747
When done, use the shortcut Cmd / Ctrl + Enter to apply changes to the Type layer .
Step 8: Duplicate the Background layer
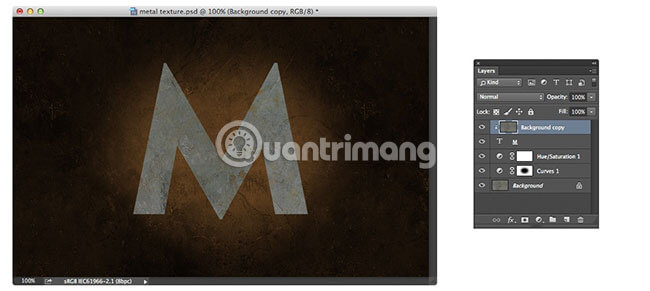
In the Window> Layer Panel menu, select the Background layer containing the original metal texture image. Use the shortcut Cmd / Ctrl + J to duplicate the layer and drag it above the Text layer in the control panel.
Step 9: Hide the copied image
Select the copied Texture layer. Use the shortcut Cmd / Ctrl + Alt + G to hide the copied image into the Text layer below.
Step 10: Add midtone to Curve line
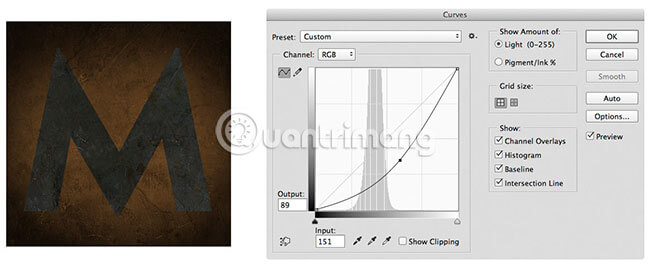
With the Texture layer selected, go to Image> Adjustments> Curves menu. Add a midtone point to the Curve line and scroll down to darken the texture on the layer.
Step 11: Apply Layer Style
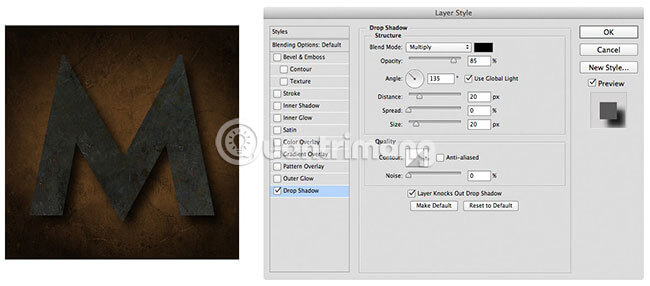
Next, we will adjust the Layer Style to separate the Text layer from the background. In the Layers panel , click on the 'FX' menu and apply the following Layer Style :
- Drop Shadow
- Blend Mode: Multiply
- Opacity: 85%
- Distance: 20px
- Spread: 0px
- Size: 20px
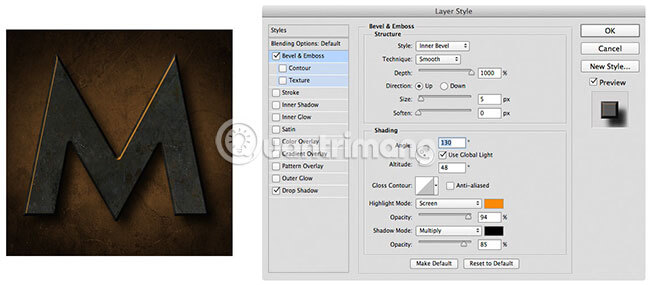
- Bevel and Emboss
- Depth: 1000%
- Size: 5px
- Angle: 130
- Altitude: 48
- Highlight Color: fa8b09
- Highlight Opacity: 95%
- Shadow Color: 000000
- Shadow Opacity: 85%
Step 12: Create fire effects around the text
Now, we will create some digital flames around the text, using the new Photoshop CC Flame Filter and some custom paths to show the location and direction of the fire.
Use the shortcut Cmd / Ctrl + Shift + N to create a new layer called 'Flames'. Select the Pen tool (P) and draw the upward path on one side of the text, where you want the fire to appear:
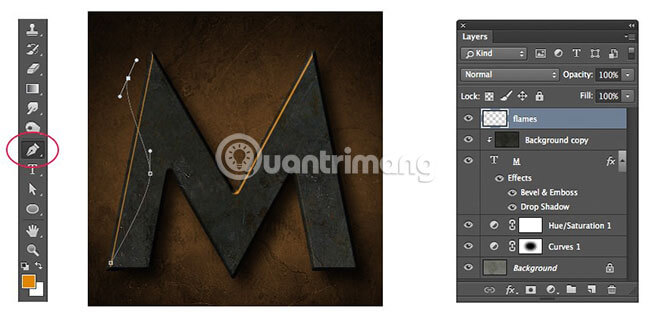
Step 13: Create path
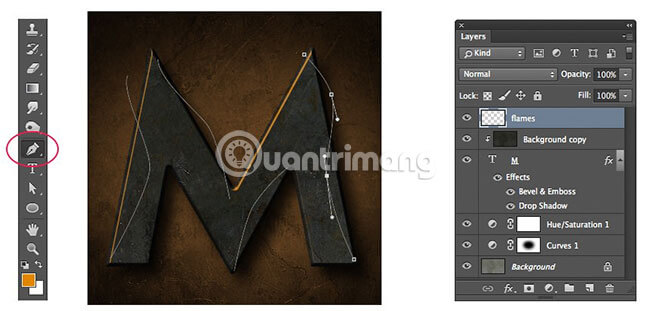
After dragging to the end of the flame point, hold down the Cmd / Ctrl key and click anywhere on the document (away from the points on the Path). To create other flames, do the same as above, but remember to press Cmd / Ctrl and click at the end of each path so that the flames show individually:
Step 14: Adjust the Flame Filter
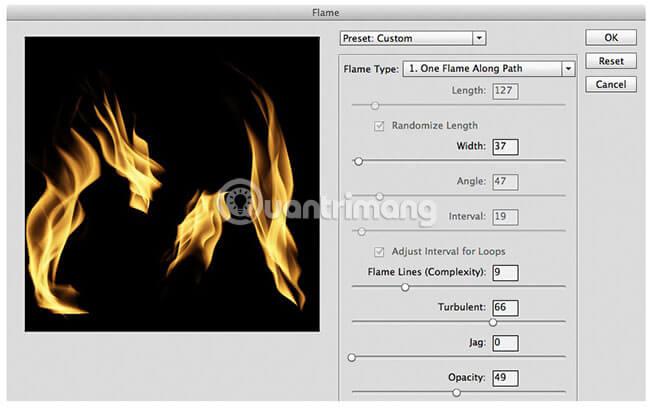
Go to Filter> Render> Flame Filter . In the dialog box, set the following key values:
- Flame Type: One Flame along Path
- Width: 37 px
- Flame Lines: 9
- Turbulent: 66
- Jag: 0
- Opacity: 49
Step 15: Adjust the values of the Filter effect
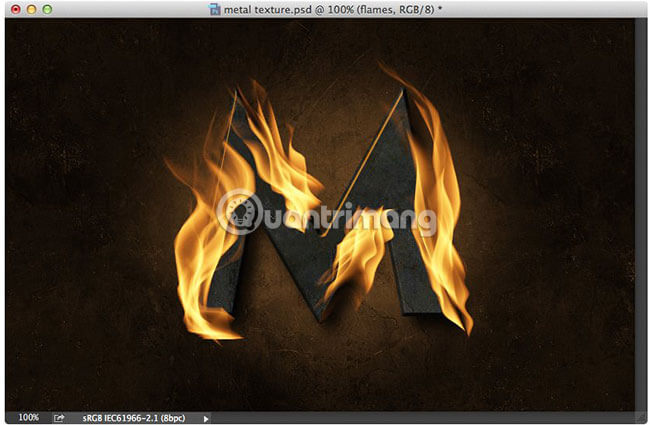
The Filter dialog box provides a lot of fire effects, so try adjusting the settings above to create the fire you want. After adjusting the values, click OK to apply the Filter effect :
Step 16: Add shadow effect
Next, we will add some shadow effects to create glow around the fire.
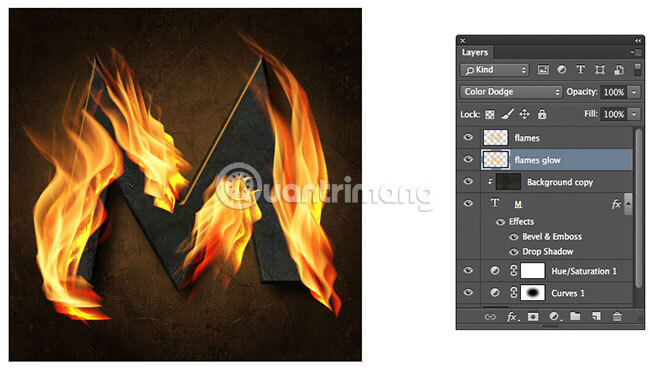
In Window> Layers Panel , select the Flames layer and use the shortcut Cmd / Ctrl + J to duplicate this layer.
Step 17: Rename the copied layer
Rename the newly copied layer to 'Flame Glow' and move it below the Flames layer in the control panel.
Step 18: Change the Blending Mode to Color Dodge
Change the Blending Mode in the Layers panel to Color Dodge. Use the Move tool to move the copy image to the right and down a bit.
Step 19: Soften the edges of the fire
Go to Filter> Blur> Gaussian Blur . Adjust Blur Radius to soften the edges of the fire effect. The example in this article uses value 8.0.

Step 20: Adjust the effect of Color Dodge
To reduce the effect of the Color Dodge effect against the background, go to Image> Adjustments> Hue and Saturation menu.
Step 21: Adjust the Saturation slider
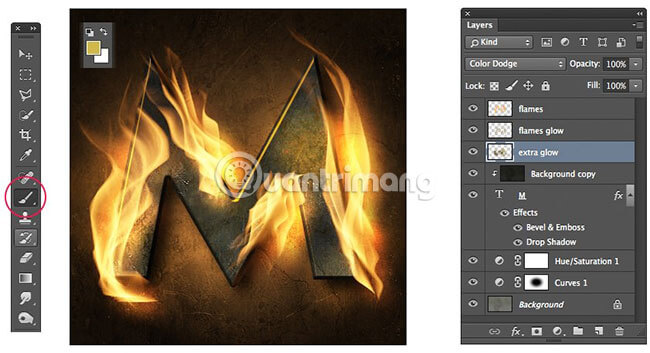
Drag the Saturation slider to reduce the intensity of the color in the fire.
Step 22: Create a 'Extra Glow' layer
Use the shortcut Cmd / Ctrl + Shift + N to create a new layer. Name it 'Extra Glow'. In the Layers panel , move it below the 'Flames Glow' layer.
Step 23:
Change the Blending Mode to Color Dodge.
Step 24:
Select the Brush Tool (B). In the toolbox, click the Foreground Swatch and change the Color to CAAF50.
Step 25: Adjust Color Dodge
Use a large soft brush to scan some glowing parts around the edge of the flame and on the text.
Color Dodge mode works really well in creating brilliant glowing effects, but is also extremely sensitive to minor changes in paint colors. If the glowing effect is too strong or changes in unwanted color, try reducing the Hue Lightness and / or Color values for the paint color in the toolbox, until you get the desired results.

Step 26: Create some sparks
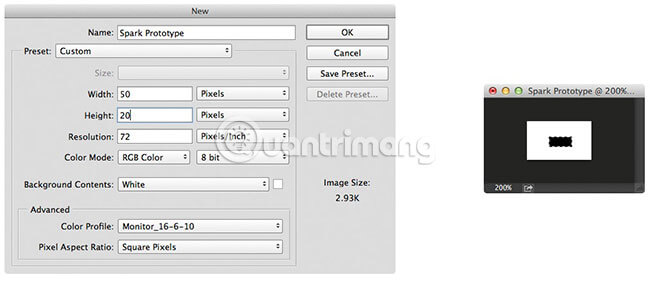
To finish, we'll add some sparks to the original part of the created fire, using a custom brush. Use the shortcut Cmd / Ctrl + N to create a new document. In the dialog box, set the following properties and then click OK:
- Name: Spark Prototype
- Width: 50 px
- Height: 20 px
- Color Mode RGB
- Background Contents: White
Step 27:
Select the Ripse Marquee tool (M) and draw a small horizontal rectangle in the document.
Step 28: Delete the selection
Use the shortcut Cmd / Ctrl + I to reverse this area to black. Use the shortcut Cmd / Ctrl + D to delete the selection.
Step 29: Add motion to the spark
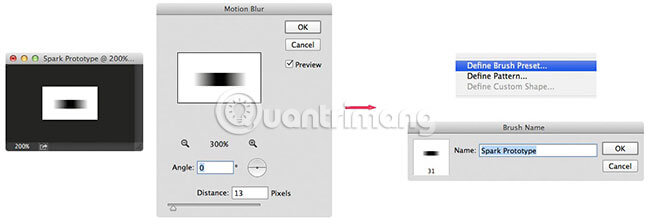
To add some motion to the spark prototype, go to Filter> Blur> Motion Blur Filter . Set the distance to 13px, Angle to 0 and click OK. To save a custom brush from the spark image, go to the menu Edit> Define Brush Preset .
Step 30: Make the brush tip more realistic
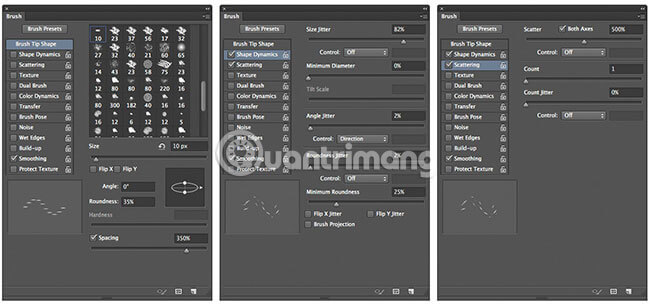
Now go back to the text that added the fire effect. Select the Brush tool (B) , display the spark prototype in the active brush tip format. Please adjust some drawing properties for this custom tip to make it look real.
Go to Window> Brush Panel menu and apply the following values for Brush Properties:
- Brush Tip Shape
- Size: 10 Px
- Roundness: 35%
- Spacing: 350%
- Shape Dynamics
- Size Jitter: 100%
- Angle Jitter 3%
- Angle Jitter Control: Direction
- Scattering
- Scatter: 300%
- Both Axes: Ticked
Step 31: Create a 'Colored Sparks' layer
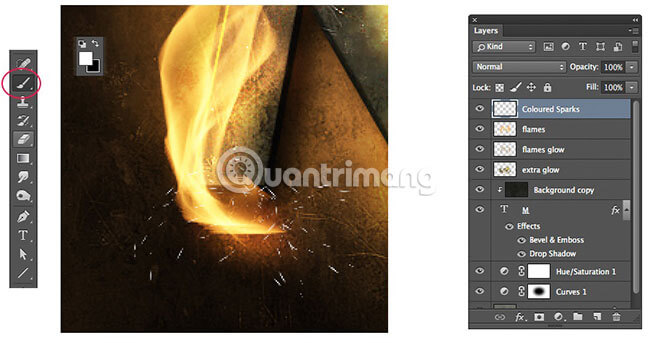
Use the shortcut Cmd / Ctrl + Shift + N to create a new layer called 'Colored Sparks'.
Step 32: Draw sparks
Set Foreground Color to White in Toolbox. In the document window, start drawing some sparks around the original part of the fire. Start drawing lines from the root and draw in the direction you want them to move, in a straight or curved way. When setting Angle Jitter Control to 'Direction', sparks will always be aligned with the direction of the mouse.
Step 33: Change the color for the spark
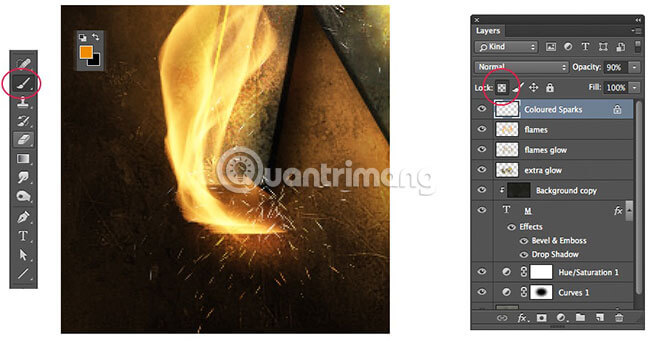
To complete, add some color changes to the sparks. On the keyboard, press the '/' key to prevent changes from applying to transparent areas of the Sparks layer . Select a soft brush preset, set the brush size to 50px.
Step 34: Create multiple shades of spark
In the toolbox, set the Foreground color to EB7E13. Start drawing around the edges of the spark with the Brush tool to add more shades to the spark.
You can continue to add different orange and gold shades to the spark to create a more diverse palette.
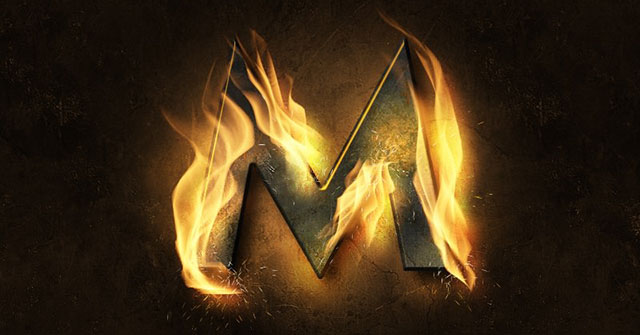
This is the final result:
Hope you are succesful.
Discover more
photoshop photoshop effects photo editing in photoshopShare by
Lesley MontoyaYou should read it
- Tutorial for creating 3D photo effects in Photoshop (Part 1)
- How to create a 7-color text effect in Photoshop
- How to create spray paint effect in Photoshop
- How to create translucent, translucent text effects in Photoshop
- Tutorial for creating 3D photo effects in Photoshop (Part 2)
- The Quiet Details That Make a Sports Betting Platform Feel Reliable
- Instructions on creating toy set images with ChatGPT AI
- How are AI agents changing the journalism industry?
- How to create an Adobe account
- How to create texture in Photoshop CC
- How to create custom gradients using Photoshop CC