How to create texture in Photoshop CC
Adobe Photoshop CC has many tools that can help design a better image. One of them is the Filter Gallery, where you can create textures for your work.
Adobe Photoshop CC has many tools that can help design a better image. One of them is the Filter Gallery, where you can create textures for your work.
In this article, TipsMake.com will show you how to create texture in Photoshop CC. And then explain how to apply that texture to another image.
Step 1: Set up the document
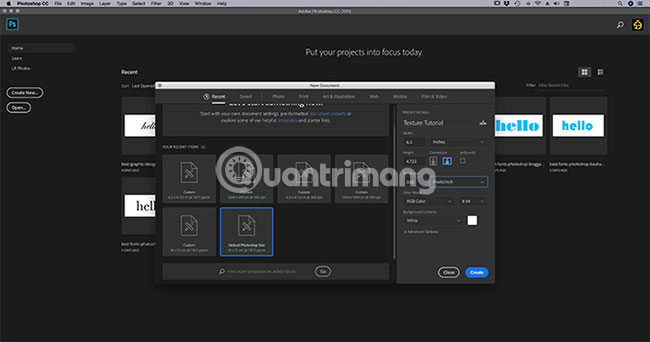
As always, the first thing you need to do is set up your file. There is no required size for this tutorial, but you can choose Default Photoshop Size, 300 pixels / inch .
Make sure you have selected RGB Color in the Color Mode section , because some filters do not work when in CMYK mode (Cyan, Magenta, Yellow, Key).
Step 2: Add basic colors

Next, you'll want to add a basic color to your image to give Filter Gallery the 'material' to work. If you don't pick a color and apply a texture, nothing will happen.
When creating a texture, the example adds a black and white gradient. Working in black and white means you don't have to worry about how color will change when you apply that texture to another image.
For example, if you create a texture that is yellow, but apply a yellow texture for the image to be blue, it will make the image look green.
To apply a gradient, go to the left toolbar and click on the Gradient tool . Click and drag the cursor on the page, then release.
If you want a deeper explanation of this step, you can read the detailed instructions from TipsMake.com on how to create a custom gradient in Photoshop.
Step 3: Open Filter Gallery

After applying the gradient, go to Filter> Filter Gallery . This is where you will create the texture.
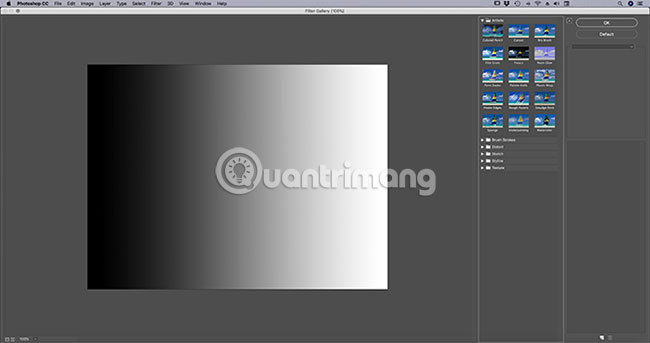
Once in the Filter Gallery, you will see the workspace like the image above.
At the center, you will see the image in action. On the right side, you will see a series of folders.
If you expand these folders, you will see a lot of rectangular icons with names below. These are the 'filters' you will use.
Photoshop groups filters based on the type of effect they create. You can explore each group by clicking on the small white arrow next to the folder.
Step 4: Apply filter

For this tutorial, we will create one of the most popular textures: Halftone Pattern.
You often see halftone technology most often used in comics and this name comes from a printing technique, using a row of continuous dots.
To find Halftone Pattern, go to Sketch> Halftone Pattern in Filter Gallery. This will automatically apply the Halftone Pattern texture to your image, but if not satisfied with the result. Fix that by going to the next section.
Step 5: Adjust the filter

If you want this halftone texture to be clearer, go to the Size bar on the right side of the Filter Gallery.
By sliding the arrow along the Size bar , you can make the dots in the halftone texture look larger.
Much better than what we had before, but the dots still look a bit fuzzy. The cause of this phenomenon is because the contrast between black and white is too low.

To highlight the contrast, go to the right side of Filter Gallery and click the Contrast bar . Drag the arrow to the right. This increases the contrast between black and white in the image.
After you're done, you're done creating the most basic texture. But what if you want to tweak one more?
The operation to create a unique texture will vary depending on the presets. But if you want to create a unique halftone texture, look at the Pattern Type section .
Step 6: Change Pattern Type
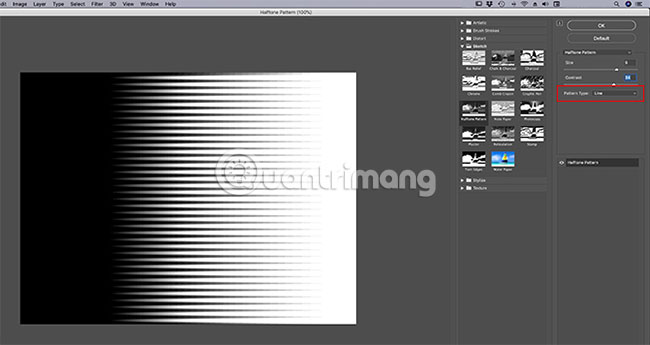
To change the Pattern Type on a halftone texture, go to the Pattern Type drop-down menu . Instead of using Dot, select Line. This option gives you a striped texture.
If you've finished creating the texture, click OK. This will take you out of the Filter Gallery and return to the main workspace. Now you have a texture that can be applied to other images.
To save the newly created texture, go to File> Save As .
Step 7: Apply texture to a new image
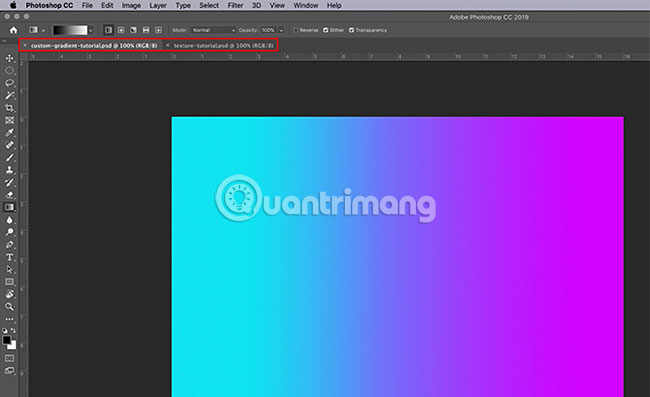
Here's how to apply the texture just created to another file.
To do this, make sure you open both files in Photoshop (saved texture file and image will apply texture).
The bold white text in the illustration below shows which file is currently active. The gray text on the other tab indicates the file is open, but does not work.

Next, make sure the texture file is active.
Select the Move tool , located in the top left corner of the toolbar.
Click and hold the mouse to drag the texture to the image tab:
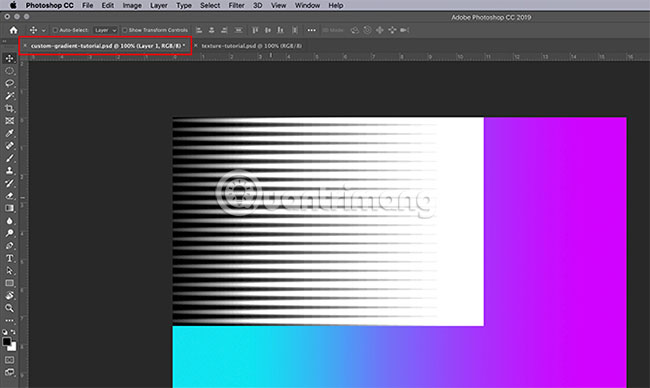
When you do that, Photoshop will automatically drag and drop the texture into the image. The texture will be placed on top of the image, in a new layer.
Now the texture has been added to the image. Go to the Layers panel in the lower right corner of the workspace. Go to the drop-down Blending Mode menu and choose a style to apply to this texture.
Each type of blending mode will create a different effect, depending on how the two layers interact with each other.
This tutorial uses Soft Light, allowing a variety of dark and light tones to appear.

This is just a way to apply texture to an image. But what if you don't want to apply your texture to a separate image? What if you want to create a texture and add color directly on it?
You can also add colors directly to your texture!
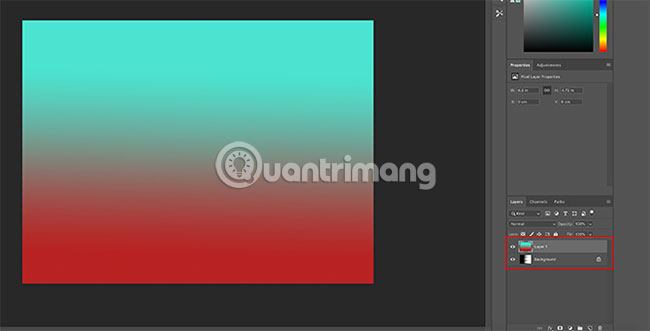
First, make sure the texture file is active. In the Layers panel , add a new layer above the texture layer.
After creating a new layer, add some color to it. You can add a gradient or a monochrome color by using the Gradient tool or Paint Bucket, depending on the preference.
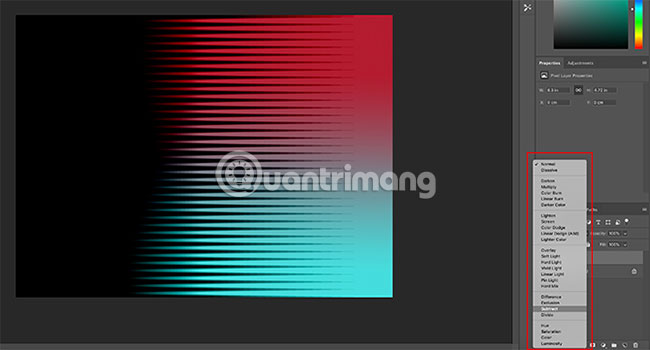
Next, go to the drop-down Blending Mode menu . Again, select the type you want to apply to the layer.
Instructions will select Subtract, because this type allows black to show through.
Everything is complete! Navigate to File> Save As to save the texture.
Photoshop is a great tool that allows you to try all kinds of visual tricks. And once you discover the Filter Gallery, you will be able to create your own texture and more.
And if you're curious about other things you can design with Photoshop, read the TipsMake.com tutorial on how to create custom brushes in Photoshop.
Hope you are succesful.
You've just finished reading the article "How to create texture in Photoshop CC" edited by the TipsMake team. You can save how-to-create-texture-in-photoshop-cc.pdf to your computer here to read later or print it out. We hope this article has provided you with many useful tech tips and tricks. You can search for similar articles on tips and guides. Thank you for reading and for following us regularly.