Table of Contents
Understanding Click requires more than a headline. The overview below breaks down the key facts, changes, and user impact.
Click Overview
 Conquer Word 2007 (period I)
 Conquer Word 2007 (phase II)
 Conquer Word 2007 (3rd installment)
Write an equation With Word 2007, to write an equation, you can insert symbols in the Symbol dialog box; use the Math AutoCorrect feature to convert text into symbols; or use the following way: - In Insert tab, Symbols group, click on the arrow below Equation button, then select Insert New Equation.

- Design tab appears on the toolbar, and you can click on the buttons in Symbols group to insert mathematical symbols, or click on the buttons in the Structures group to insert a math structure available, then edit again. Note: To display the full list of mathematical symbols in Symbols group, click the More button in the lower right corner of the group.

Use the icons in Math AutoCorrect - Click Microsoft Office Button, then press Word Options. - In the left pane, click Proofing, then click the AutoCorrect Options button. - In the AutoCorrect dialog box, click the Math AutoCorrect tab, and then check the 2 Use Math entries AutoCorrect rules outside of math regions and the Replace text item as you type. Remember the characters in the Replace item (the character you entered) and the With (the mathematical character will replace).
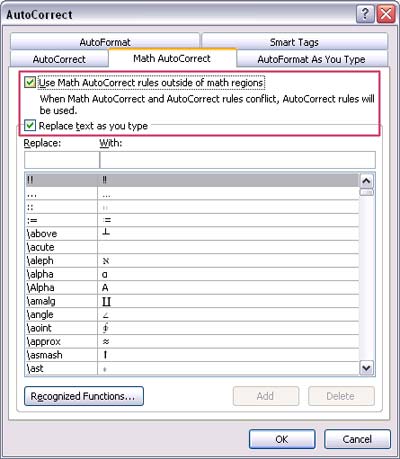
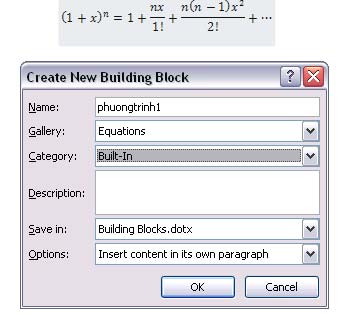
- Click OK twice to close the dialog boxes. - Now try typing the characters (Replace item) and press the space key, it will transform into the corresponding mathematical character. For example, approx, clicking a space will turn into a sign. Insert a common equation In the Insert tab, the Symbols group, click the arrow below the Equation button. A menu appears with a list of common equations. If you want to use it, just click on it to insert it into the document and edit it to your liking. Add an equation to the list of common equations - Choose an equation you want to add. - Under Equation Tools, in the Design tab, Tools group, click the Equation button, then select Save Selection to Equation Gallery. - In the Create New Building Block dialog box, enter the name of the equation in Name. - At the Gallery list, select Equations. Click OK.
Change the equation to be edited in Word 2007
You simply click on the equation you want to edit and change as you like.
Change the equation to be edited in Word earlier version
To change an equation that was edited in the old version, use Equation 3.0 add-in or Math Type add-in, you need to use the add-in that wrote this equation.
Also, when you open a document that contains an equation written in an older version of Word, you cannot use the written program and change the provided equation unless you convert the document to Word format. 2007.
* Convert documents to Word 2007 format
- Click Microsoft Office Button, then click Convert.
- Click OK in the confirmation dialog.
- Click Microsoft Office Button, then click Save.
* Change the equation to be edited using Equation 3.0
- Double click on the equation you want to edit.
- Change the equation as you like.
* Change the equation written with Math Type
- Make sure the Math Type is installed on the machine.
- Double click on the equation you want to edit.
- In Math Type, edit the equation as you like.
- On the File menu, click Close and Return to . to return to the Word editor window.
TEST AND LANGUAGE TESTING
Automatically check for spelling and grammar errors (ripples red, blue, green)
When you enable automatic spell checking during typing, you can rest assured that there are not many spelling errors in the document. Word 2007 will mark the error words to help us detect errors quickly.
For example : You can right-click on the wrong word to see the recommended fixes.
Similarly, if you enable automatic grammar checking, Word will mark grammatical errors in the document while you are editing.
For example : You can right-click and select the recommended error correction types. You can also choose Ignore Once to ignore this error, or select About This Sentence to see why Word considers the error.
Turn on or turn off automatic spelling and grammar checking
- Click on Microsoft Office Button, select Word Options.
- In the dialog that appears, select Proofing in the left pane.
 - To enable / disable automatic error checking in the current (open) document, do the following:
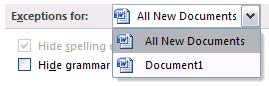
- In the Exceptions for section, select the name of the current document.
- Select or uncheck Hide spelling errors in this document only and Hide grammar errors in this document only.
- To enable / disable automatic error checking in all documents from now on, you do the following:
- In the Exceptions for section, select All New Documents.
- Select or uncheck Hide spelling errors in this document only and Hide grammar errors in this document only.
Check all spelling and grammar errors after editing the text - Select the text you want to check for errors (or not select if you want to check the entire text). - Press F7 key (or select Review tab, press Spelling & Grammar button in Proofing group). - If the program detects a spelling error, the Spelling and Grammar dialog box appears, highlight the wrong Word.
- At Suggestions frame, you can choose the suggestions for error correction that the program offers and click the Change button to edit according to that suggestion.
- If you want to fix it yourself, click on the document, where the Word being detected is an error and correct it. Edit and click the Resume button to check other words.
- In case the Word Word detects is an error but the Word you think is correct and you want Word to recognize that the Word is spelled correctly the next time you "catch the error", add it to the dictionary by Click the Add to Dictionary button.
- If you want to "ignore" from the wrong and move on to check other words, press the Ignore Once button or Ignore All.
- In case you frequently make mistakes in this Word and you want Word to automatically correct the correct Word while you type text, select the correct Word in the Suggestions box and click the AutoCorrect button.
- Also, if you want to check grammar at all times, check Check grammar in Spelling and Grammar dialog box. After the spell check, the program will switch to your grammar test. The way to fix errors is similar to the above.
Find words in the dictionary
Using the Research feature, you can find words in the dictionary. Doing:
- In the Review tab, the Proofing group, click the Research button.
- To find a single word in the document, hold down the Alt key and click on the word to search.
- To look up a phrase, use the mouse to select the words, hold down the Alt key and left click on the selection.
- In the Research pane on the right of the screen, the Search for section, you will see the word to be displayed here. Below is the interpretation of it.
- You can also type the word you want to search directly into the Search for box and click OK.
Look up synonyms and antonyms
 Using the Research feature, you can also look up synonyms and antonyms.
- In Review card, Proofing group, you click Thesaurus button.
- Hold down the Alt key and click on the word to look up. The result will be displayed in the Research pane on the right.
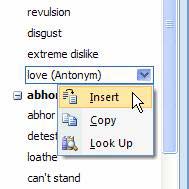
- To insert that synonym or antonym into the current document, where the cursor is, you hover your mouse over the word in the results list, click the arrow next to the word, select Insert.
- To find the synonym / antonym of the word in the list found, click on the word in the results list.
Note : You can find synonyms and antonyms in other languages (besides English) by clicking on the list box below the Search for input box and selecting a language, such as French (French ) such as.
Translate text
Unlike the word definition, in this section we will learn how to translate a long piece of text.
- In the Review tab, the Proofing group, press the Translate button.
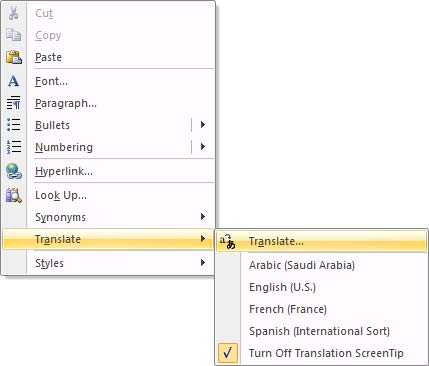
- Or you can also right-click on any location in the document, select Translate - Translate.
Using the Research feature, you can also look up synonyms and antonyms.
- In Review card, Proofing group, you click Thesaurus button.
- Hold down the Alt key and click on the word to look up. The result will be displayed in the Research pane on the right.
- To insert that synonym or antonym into the current document, where the cursor is, you hover your mouse over the word in the results list, click the arrow next to the word, select Insert.
- To find the synonym / antonym of the word in the list found, click on the word in the results list.
Note : You can find synonyms and antonyms in other languages (besides English) by clicking on the list box below the Search for input box and selecting a language, such as French (French ) such as.
Translate text
Unlike the word definition, in this section we will learn how to translate a long piece of text.
- In the Review tab, the Proofing group, press the Translate button.
- Or you can also right-click on any location in the document, select Translate - Translate.
- To select translation language, at Frame Translation on the right, select source language in From section, target language in To section. - To translate any Word in the document, hold down the Alt key and left click on the Word. Its meaning will be displayed in Translation frame on the right. - To translate a piece of text, use the mouse to select the text, hold Alt and left click on the selection. Its meaning will be displayed in Translation frame on the right.
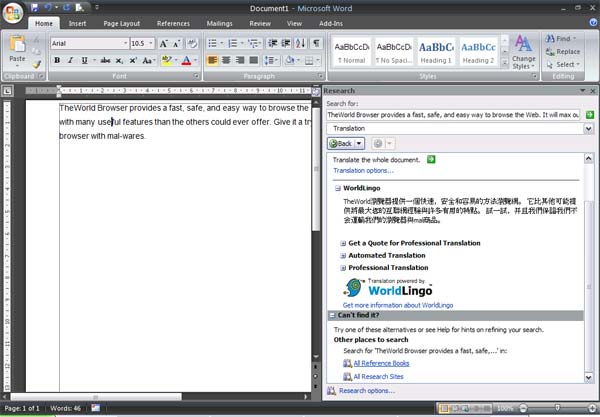
- To translate the entire document, in the Translation frame, click the Translate the whole document button. Then click Yes in the confirmation dialog. The translation will be displayed in a newly opened Web browser window. - In addition, you can also translate words or paragraphs by manually entering the Search for frame, then press the Start Searching button. Turn on the 'mouse over Word to display meaning in a Screentip' feature Just put your mouse on the Word, its meaning (translated into another language) will appear in a Screentip next to it, very convenient.
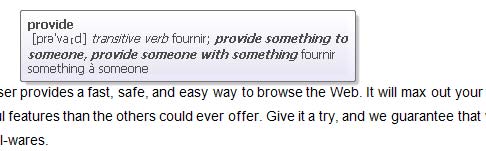
To enable this feature, do the following: - At the Review tab, the Proofing group, click on the arrow next to the Translation ScreenTip button.
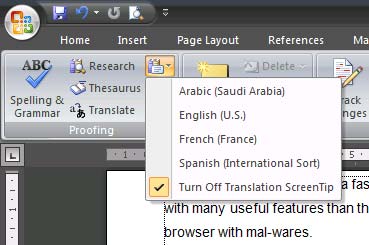
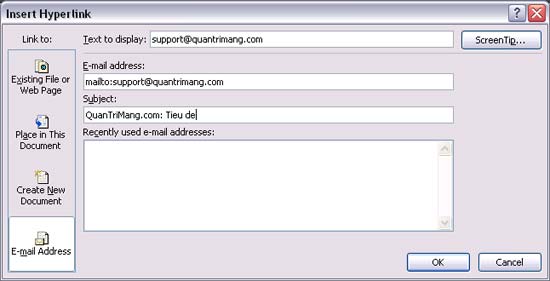
- Select a language to translate into the menu that appears. - To turn off this feature, select Turn Off Translation ScreenTip. Automatically create hyperlinks for Web addresses Word automatically creates a hyperlink when you type in a Web address (such as www. Microsoft. Com) and press Enter or space key. If you want to disable / enable this feature, click Microsoft Office Button, select Word Options. Click Proofing. Click the AutoCorrect Options button, click the AutoFormat As You Type tab. In the Internet and network paths with hyperlinks box, deselect or choose to disable / enable this feature. Create an arbitrary hyperlink to a document, file or Web page 1. Select the text or image you want to use to display as a hyperlink. 2. In the Insert tab, Links group, click the Hyperlink button. 3. The Insert Hyperlink dialog box appears. - To link to an existing file or Web site, click the Existing File or Web Page button under the Link to section, and then enter the address you want to link to in the Address box. If you don't know the address of a file, you can use the file / folder browse pane in this window to select the file you want to link. - To link to a file that you have never created, press the Create New Document button under Link to, then enter the name of the new file to be created in the Name of new document section. In the When to edit section you can choose to Edit the new document later (compose this document later) or Edit the new document now (compose now). To customize the ScreenTip (shown when you hover over the hyperlink), press the ScreenTip button and type in the note. If you do not specify this comment LINE, Word will use the path or address of the file linked to the ScreenTip. - Click OK when creating hyperlink. Create a hyperlink to an empty e-mail page Perform step 1 and step 2 above to display the Insert Hyperlink dialog box. 3. Under the Link to section, press the E-mail Address button. 4. In the E-mail address field, enter the e-mail address you want when you click on the hyperlink and send it to this address. 5. In the Subject section, enter the subject letter. Click OK.
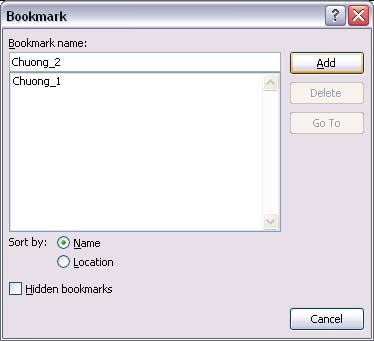
Create a hyperlink to any location in the current document or Web page To use this feature, you first need to mark the destination location you want to link to in the current document. * Insert a bookmark: 1. In the current document, select the text or object to which you want to assign a bookmark. 2. In the Insert tab, Links group, press the Bookmark button. 3. Bookmark window appears. At Bookmark name, type in a name to identify this bookmark (note, names cannot contain spaces). Click Add to add it.
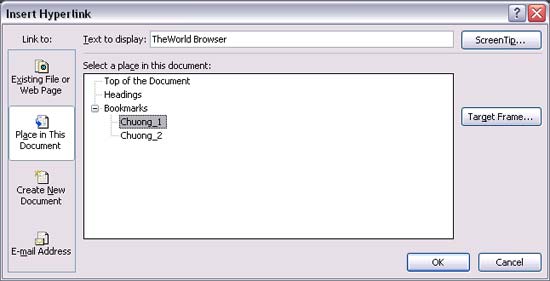
* Add links to bookmarks: 1. Select the text or object you want to display as a hyperlink. 2. Right-click and select Hyperlink in the context menu. 3. Under the Link to section, click the Place in This Document button. 4. In the list, select a bookmark to link to. Click OK.
Create a hyperlink to any location in the document or another Web page (not the current page) 1. First, create bookmarks in the destination file (the file you will link to) similar to the above. 2. Open the source document, select the text or the object you want to display is hyperlink. 3. Right-click and select Hyperlink in the context menu. 4. Under the Link to section, click the Existing File or Web Page button. 5. In the Look in box, browse to the destination file you want to link to. 6. Click the Bookmark button, then select the bookmarks you want to link to in the destination document. Click OK. Remove a hyperlink Right-click on the hyperlink you want to remove, select Remove Hyperlink in the context menu. Quickly apply a style (Quick Style) Apply a pattern 1. Select the text you want to apply the style to. 2. In the Home tab, Styles group, click on a style you like. If you don't see the format you want, click the More button to expand the Quick Styles framework.

For example, if you want the selected text to be applied to the title style, click the Title button in the list box. You can preview how the format is applied by hovering over each type you want to see, it will apply 'try' to the text you are selecting. Create a model 1. Select the text you want to create a new style. For example, you want to create a bold, red text format. 2. In the Home tab, the Font group, you in turn bold it (press B) and fill it with red (select the color from the Font Color button). 3. Right-click the selection, point to Styles, and click Save Selection as a New Quick Style. 4. Enter the name of the new style (such as Style 1) and click OK. Immediately new typefaces will fit in the Styles group in the Home tab, ready for you to use. Change pattern 1. Format the text to your liking. 2. In the Home tab, the Styles group, right-click the style you want to change, select Update to Match Selection. In the document, all text that has been applied in this way will be updated with the new format. Remove a pattern 1. In the Home tab, Styles group, right-click on the pattern you want to remove. 2. Select Remove from Quick Styles gallery. Set tab stops (Tab stops) For convenient tab settings, you should display the horizontal ruler on the top of the document by pressing the View Ruler button at the top of the vertical scroll bar. You can quickly select a tab by clicking on the tab selector box - the cell that intersects the vertical ruler and the horizontal ruler (in the upper left corner of the document page) until you select the desired tab type, then press Click the horizontal ruler where you want to place the tab. Depending on the specific situation, you can use one of the following tab types:
- Left tab: Set the start position of the text from which to run right when you input.
- Middle tab: Position the center of the text. The text will be between the tab placement when you type.
- Right tab: Located at the right end of the text. When you enter data, the text will move left from the tab position.
- Decimal tab: When setting this tab, decimal decimal separators will be on the same place.
- Bar Tab: This tab type does not position text. It will insert a vertical bar at the tab placement.
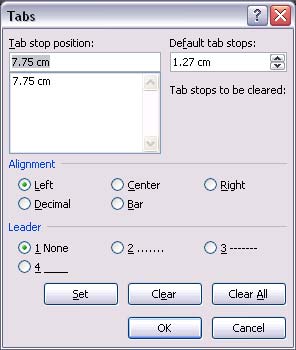
If you want to set tab stops at the right position and you can't determine exactly when you click on the horizontal ruler, or you want to insert special characters before the tab, you can use the Tabs dialog by double clicking. On any tab stops on the ruler. After installing the tab stops, you can press the Tab key to jump to each stop in the document.
 Conquer Word 2007 (V period)
 Conquer Word 2007 (last term)
Nguyen Hong Phuc
Frequently Asked Questions
What happened in Conquer Word 2007 (Term 4): Click?
Understanding Click requires more than a headline.
What factors influenced Click?
The overview below breaks down the key facts, changes, and user impact.
What was the practical impact on users?
Click Overview Conquer Word 2007 (period I) Conquer Word 2007 (phase II) Conquer Word 2007 (3rd installment) Write an equation With Word 2007, to write an equation, you can insert symbols in the Symbol dialog box; use the Math AutoCorrect feature to convert.
Was this article helpful?
Your feedback helps us improve.
Related Articles
 Conquer Word 2007 (Last Term): Click12 minutes read
 Conquer Word 2007. (Period III): Click19 minutes read
 Ea Remake Command && Conquer with 4k Graphics, New Multiplayer2 minutes read
 Conquer Word 2007 (V Period): Underline15 minutes read
 Conquer Word 2007 (Phase II): Page14 minutes read
 Say the Word on Beat: Fun Game: Explained7 minutes read
Reader Comments 0
Sign in with email or Google to join the discussion.