Whether you have used Microsoft Office 2003 or earlier versions, when you come into contact with this latest version of Microsoft Office 2007, you will still be 'embarrassed' as a beginner.
Whether you have used Microsoft Office 2003 or earlier versions, when you come into contact with this latest version of Microsoft Office 2007, you will still be embarrassed like a beginner.
Indeed, the Office 2007 suite is a 'makeover' of both form and content that will certainly take a lot of time to learn about it. However, once you have mastered this software suite, you will feel your office work becomes much softer than before because the layout of the program is streamlined, automatic support tools available. ready to help you, new features better meet your needs .
Get familiar with the new interface
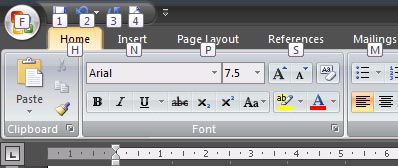
In Word 2007, you will no longer see command menus like the previous version, but instead the 'ribbon' system with 3 main components: card (Tab), group (Group) and Command buttons. The related buttons are grouped into a group, such as font selection buttons, font size, bold, italic, underline . are grouped into the Font group. Many groups that share the same task are grouped into one card.
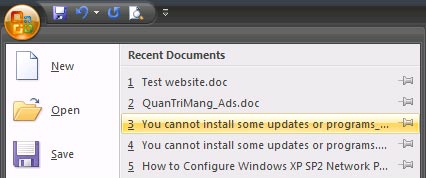
Notice, in the upper left hand corner there is a circle button, it is called Microsoft Office Button. Clicking this button will appear a command table similar to the File menu of the previous version of Word, including the commands: New, Open, Save, Print .
The Quick Access Toolbar is a toolbar located next to the Microsoft Office Button, providing quick access to commonly used command buttons. You can click on the arrow button at the end of the bar and add other user or command buttons to this toolbar by checking it.
Use keyboard shortcuts to open tags, command buttons
Images 1 of Conquer Word 2007
In addition to the click method, you can use keyboard shortcuts to quickly access tabs and buttons. Very simply, hold down the Alt key for 2 seconds, immediately appear the letters on the cards, you press the next letter on the card you want to open, the card will be activated. Now, on the command buttons, a series of letters will appear so you can activate it in the same way.
Create a new document
Similar to Word 2003, the shortcut to create a new document in Word 2007 is Ctrl + N. Alternatively: Click on Microsoft Office Button, select New, double-click the Blank item document.
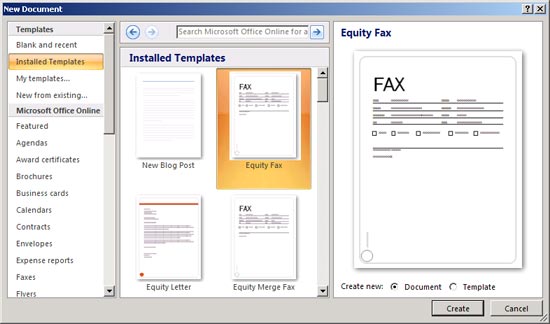
Create a new document from an existing template: Click Microsoft Office Button, select New. Click Installed Templates, then select a template installed on your computer or choose a template from Microsoft Office Online (requires an Internet connection to download). Click the Create button to create a new document from the selected template.
Images 2 of Conquer Word 2007
Open the document available on the device
Similar to Word 2003, the shortcut to open the available document is Ctrl + O. You can also go to Microsoft Office Button, select Open.
Images 3 of Conquer Word 2007
Save document
Shortcut to save the document is Ctrl + S (same as Word 2003). Alternatively: Click Microsoft Office Button, select Save.
If this document file has not been previously saved, you will be asked to name the file and choose a location to save.
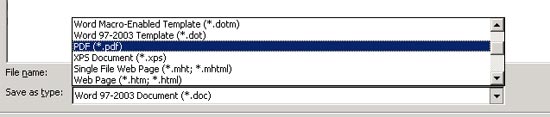
To save the document with a different name (or other format), click Microsoft Office Button, select Save As (shortcut F12, similar to Word 2003).
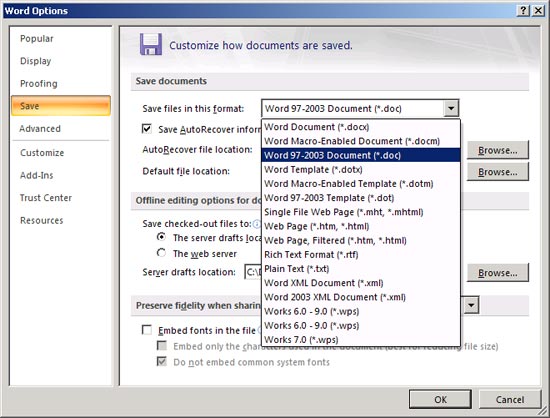
Default save documents as Word 2003 and earlier
By default, Word 2007 documents are saved as * .DOCX format, different from the * .DOC you are familiar with. With this format, you will not be able to open it in Word 2003 or earlier if you do not install an adapter. For compatibility when opened in Word 2003 without installing a program, Word 2007 allows you to save in Word 2003 format (in the Save as type list of the Save As dialog box, select Word 97-2003 Document).
Want Word 2007 to save with Word 2003 format by default, click Microsoft Office Button, select Word Options to open the Word Options dialog box. In the left pane, select Save. In Save files in this format, select Word 97-2003 Document (* .doc). Click OK.
Images 4 of Conquer Word 2007
In Word 2003 also has the default feature saved in a certain format (of course, there is no Word 2007 format). To access the corresponding feature in Word 2003, go to Tools> Options> Save tab> select the format in Save Word files as> OK.
Minimize the possibility of data loss when the program is closed unexpectedly
As a precaution in case of hanging up, disconnecting the power to lose data, you should turn on the automatic backup feature periodically. Also in the Word Options dialog box, select the Save item on the left, check Save AutoRecover information every, then enter the number of minutes saved automatically in the box next to it. Click OK.
Save the document in PDF / XPS format
A new feature in Word 2007 is the ability to save documents as * .PDF and * .XPS files. Perhaps you are quite familiar with the PDF format. XPS? Similar to PDF, XPS (XML Paper Specification) is an electronic file that has a fixed layout, ensuring that when the file is viewed on the network or printed, it retains exactly the format you need, the data in the file easy to change.
To save or export to PDF / XPS format, you first need to install Microsoft Save as PDF or XPS support for the 2007 Office system: go to http://r.office.microsoft.com/r/ rlidMSAddinPDFXPS or http://tinyurl.com/y32j78 and follow the instructions in it to install.
Once installed, you can save the document as PDF / XPS by clicking Microsoft Office Button, selecting Save As, selecting PDF or XPS.
Images 5 of Conquer Word 2007
Zoom in / out the document
Perhaps you're familiar with the Zoom box on Word 2003's Standard toolbar, which helps to zoom in or out of documents with many options. In Word 2007, where is this tool? Put your eyes down on the lower right corner of the window, in the status bar, see the Zoom slider. Just drag the slider to the right to zoom in or left to minimize the document.
Images 6 of Conquer Word 2007
Set special zoom / zoom mode
In the View tab, the Zoom group, press 100% to bring the document to its correct size. Also in the Zoom group, the One Page button allows you to display exactly 1 page on the screen, the Two Pages button displays exactly 2 pages, and Page Width is the Zoom mode, the page width fits the screen width. Pressing the Zoom button will give you more options.
View the document in Full Screen Reading mode
In Word 2003, you can view the document as a book viewer (2 pages opposite each other, and the screen width is maximized to be able to read and annotate documents easily). How to do it: go to the View - Reading Layout menu.
For Word 2007, this tool is located in the View tab, Group Documents Views, Full Screen Reading item. When in Full Screen Reading mode, press the arrow key in the lower corner of the page to move back and forth between pages. Press ESC to return to Print Layout mode. Also in the Document Views group, you can select many other display modes such as Web Layout, Outline, Draft.
Images 7 of Conquer Word 2007
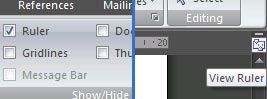
Ruler bar (Ruler)
Vertical and horizontal rulers are convenient for you to align, but in this version of Word 2007 does Microsoft seem to have removed it? Not so, like Word 2003 allows you to freely turn off the Ruler bar (View - Ruler menu), in the 2007 version, this function has been added to the View tab, Show / Hide group. You just need to check the Ruler to make it appear again.
Another way to make the ruler appear is to click the View Ruler button at the top of the vertical scroll bar.
Images 8 of Conquer Word 2007
If you do this, you only see that each horizontal ruler appears, not the vertical ruler, do the following to turn up the vertical ruler: Click Microsoft Office Button, click Word Options. In the dialog that appears, in the left pane select Advanced. Drag the slider in the right pane below the Display group, check the Show vertical ruler in Print Layout view checkbox. Click OK
Note : You must see the document in Print Layout mode to show the ruler bar.
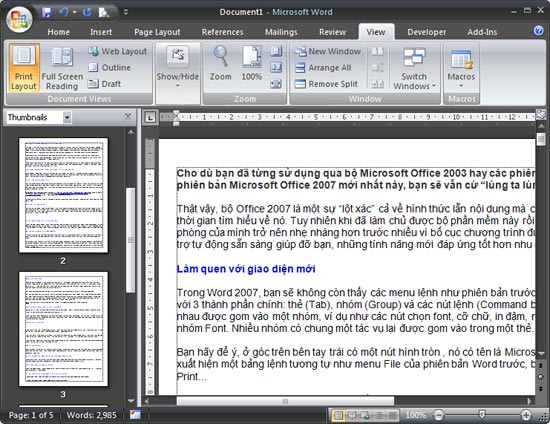
Browse documents in thumbnail mode (Thumbnails)
This mode is useful if you have too many pages in your document because it gives you an overview of the pages, and you can jump quickly to any page.
In the View tab, the Show / Hide group, you check the Thumbnails checkbox. Immediately on the left of the window appears a frame containing thumbnails of the pages in the document, along with the page number below. You click on a page to jump to that page.
Images 9 of Conquer Word 2007
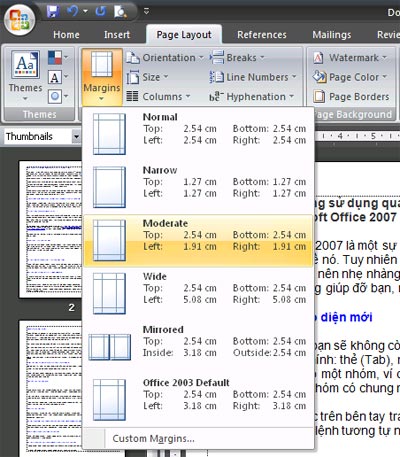
Change page margin setting
In Word 2003, to change page settings, go to File - Page Setup menu. What about Word 2007? The paper page settings are in the Page Layout tab, the Page Setup group.
- To change the page margins, press the Margins button, a drop-down menu lets you select the types of page margins you like (each margin type has a parameter next to it, for example, Normal, upper, lower, left, right are 1 inch from the edge of the paper .).
Images 10 of Conquer Word 2007
- If the page margins you want to set are not available in the list, click Custom Margins at the bottom of the menu, then enter the new parameters yourself.
Show page margins
Click Microsoft Office Button, click Word Options. In the dialog box that appears, in the left pane click Advanced, the right pane drags the slider to the Show document content group and ticks the Show text boundaries checkbox. Click OK.
Page margins appear in the document as dashed lines
In Word 2003, you can perform the corresponding function by going to Tools - Options> View tab> checking the Text boundaries in the Print and Web Layout options group> OK.
Select the paper orientation for the entire document
In the Page Layout tab, the Page Setup group, click the Orientation button and choose either Portrait (Landscape) or Landscape (horizontal page).
Set vertical and horizontal pages in the same document
- Use the mouse to select the text you want to change to portrait or landscape.
- In the Page Layout tab, the Page Setup group, click the Margins button.
- Click Custom Margins, select Portrait (Landscape) or Landscape (horizontal page) in Orientation.
- In Apply to, select Selected text. Click OK.
Change the paper size
If you want to change the paper size, in the Page Layout tab, the Page Setup group, click the Size button. The drop down menu lets you choose one of the available paper sizes: Letter, A4, A5, A6, Postcard .
To set a special paper size that is not on the list, select More Paper Sizes at the bottom of the menu and enter the width and height you like.
Remedy: The top edge is gone
When you view the document in Print Layout mode, the insertion point is close to the upper left corner of the page, as if there is no upper margin. How to fix:
1. When the upper or lower margin is not displayed, move the mouse pointer to the upper or lower margin of the page until the pointer changes to a double-headed arrow and then double-click.
2. The top and bottom margins are now displayed.
Another way to overcome the problem of losing margins on:
- In the View tab, group Document Views, make sure that the Print Layout button is selected.
- Click Microsoft Office Button, click on Word Options.
- In the left pane, select Display.
- In the right pane, under the Page display options group, check Show white space between pages in Print Layout view. Click OK.
Unlike Word 2007, double-click, in Word 2003 to re-display the top margin, move the mouse pointer to the upper or lower margin of the page until the cursor changes to a double-headed arrow, and then press a left mouse button. .
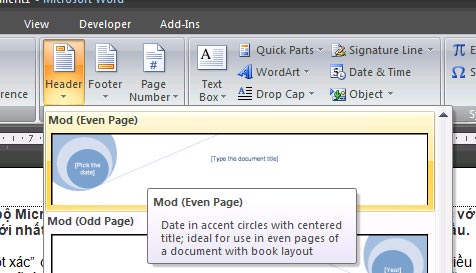
Insert Header, Footer for the entire document
In Word 2003, to insert a Header or Footer into the document, we go to the View menu - Header and Footer. In Word 2007, at the Insert tab, the Header & Footer group, click the Header or Footer button.
A drop down menu with Header, Footer templates for you to choose. Next you enter the content for that Header or Footer. Once finished, double click on the content area of the page, immediately Header / Footer will be applied to the entire page of the document.
Images 11 of Conquer Word 2007
Change the old Header / Footer with the new Header / Footer
At the Insert tab, the Header & Footer group, click the Header or Footer button. Then reselect a new Header / Footer to replace the current Header / Footer.
Do not use Header / Footer for the first page
In the Page Layout tab, click on the lower right corner of the Page Setup group to open the Page Setup dialog box. Next, open the Layout tab. Check the Different first page section under Headers and footers. Click OK.
So the Header / Footer has been removed from the first page of the document.
In Word 2003, you can also remove Header / Footer for the first page by going to the File - Page Setup menu> selecting the Layout tab> marking check Different first page> OK.
Apply different Header / Footer for even and odd pages
In the Page Layout tab, click on the lower right corner of the Page Setup group to open the Page Setup dialog box. Next, open the Layout tab. Mark different Different and even items under Headers and footers. Click OK.
You can now insert Header / Footer for even pages on any even page, insert Header / Footer for odd pages on any odd page.
In Word 2003, you can do the same by going to the File - Page Setup menu> selecting the Layout tab> marking check Different odd and even> OK.
Change the content of Header / Footer
At the Insert tab, the Header & Footer group, click the Header or Footer button. Next select Edit Header / Edit Footer in the drop down menu to edit the Header / Footer content. While editing you can reformat the font, style, color . for Header / Footer titles by selecting the text and using the Mini toolbar that appears next to it.
Done editing you double click outside the content area of the document page.
Delete Header / Footer
At the Insert tab, the Header & Footer group, click the Header or Footer button. Next select Remove Header / Remove Footer from the drop down list.
Creating different Header / Footer for different areas of the document
- First, you need to create zone breaks to divide the areas in the document. Click on the location where you want to place a new area. In the Page Layout tab, the Page Setup group, click the Breaks button and select an appropriate regional break type in Section Breaks, for example Continuous (we'll learn more about page breaks / section breaks in later articles).
- At the Insert tab, Header & Footer group, click on the Header or Footer button. Next select Edit Header / Edit Footer to edit the content for Header / Footer.
- On the Header & Footer tab, Navigation group, if you see the Link to Previous button is lit, click this button again to disconnect the Header / Footer in this new area from the previous area. You will see the Same as Previous item in the upper right corner of the Header / Footer disappears.
- Then edit the Header / Footer for this new area and rest assured that the Header / Footer of the previous region has not been changed.
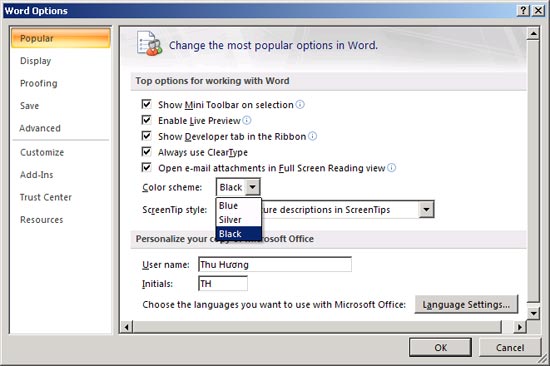
Change the look for Office
Did you see that the traditional Microsoft Word green color has been changed? Office 2007 has a feature to change the display interface (for all programs in the 2007 Office suite) and there are 3 colors you can choose from: Blue (Blue), black (Black), silver ( Silver). You can change it by clicking Microsoft Office Button, clicking Word Options. In the dialog that appears, in the left pane click Popular, in the Color Scherme section select the color you want ( Note : changes will be applied when restarting the open Office program).
Images 12 of Conquer Word 2007
Images 13 of Conquer Word 2007
Conquer Word 2007 (phase II) Images 14 of Conquer Word 2007
Conquer Word 2007 (3rd installment) Images 15 of Conquer Word 2007
Conquer Word 2007 (Term 4) Images 16 of Conquer Word 2007
Conquer Word 2007 (V period) Images 17 of Conquer Word 2007


 The most detailed guide on how to number pages, skipping the first page and starting from any page in Word.
 How to rotate any page horizontally in Word
 7 ways to number pages in Word that you need to know.
 How to create templates in Notion and share them with others.
 How to number pages starting from any page in Word
 How to quickly number pages in Word 2010, 2013, 2016, and 2019