Conquer Word 2007 ... (period III)
Going further into conquering Word 2007, today's lesson will show you how to search - replace and handle special formats.
 Conquer Word 2007 (period I)
 Conquer Word 2007 (phase II)
Going further into conquering Word 2007, today's lesson will show you how to search - replace and handle special formats.
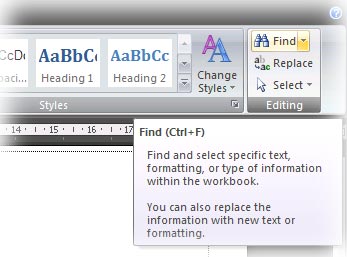
FINDING AND REPLACING
Find text
You can quickly search for a word or phrase in the following way:
- In the Home tab, Editing group, press the Find button (or press the shortcut Ctrl + F).
- In the Find what section of the Find and Replace dialog box that appears, enter the text you want to find.
- To find each word or phrase, click Find Next. To find all words or phrases at once in a text, press Find in, then press Main Document.
- To end the search process, press ESC.
Find and replace text
- In the Home tab, Editing group, click Replace button (or press the shortcut Ctrl + H).
- In the Find what section, enter the text you want to find.
- In the Replace with section, you enter the text you want to replace.
- To find the next paragraph, click Find Next.
- To replace the text, press Replace. After pressing the word, Word will move to the next paragraph.
- To replace all found text, click Replace All.
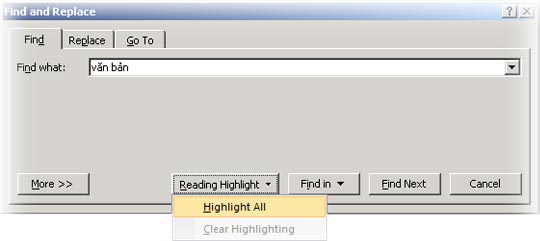
Find and highlight the found text
To easily identify the search terms, you can highlight it on the screen (do not highlight when printing out).
- In the Home tab, Editing group, press the Find button (Ctrl + F).
- In the Find what box, enter the text you want to find.
- Click Reading Highlight, then select Highlight All.
- All found words will be highlighted. To turn this feature off, click Reading Highlight again, select Clear Highlighting.
Find and replace special formats
- In the Home tab, Editing group, press the Replace button (Ctrl + H).
- Click the More button if you do not see the Format button.

- To search for text in a special format, enter the text in the Find what box. If only to search for formatting, leave this box blank.
- Click the Format button, then select the format you want to find.
- Click the Replace with box, then click Format, select the replacement format. If you also want to replace with text, enter the text in the Replace with box.
- Click Find Next, click Replace to find and replace special formats. For a full replacement, click Replace All.
Find and replace paragraphs, page breaks, and other items
- In the Find and Replace dialog box that appears after pressing Ctrl + H, click the More button if you don't see the Special button.
- Click on the Find what box, then click the Special button and select an item to search.
- Enter what you want to replace in the Replace with box.
- Click Find Next, Replace or Replace All.
Use wildcards when searching
- Turn on the Find and Replace dialog box.
- Click More button to expand the dialog box.
- Check the box Use wildcards.
- Enter the word and the wildcard characters in the Find what box.
- Enter what you want to replace in the Replace with box.
- Click Find Next, Replace or Replace All.
Table of wildcards
Representation Enter Example Anyone character?'s? t' find 'sat' and 'set'.A series of characters*'s * d' finds 'sad' and 'started'.Start a word<'<(inter)' find 'interesting', 'intercept'.Do not look for 'splintered'.End a word>'(in)>' find 'in', 'within'.Don't search for 'interesting'.One of the characters specifies[]'w [io] n' searches 'win' and 'won'.Any character in the range[-]'[rt] ight' finds 'right' and 'sight'.The sequence must be in ascending order.Any one character, except the given characters in brackets[! Xz]'t [! Am] ck' find 'tock', 'tuck'.Do not look for 'tack' or 'tick'.
To find a character defined as a wildcard, you type the sign before the character. Such typing? to find the question mark. You can use single punctuation to group wildcards and text to indicate the order of calculations. For example, type <(pre) * (ed)> to find 'presorted' and 'prevented'.
You can use the wildcard n to search for an expression and replace it with a sorted expression. For example, type (Office) (Word) in the Find what box and type 2 1 in the Replace with box. As a result, the program will find the word Office Word and replace it with Word Office.
INSERT THE LOGO OR SPECIAL CHARACTER
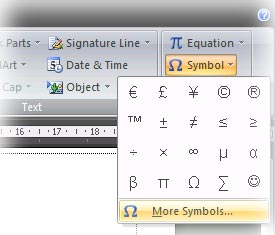
Insert symbol
- Click where you want to insert the icon in the document.
- At Insert tab, Symbols group, click Symbol button.
- Perform one of the following two operations:
-
Click on the icon you want to insert in the drop down list.
-
If the icon to insert is not in the list, click More Symbols at the bottom of the list. The Symbol dialog box appears. In the Font section, you select a font you like, click the icon to insert in the box below, press the Insert button to insert. Then click Close to close the Symbol dialog box.
Note : If you select an expanded font type, such as Arial or Times New Roman, the Subset list will appear next to the Font selection item. Use this list to select the characters of the extended language.
Insert a special character
- Click where you want to insert a special character.
- At Insert tab, Symbols group, click Symbol button. Then select More Symbols.
- In the Symbol dialog box, click the Special Characters tab.
- You select in the list one character to insert and press the Insert button.
- Click the Close button to close the dialog box.
Insert a Unicode character from the Symbol dialog box
When you select a Unicode character in the Symbol dialog box, its code is displayed in the Character code box.
- Click on the location where you want to insert Unicode characters.
- In Insert tab, Symbols group, click Symbol button and select More Symbols.
- In Symbol dialog box, Symbols card, in the Font box you choose the font you like.
- In the From box, you select Unicode (hex).

- If the Subset box is displayed, select a subset character.
- Click the character you want to insert in the list and press the Insert button.
- Click Close.
Use the keyboard to insert Unicode characters into documents
If you know the code of the character to insert, you can enter it in the document and press Alt + X to convert it to a character. For example, you enter 00A9 and press Alt + X immediately after that will be the character. In contrast, to display a Unicode character code of a certain character in a document, you place the cursor behind that character and press Alt + X.
Insert a predefined icon by using AutoCorrect
To use this feature, first enable AutoCorrect:
- Click Microsoft Office Button, then select Word Options.
- In the Word Options dialog box, select Proofing in the left pane.
- Click the AutoCorrect Options button. In the dialog that appears, select the AutoCorrect tab.
- Check the Replace text item as you type.
- Click OK twice to close the dialog boxes.
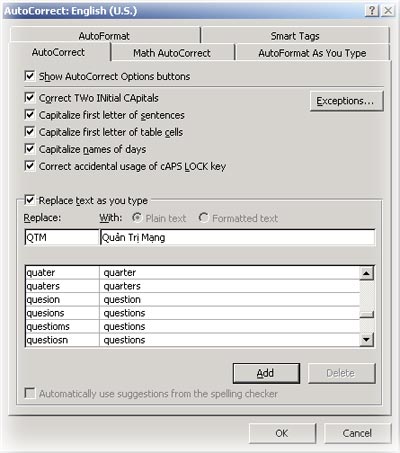
Create your own AutoCorrect entries
- In Insert tab, Symbols group, press Symbol button, select More Symbols.
- In Symbol dialog box appears, click on Symbols or Special Characters tab as you like.
- Select an icon or special character that you want to include in AutoCorrect.
- Click the AutoCorrect button. The icon you select will appear in the With box.
- In the Replace section, you type the characters that Word will automatically switch to the icon or special character you selected above.
- Click the Add button.
- Click OK.
- Click Close to close the Symbol dialog box.
TICKETS WITH SEALED BRICKS (-)
When a word is too long, does not fit into the end of the line, Word will move from one line to the new beginning instead of hyphenating it. However, you can use the Hyphenation feature to automatically join or hyphenate the text, setting the maximum number of distances allowed between a word and the right margin without hyphenating it.
When using the auto hyphenation feature, Word 2007 automatically inserts hyphens into the necessary locations. When hyphenating by hand, Word will find the text to hyphenate and ask if you want to insert the hyphen.
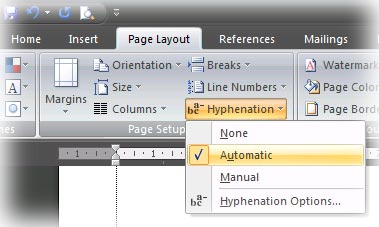
Automatically insert hyphens in the entire document
- Make sure no text is selected.
- In the Page Layout tab, the Page Setup group, press the Hyphenation button, then select Automatic.
Insert arbitrary hyphens
You can control the interrupt position of a word or phrase if the word 'drops' at the end of the line. For example, you can specify an interrupt position of the word 'nonprinting' as 'non-printing' instead of 'nonprint-ing'.
- In the Home tab, Paragraph group, press Show / Hide button.
- Click on the location in the word where you want to insert the hyphen.
- Hold Ctrl and press the hyphen key.
Automatically insert hyphens in a document section
- Select the text you want to hyphenate.
- In the Page Layout tab, the Page Setup group, press the Hyphenation button, then select Automatic.
Manual hyphenation in a document section
When you hyphenate it manually, Word 2007 will find the text to hyphenate. After you specify the location you want to hyphen in the text, Word inserts an arbitrary hyphen. If you later edit the document and change the line breaks, Word will only display and print the hyphens that still fall at the end of the line without resuming the document.
- Select the text you want to hyphenate.
- In the Page Layout tab, the Page Setup group, click the Hyphenation button, then select Manual.
Inserting a hyphen without interruption
Non-breaking hyphens help prevent words, numbers, or phrases from being interrupted if it falls at the end of a line. For example, you can prevent 999-1234 from being interrupted midway, instead the entire sequence of numbers will be moved to the beginning of the next line.
- Click where you want to insert the hyphen without interruption.
- Hold down Ctrl, Shift and press the hyphen.
Set the hyphenation area
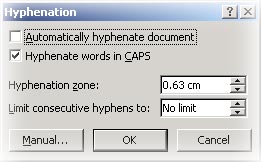 The hyphenation zone is the maximum number of spaces allowed between a word and right margin without hyphenating this word. You can change the hyphenation zone: to reduce the number of hyphenations, make the tile join more widely; To reduce the discrete nature of the right margin, you make the tiles more narrow.
- In the Page Layout tab, the Page Setup group, click the Hyphenation button, then select Hyphenation Options.
- In the Hyphenation zone, enter the distance you want.
Remove automatic hyphens
In the Page Layout tab, the Page Setup group, click the Hyphenation button, then select None.
Remove the hyphen manually
- In the Home tab, Editing group, click Replace button (or press Ctrl + H key).
- Click More >> button to expand the Find and Replace dialog box.
- Click the Special button, then select:
-
Optional Hyphen : if you want to remove the hyphen manually.
-
Nonbreaking Hyphen : to remove hyphens without interruption.
- Leave the Replace with box blank.
- Click Find Next, Replace, or Replace All.
DISCUSSION PROBLEMS WHEN DRAFTING
The new word "overrides" the old word
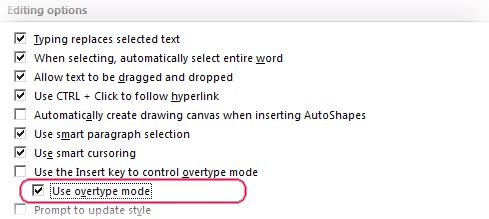
Symptoms : Every time you type new words, the old words at the insertion point are deleted.
Cause : Overwrite mode has been turned on.
Solution : Turn off the overwriting mode by:
- Click on the Microsoft Office Button, then press the Word Options button.
- Click Advanced in the left pane.
- Under the Editing options group, delete the check mark before the Use overtype mode entry. Click OK.
Cannot find the Clear Contents command
Symptoms : You want to delete text or graphic objects but can't find the Clear Contents command to do this.
Cause : Different from previous versions, the Clear Contents command is not available in Word 2007.
Solution : You can use the Delete key to delete text or graphic objects after selecting it.
Word scrolls too fast when you drag the mouse to select text
Symptoms : When you select text by holding and dragging the mouse down, Word scrolls the document so quickly that it is difficult to release the mouse in the exact location where you want to end the selection.
Cause : While you drag the mouse to select the word, Word will scroll the document in the direction you choose.
Solution : To solve this problem, you should combine the mouse and keyboard while selecting the word.
- Click on where to start the selection.
- Use the scroll bar to slide to the position you want to end the selection.
- Hold Shift while left clicking on the end of the selection.
Where does the Insert File command disappear?
Symptom : You want to insert text from another document into the current document but cannot find the Insert File command to do this.
Cause : In Word 2007, the Insert File command was renamed to Text from File and moved to the Object menu in the Insert tab.
Solution :
- Click at the location where you want to insert the document.
- In Insert tab, Text group, click on the arrow next to Object button, select Text from File.
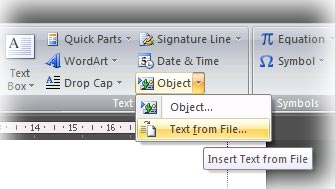
- In the Insert File dialog box, you specify the file you want to insert, then double-click it to insert it into the current document.
Cannot drag - release mouse on text
Symptoms : Cannot use drag-and-drop to perform copy or move text.
Cause : The drag-and-drop function in Word has been disabled.
Solution :
- Click on the Microsoft Office Button, then press the Word Options button.
- Click Advanced in the left pane of the dialog box.
- Under the Editing options group, check the Allow text check box to be dragged and dropped. Click OK.
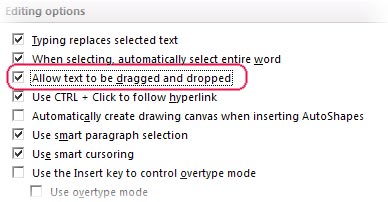
- Now you can select the text and use the mouse to drag - drop the text to a new position to move (or keep adding the Ctrl key while performing to copy).
Unicode is 'jumped' when copying
Symptom : When using Unicode font, if copying a line of text, the phenomenon of jumping text appears.
Solution :
- Click on the Microsoft Office Button, then press the Word Options button.
- Click Advanced in the left pane.
- Under the Cut, copy, and paste groups, click the Settings button.

- Uncheck the Adjust sentence and word spacing checkbox. Click OK twice to close the dialog boxes.
Conquer Word 2007 (Term 4)
Conquer Word 2007 (V period)
Conquer Word 2007 (last term)
Nguyen Hong Phuc
Was this article helpful?
Your feedback helps us improve.
Related Articles
 Conquer Word 2007 (V period)3 minutes read
 Word error does not capitalize after a period and how to fix it effectively4 minutes read
 EA remake Command & Conquer with 4K graphics, new multiplayer mechanism, will be released in June this year2 minutes read
 Conquer Word 2007 (Term 4)20 minutes read
 Conquer Word 2007 (phase II)13 minutes read
 How to type a dot in Word extremely quickly1 minutes read
Reader Comments 0
Sign in with email or Google to join the discussion.