Conquer Word 2007 (last term)
- Conquer Word 2007 (period I)
- Conquer Word 2007 (phase II)
- Conquer Word 2007 (3rd installment)
- Conquer Word 2007 (Term 4)
- Conquer Word 2007 (V period)
Use the Bullets - Numbering feature to mark / number automatically
Create a bulleted or numbered (number) automatic list
1. Tap the * sign to start a list of bulleted or entered bookmarks 1. To start an automatic numbering list, then press the space bar (space bar) or Tab key.
2. Enter any text you want.
3. Press the Enter key. Word will automatically insert a bullet or next order number.
4. To finish marking, number automatically, press Enter twice or press the Backspace key to delete the last bullet or number.
If automatic numbering / numbering is not available, turn it on in the following way :
1. Click the Microsoft Office Button, then select Word Options.
2. Click Proofing.
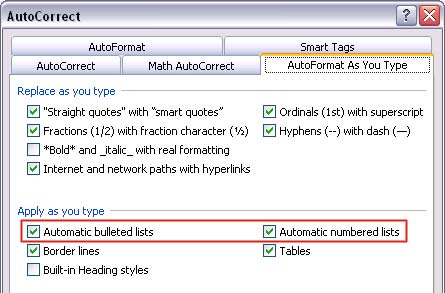
3. Click the AutoCorrect Options button, and then click the AutoFormat As You Type tab.
4. Under the Apply as you type group, check the boxes for Automatic bulleted lists and Automatic numbered lists. Click OK to close the dialog boxes.
Add bullet or numbering to the list
1. Select an item you want to add.
2. In the Home tab, the Paragraph group, press the Bullets button or the Numbering button.
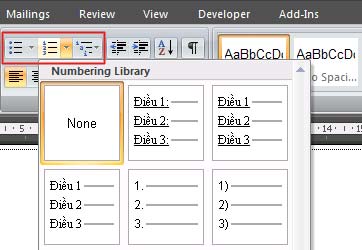
Note : You can find many other bullet or style styles by clicking the arrow next to the Bullets / Numbering button.
Stretch the spacing between items in the Bullets / Numbering list
1. In the Home tab, Styles group, click on the downward-facing arrow to the right to expand the Styles list. Then right-click the List Paragraph type, select Modify.
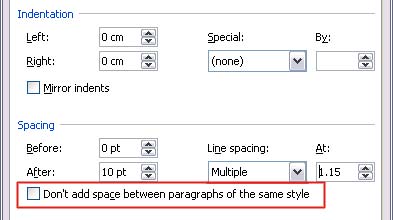
2. In the Modify Style dialog box, click the Format button, select Paragraph.
3. Uncheck the item Don't add space between paragraphs of the same style. Click OK to close the dialog boxes.
Transfer Bullets / Numbering lists from one level to multiple levels
1. Click on an item in the list where you want to convert it to another level.
2. In the Home tab, Paragraph group, click the arrow next to the Bullets or Numbering button, select Change List Level and choose a level you want.
Add image or icon bullets to the list
1. Select the item you want to add image bullets or icons.
2. In the Home tab, Paragraph group, click the arrow next to the Bullets button.
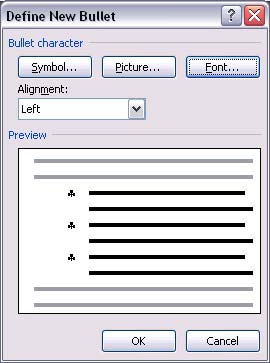
3. Select Define New Bullet. In the Define New Bullet dialog box, press the Symbol button (icon) or Picture (image) for the purpose.
4. Select the image or icon you want to use, then click OK twice.
Add a picture or logo bullet into the Bullet library
1. Open the document containing the bullet icon you want to add to the library.
2. In the Home tab, Paragraph group, click the arrow next to the Bullets button.
3. Under the Document Bullets group, right-click the bullet type you want to add to the library, then select Add to Library.
Delete a style from the Bullet library
1. In the Home tab, Paragraph group, click the arrow next to the Bullets button.
2. Under the Bullet Library group, right-click a type you want to remove from the list, then select the Remove item.
Create a list of check boxes (checklist)
When creating a multiple-choice document, make sure you design the check boxes for the user to tick. There are two types of markup in the document: one is used for printing (for the user to mark the paper), the second form is for the user to mark directly in the file content.
Create a checklist for printing
There are 2 basic ways to create a checklist for printing:
- If your document does not contain many different types of bullets, you can use how to create a custom format bullets list.
- If your document has many different bullets available, you can prevent older bullets from changing by creating a checklist in the table.
Create checklist by customizing bullets format
1. Enter the items in your list.
2. Select this list.
3. In the Home tab, Paragraph group, click the arrow next to the Bullets button.
4. Select Define New Bullet.
5. Click the Symbol button.
6. In the Font dialog box, select a preset icon font on your computer, such as Wingdings font.
7. Double-click the check box icon that you want to insert into the document. Click OK.
Create a table to prevent old bullets from changing when creating a checklist
Step 1: Create the table
1. On the Insert tab, the Tables group, click the Table button.
2. Select Insert Table.
3. In the Number of columns section, enter 2.
4. At Number of rows, enter the number of lines you want, note that each line contains an item selected in the checklist.
5. Click OK.
Step 2: Insert the check box and input data box
1. Click on the first box above the left in the table.
2. In the Insert tab, Symbols group, click the Symbol button and select More Symbols.
3. Click on Symbols card.
4. In the Font box, select an icon font installed on your computer, such as Wingdings font.
5. Double-click the check box icon you want.
6. Click Close.
7. Click on the next box where you want to insert a check box, press Ctrl + Y, you will see a new check box appear.
8. After inserting the check box you want, click on the first box at the top right and enter the items corresponding to the check box created.
Step 3: Refine the composition

Table alignment tabs
1. Right-click the table, point to AutoFit and select AutoFit to Contents.
2. Right-click the table, select Table Properties. Then open the Table tab in the new dialog box that appears.
3. Click the Options button, in the Left, Right boxes, enter the distance between the check box and the next text, for example .02 inches. Click OK.
4. In the Table tab, click the Borders and Shading button, then click the Borders tab.
5. Under Setting, click None, and press OK twice to close the dialog boxes.
Note : After you remove the border of the table, you will still see a broken border, but you can rest assured that this border will not be displayed when printing. If you want these broken borders to disappear completely, you can click the View Gridlines button on the Table group of the Layout tab below Table Tools.
How to create a bookmark so that users can directly mark the file content
Step 1: Create the table
1 In the Insert tab, the Tables group, click the Table button, and then select Insert Table.
2. In the Number of columns box, type 2.
3. In the Number of rows box, enter the number of lines you want, each line is a selection in the list that will create. Click OK.
Step 2: Insert the check box and input data
To add cells that allow users to check directly in the file, you need to use the Developer tab.
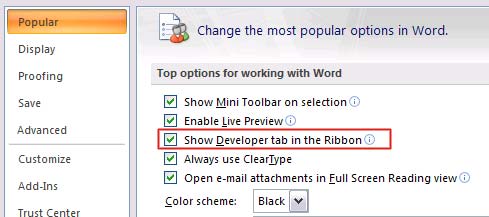
* Show Developer tab
1. Click the Microsoft Office Button, select Word Options.
2. In the dialog box that appears, select the Popular item in the left pane.
3. Select Show Developer tab in the Ribbon. Click OK.
* Add to check box
1. Click on the first box to the left of the table.
2. In the Developer tab, the Controls group, click the Legacy Tools button.
3. Under Legacy Forms, select Check Box Form Field.
Note : If the check box is gray, click the Legacy Tools button, select the Form Field Shading to remove the gray background.
4. Click the next box, where you want to insert a check box. Then press Ctrl + Y to insert the check box.
5. After all the check boxes have been inserted, click on the first box to the right of the table and enter the items corresponding to each check box on the left.
Step 3: Refine the layout
1. Right-click the table, point to AutoFit and select AutoFit to Contents.
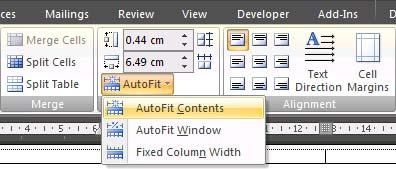
2. Right-click the table, select Table Properties. Then open the Table tab in the new dialog box that appears.
3. Click the Options button, in the Left, Right boxes, enter the distance between the check box and the next text, for example 0.19cm. Click OK.
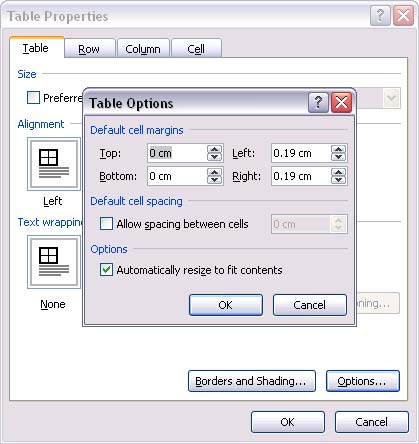
4. In the Table tab, click the Borders and Shading button, then click the Borders tab.
5. Under Setting, click None, and press OK twice to close the dialog boxes.
Step 4: Lock the form
In order for the user to tick the document file directly, you need to lock the form again. Note, when locking the form again you cannot edit the text or layout of the document, so make sure to take this step eventually.
1. Click the Design Mode button in the Controls group of the Developer tab to turn off Design mode.
2. In the Developer tab, Protect group, click the Protect Document button, then select Restrict Formatting and Editing.
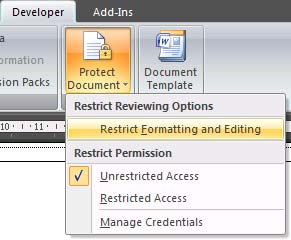
3. In the Protect Document pane, under Editing restrictions, select Allow only this type of editing in the document.
4. In the combo box below, select Filling in forms.
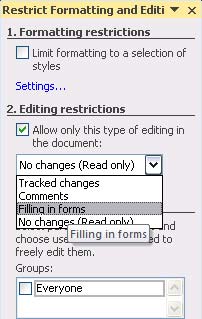
5. Under Start enforcement, click the Yes, Start Enforcing Protection button.
6. To set a password, prevent the user from removing protection, enter the password in the Enter new password (optional) box and confirm the password in the box below.
Now you can send this document to the user to tick, then they save and send it back to you. Very useful if you want to conduct a survey survey via e-mail .