Causes and solutions for laptops unable to connect to Wi-Fi on Windows 11.
If a computer cannot connect to Wi-Fi on Windows 11, it can cause many difficulties in both work and studies.
- Reasons why my laptop can't connect to Wi-Fi on Windows 11.
- How to fix the problem of a laptop not connecting to Wi-Fi on Windows 11.
- Tips for a more stable Wi-Fi connection
- Fix by resetting network settings.
- Change network configuration
- Change DNS
- Update network drivers.
- Use Troubleshoot
- Use the keyboard shortcut to turn Wi-Fi back on.
- Refresh your IP address.
- Restart your computer.
- Check the hardware.
Refer to the following article from TipsMake for solutions to the problem of a laptop not connecting to Wi-Fi on Windows 11.
Reasons why my laptop can't connect to Wi-Fi on Windows 11.
Laptops failing to connect to Wi-Fi is one of the most common problems for users who frequently use their computers for studying and working. To determine the correct solution, we need to identify the causes of the laptop's inability to connect to Wi-Fi on Windows 11.

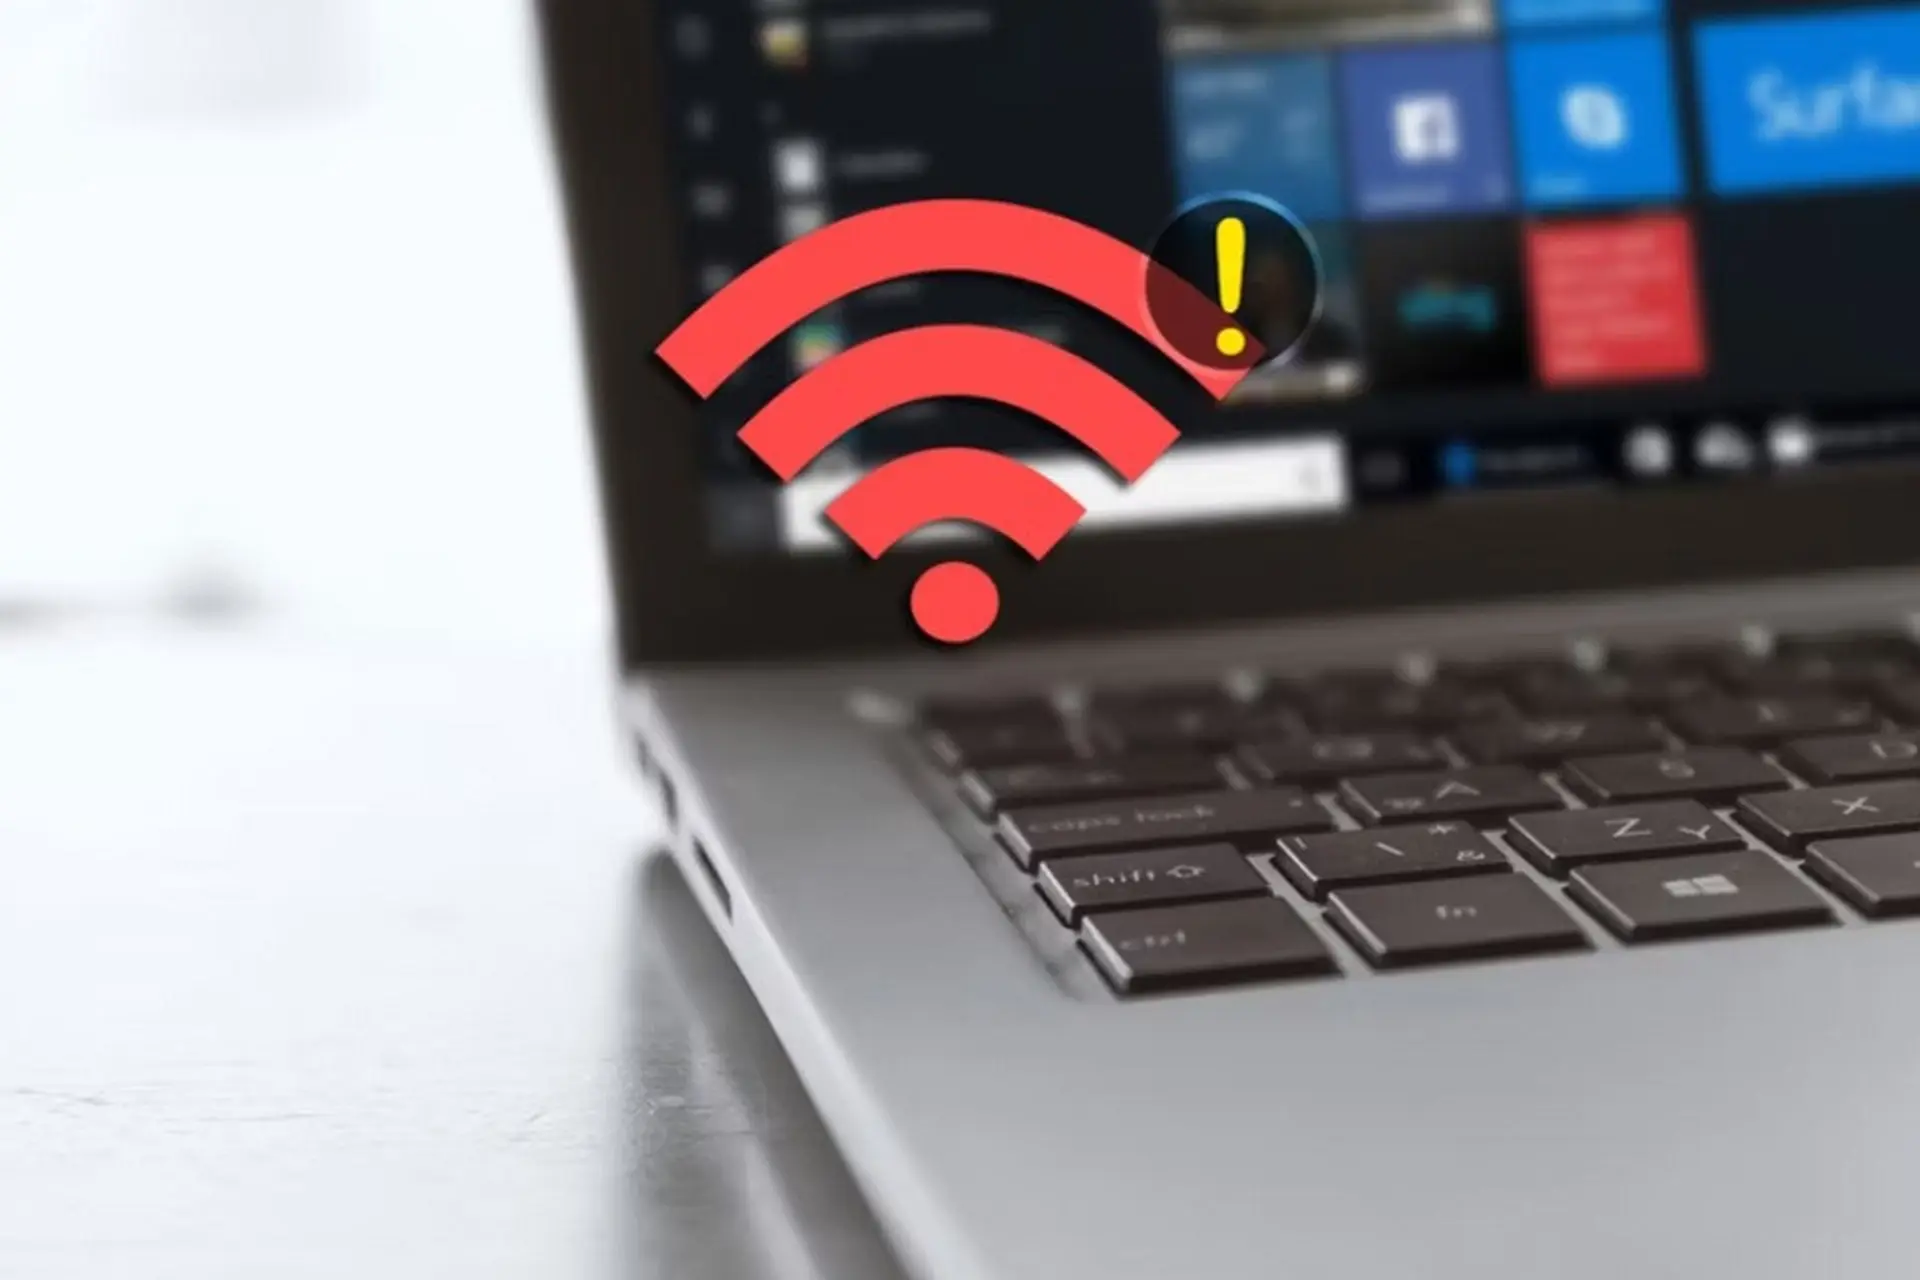
Laptop cannot connect to Wi-Fi on Windows 11.
Some common causes may include:
- The Wi-Fi connection feature is not enabled on the laptop.
- A malfunctioning Wi-Fi router or transmitter is causing the laptop to be unable to connect to Wi-Fi.
- The computer might be infected with a virus, which is why it can't connect to Wi-Fi.
- The computer is unable to connect to Wi-Fi due to an outdated or unstable driver.
- Users who try to fake their IP address may easily cause Windows 11 to mistakenly interpret this as an error, preventing the laptop from connecting to Wi-Fi.
How to fix the problem of a laptop not connecting to Wi-Fi on Windows 11.
Fix by resetting network settings.
Step 1: Users access Settings by clicking the Start button (Windows icon) or pressing the Windows + I key combination in the taskbar.
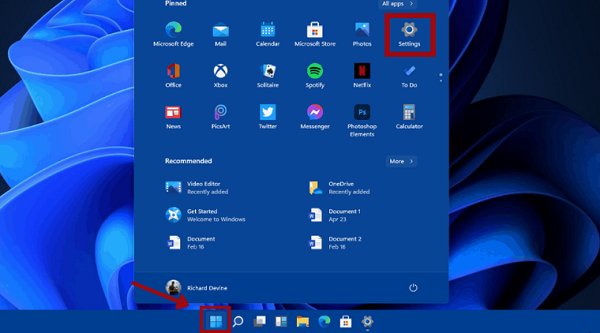
Click the Windows Start button.
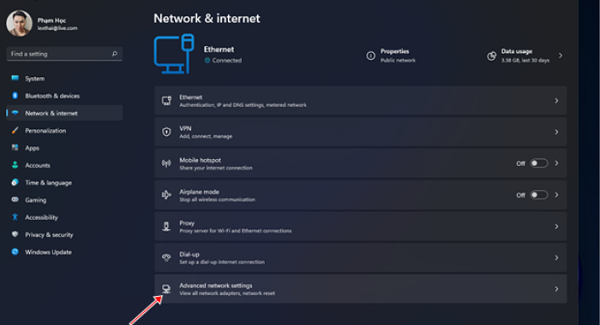
Step 2: On the Settings page, click on the 'Network & Internet' option (in the list on the left) and then click on 'Advanced Network Settings'.

Click on 'Advanced Network Settings'.
Step 3: In the 'Advanced Network Settings' section, select 'Network Reset'.
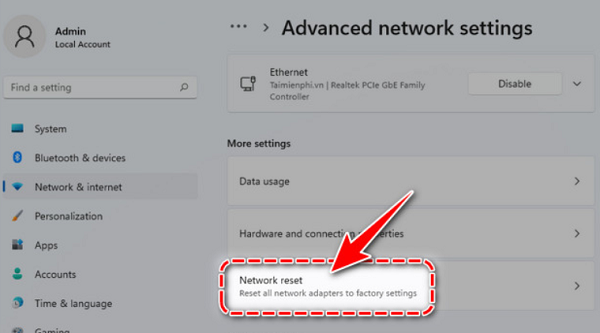
Proceed by selecting the 'Network Reset' option.
Step 4: Click on the 'Reset Now' option.
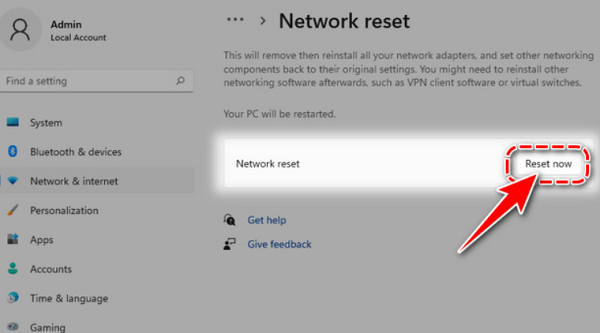
You then click on the 'Reset Now' option.
Step 5: Finally, simply select 'Yes' and you're done.
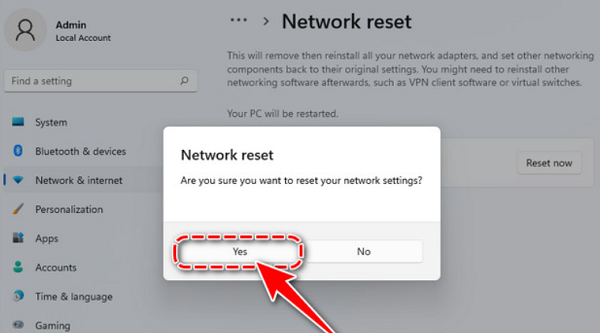
You just need to select 'Yes' and you're done.
The restart process will take 5 minutes. After waiting for the computer to finish booting up, reconnect to your Wi-Fi network and access the internet normally.
Change network configuration
Step 1: Right-click on the Wi-Fi icon in the 'Taskbar' and then select 'Network and Internet settings'.
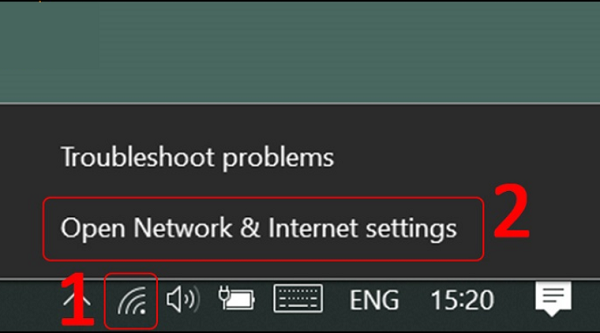
Select 'Network and Internet settings'.
Step 2: In the 'Network & Internet' section, select 'Properties'.

Continue by selecting the 'Properties' option.
Step 3: Change the option in 'Network profile type' to 'Private network', and finally check if the Wi-Fi connection is established.

Change DNS
Step 1: Open 'Settings' and then select 'Network & Internet Advanced network settings'.
Select 'Network & Internet Advanced network settings'.
Step 2: Then scroll down, find and select 'More network adapter options', and click on it.
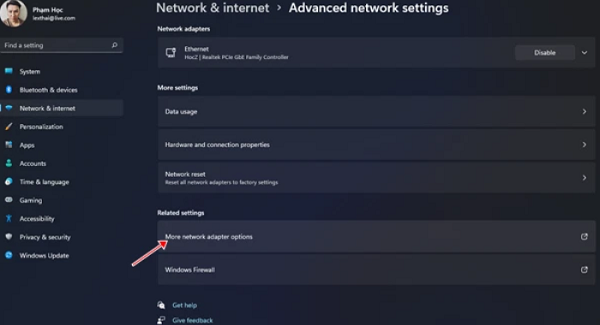
Select 'More network adapter options' and then click on it.
Step 3: A network connection management window will appear. Right-click on your network adapter and select 'Properties'. Next, select 'Internet Protocol Version 4' and then enter your DNS settings. Finally, click 'OK' to save the changes.
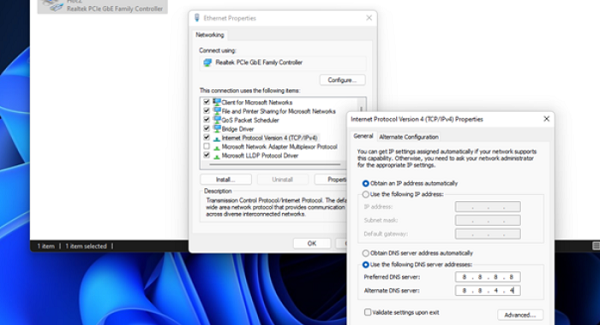
Select 'Internet Protocol Version 4'
Update network drivers.
Step 1: First, right-click on the 'Start' button and select 'Device Manager'.
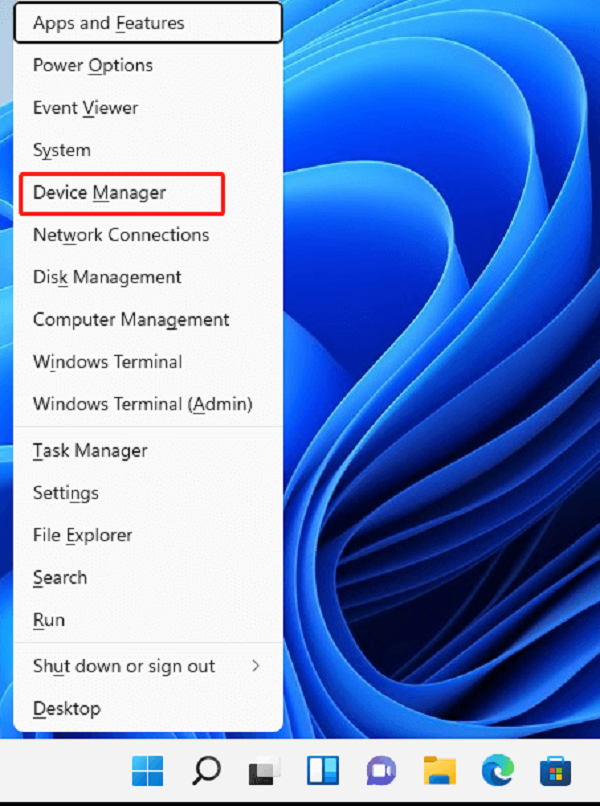
Right-click the 'Start' button and select 'Device Manager'.
Step 2: In the 'Device Manager' window, find 'Network adapters' and click the expand arrow. Next, right-click on the network card driver and select 'Update driver'.
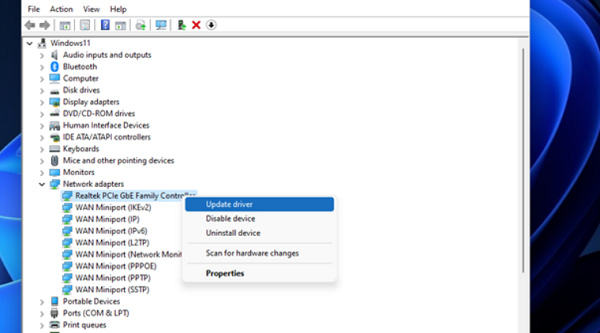
Right-click on the network card driver and select 'Update driver'.
If you are using a separate network card, right-click on it and select 'Properties'. Then select the 'Power Management' tab and uncheck 'Allow the computer to turn off this device to save power'. Finally, click 'OK' to save the changes.
Step 3: Here you can choose between automatic updates ('Search automatically for drivers') or manual updates ('Browse my computer for drivers').
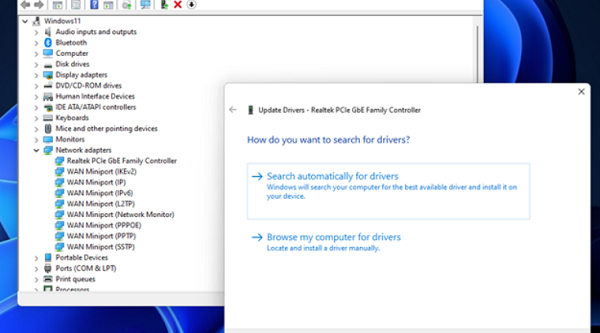
You can choose between automatic or manual updates.
Use Troubleshoot
Step 1: Enter the keyword 'services.msc' into the search box below the taskbar and click.
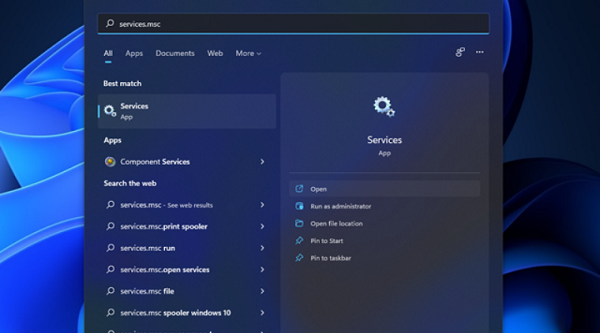
Enter the keyword 'services.msc' into the search box.
Step 2: Then find the 'WLAN Auto-Config' option and double-click on it.
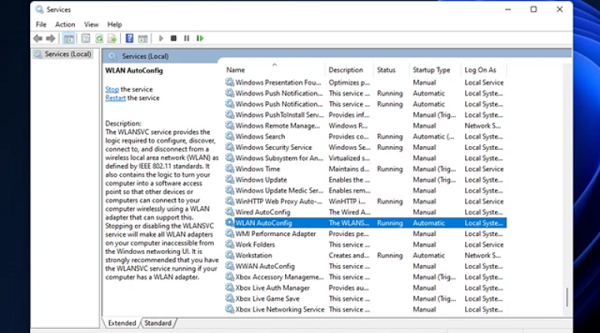
Then find the 'WLAN Auto-Config' section.
Step 3: In the 'Startup type' section, select 'Automatic' and finally click 'Ok' to save.
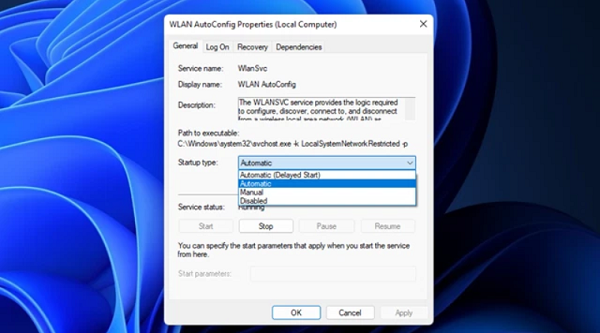
Select 'Automatic' and finally press 'Ok' to save.
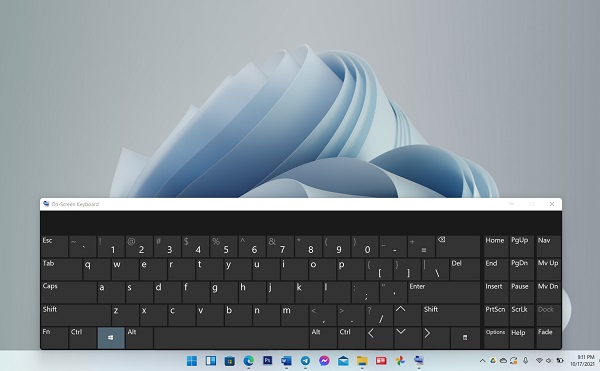
Use the keyboard shortcut to turn Wi-Fi back on.
Nowadays, computers often have a quick Wi-Fi toggle button, and accidentally pressing it can cause you to lose your Wi-Fi connection. To resolve this, quickly use the keyboard shortcuts for your specific computer model below to turn Wi-Fi on:
- Dell laptops: press the Fn + PrtScr key combination.
- Asus laptops: press the Fn + F2 key combination.
- Lenovo laptops: press the Fn + F5 or Fn + F7 key combination.
- Acer laptops: press the Fn + F5 or Fn + F2 key combination.
- HP laptops: press the Fn + F12 key combination.
- Toshiba laptops: press the Fn + F12 key combination.
Use keyboard shortcuts on Windows 11 to turn Wi-Fi back on.
Note, make sure you don't have airplane mode enabled. If you don't know the exact keyboard shortcut on your laptop, select the Wi-Fi icon in the bottom right corner of the screen >> then select the appropriate Wi-Fi address.
Refresh your IP address.
A laptop failing to connect to Wi-Fi on Windows 11 could also be a sign that its IP address is conflicting with other devices using the same network. To fix this, you need to refresh the IP address and then reconnect.
Step 1: Press the Windows + R key combination to open the Run dialog box >> type the command 'cmd'.
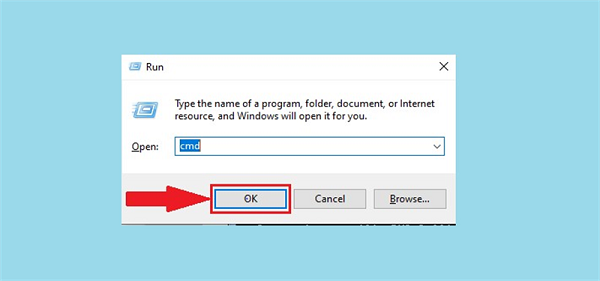
Enter the command 'cmd'.
Step 2: Next, enter the command 'ipconfig /release' and press 'Enter' to delete the old, faulty IP address.
Step 3: Finally, you need to enter the command 'ipconfig /renew' and press 'Enter' for your laptop to receive the new IP range.
What you need to do now is restart your laptop and check your Wi-Fi connection again.
Restart your computer.
The problem of a laptop not connecting to Wi-Fi on Windows 11 can also be fixed by restarting your computer. This is an easy method, but it's quite effective for most errors on the Windows operating system.
Check the hardware.
If your computer can't connect to any Wi-Fi network, it's likely a hardware problem. Check if your Wi-Fi router is working properly. If you're using a desktop computer, make sure the USB Wi-Fi adapter is properly plugged in and functioning correctly. If you're using a laptop, check if your Wi-Fi card is working properly. In this case, you should take your computer to a reputable repair center for experienced technicians to check and fix the problem.
Check your computer hardware.
Tips for a more stable Wi-Fi connection
You need to place the router in an open location, away from obstructions, to avoid signal interference. Additionally, bring the device close to the Wi-Fi access point for easier connection.
In summary, the article above has provided you with ways to fix the problem of your laptop not connecting to Wi-Fi on Windows 11. Hopefully, this information will help you successfully resolve the issue on your computer.
- Fix 'Windows was unable to connect to' error when connecting to wifi
- Connect 2 Windows XP laptops without cables
- Fix Unable to connect to authentication service LMHT error
- How to fix the problem of being unable to enter Terminal in Linux
- 11 computer problems and workarounds
- Laptop does not have a camera: Causes and solutions
- KDE Connect - Download the latest KDE Connect here
- How to Connect Two Laptops via LAN
- How to connect Airpod to Windows laptop and Macbook
- Causes and solutions for TV not connecting to WiFi
- Steps to change Taskbar position on Windows 11
- Download Ghost Windows 11 Pro Full Soft v1.0 Best New Standard 2021
- How to report Windows 11 errors, suggest Windows 11 features for Insider Preview users
- List of MSI motherboards that support Windows 11
- Steps to open Local Security Policy on Windows 10, Windows 11
- How to use Explorer Patcher, a tool to bring Windows 10 Taskbar to Windows 11
- How to bypass TPM 2.0 requirement when installing Windows 11?
- Download Ghost Windows 11 Pro No Soft v1.0 2021
- How to disable Sleep mode on Windows 11
- How to open multiple images side by side for comparison on Windows 11
-
 5 ways to fix Wi-Fi disconnection issues on Windows 11 laptops.
-
How to recover your Wi-Fi password, find saved Wi-Fi passwords on your laptop.
-
How to easily share Wi-Fi on iPhone and Android.
-
Ways to connect to Wi-Fi for desktop PCs.
-
How to hide other Wi-Fi networks when connecting to Wi-Fi on your computer.
-
Fixing the limited wifi error on Windows 10
 5 ways to fix Wi-Fi disconnection issues on Windows 11 laptops.
 How to recover your Wi-Fi password, find saved Wi-Fi passwords on your laptop.
 How to easily share Wi-Fi on iPhone and Android.
 Ways to connect to Wi-Fi for desktop PCs.
 How to hide other Wi-Fi networks when connecting to Wi-Fi on your computer.
 Fixing the limited wifi error on Windows 10