How to bypass TPM 2.0 requirement when installing Windows 11?
As you all know, on June 28, 2021, Microsoft officially introduced Windows 11 version to a large number of users.
And one of the issues that users (technology lovers) are talking about the most is the compatibility of computers with Windows 11.
In fact, Windows 11 requires not too high hardware to be able to run, it is probably only on par with Windows 10. However, it is worth mentioning that in this version of Windows 11, Microsoft has paid much more attention to its security capabilities.
The proof is that Microsoft requires computers with integrated TPM 2.0 security chip to be able to install it. This is also the reason that many machines have terrible configuration, but without TPM chip, it is still not possible to install Windows 11.
So the question is how to bypass TPM 2.0 to be able to install Windows 11? Is there any way to get around it?
Yes, of course there is, walking around, I see there are many ways, so in this article I will summarize it into a complete article for you to follow more easily!
I. How to bypass TPM 2.0 requirement to install Windows 11?
I will constantly update new methods that I know here, so if you are interested in this issue, don't forget to bookmark the article for easy tracking:
#first. Edit Regedit again during Windows 11 installation cài
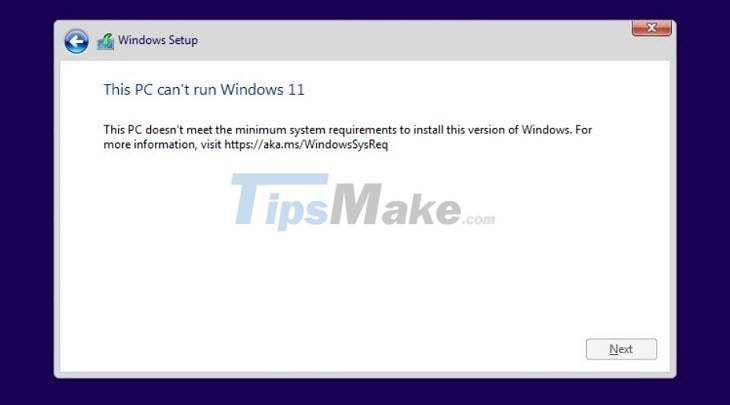
During the installation process, if you see an error message like the image below, something like:
This PC can't run Windows 11
This PC doesn't meet the minimum system requirememts to install this verion of Windows. For more information, visit https://aka.ms/WindowsSysReq

+ Step 2: At this screen, press the key combination SHIFT + F10 on the keyboard to open the command line window (CMD), we will proceed to edit Regedit a bit.
+ Step 3: The CMD window appears => enter the command regedit.exe => and press Enter.
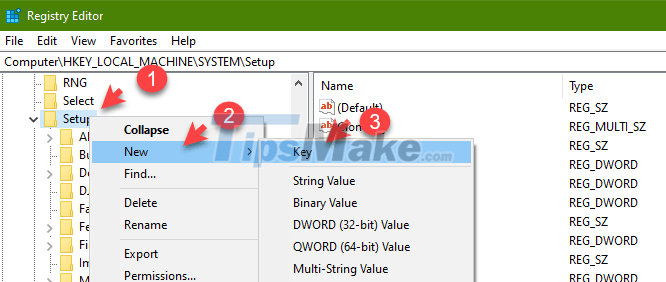
Now the Registry Editor window will appear, continue to access the path below:
HKEY_LOCAL_MACHINESYSTEMSetup
=> Then create a new key named LabConfig by: Right-click the Setup key => then select New => select Key => and name it LabConfig

+ Step 4: Next, create 2 new DWORDs in LabConfig key with the names:
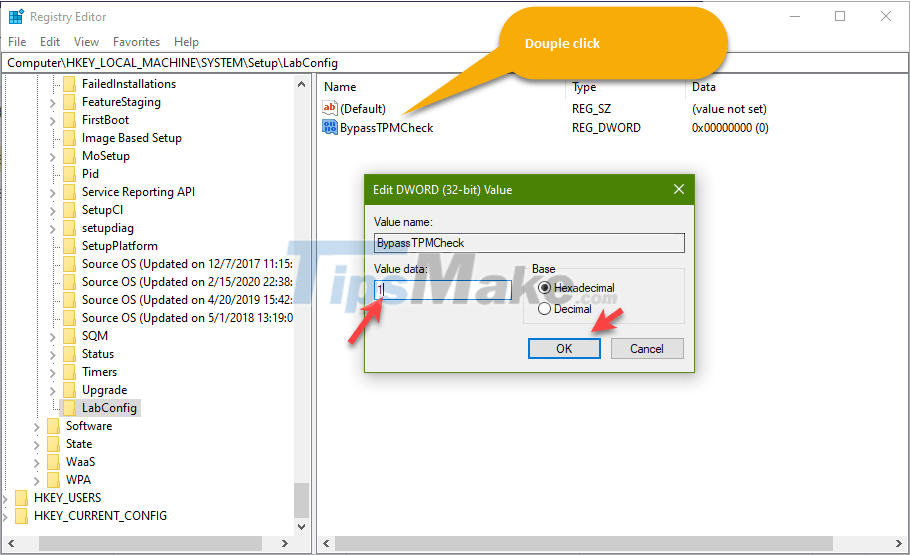
- BypassTPMCheck
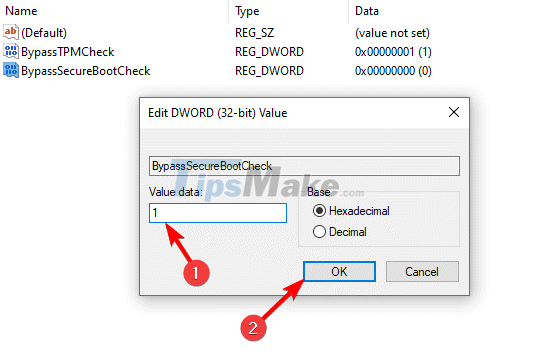
- BypassSecureBootCheck
Do the following:
Right-click any empty area in the LabConfig key => then select New => and select DWORD (32-bit) Value

Then set this value as BypassTPMCheck => then double click on this value => and enter 1 in the Value data box.

Exactly the same, you continue to create a second value called BypassSecureBootCheck => then also set the value 1 in the Value data box.

Yes, after saving and exiting, the error message above disappeared, and now you can install Windows 11 normally.