8 useful table formatting tips in Microsoft Word
You cannot create a beautiful Microsoft Word document without tables. In Microsoft Word, tables are necessary formatting tools. Microsoft Office makes it easy to create and format basic tables in Word for Office 365, Word 2019, Word 2016, and Word 2013.
The rate of using tables in Word is currently very low. It's time to fix that because the number of people questioning how to format the table properly in Word is increasing dramatically. The following 8 tips will be a great starting point for everyone!
Format tables in Microsoft Word
- 1. How to create a table in Word
- How to locate the table on the page?
- 2. Use the Ruler tool
- 3. Convert text into tables (and vice versa)
Microsoft Word translates text into tables- Convert tables into text
- 4. Enter the number of columns automatically
- 5. 'Freeze' tables!
- 6. Change the row to the columns in the table
- 7. Paste Excel tables into Gmail
- 8. Reuse your tables to save time
1. How to create a table in Word
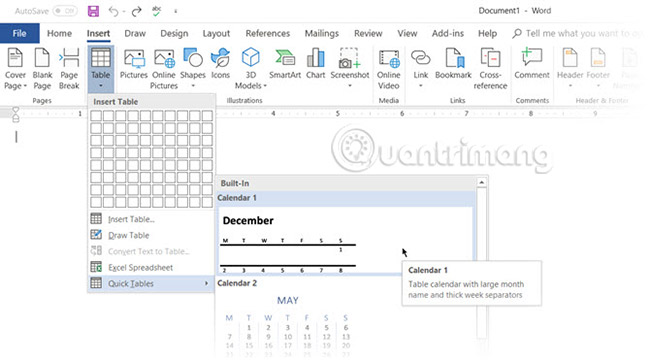
Using tables and even changing them by data has become much easier in new versions of Word, such as Microsoft Word 2019 and Office 365. Intuitive formatting features help you better control data ( and faster.) But first go to Ribbon> Insert> Table> Insert Table to create your own table.
Word gives you 5 options to create a table.
The fastest way to get started is with Quick Tables. The integrated design is quite useful, even if you don't have much design skills. You can modify the design by adding rows and columns or deleting unnecessary rows and columns.
Another quick way to create a table in Word is the Insert Control feature . You can create a new column or row with one click. Hover over a table. A bar appears just outside your table between two columns or an existing row. Click it when it appears and a new column or row will be inserted into that location.

When you want to move or arrange a row around, use Alt + Shift + Up arrow and Alt + Shift + Down arrow to sort rows up or down. Move adjacent rows by selecting all those rows.
See also how to create tables in Word 2007 and Word 2016.
How to locate the table on the page?
Right-click on the table and select Table Properties from the context menu. The Table Properties dialog box is a tool to accurately control the data and how it displays. Control the size, alignment and indentation of the table.
By default, Word aligns a table to the left. If you want to center a table on the page, select the Table tab . Click Alignment > Center.
Indent from the left view controls the distance of the board from the left margin.
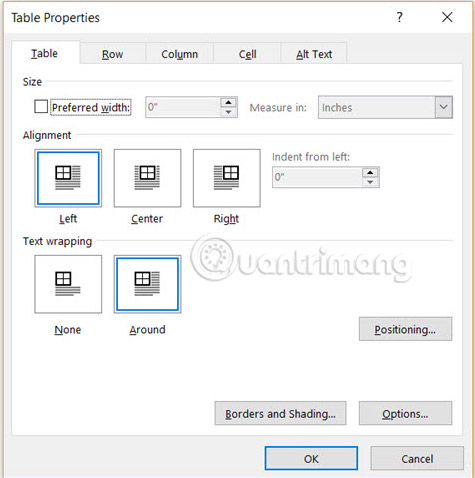
Select the position of the table based on the text around it, so that the overall document will have a visual aesthetic interface. Use the handles to adjust the table. The text will automatically change from None to Around. From the Table Positioning dialog box , you can set the distance from the text to each side of the table.
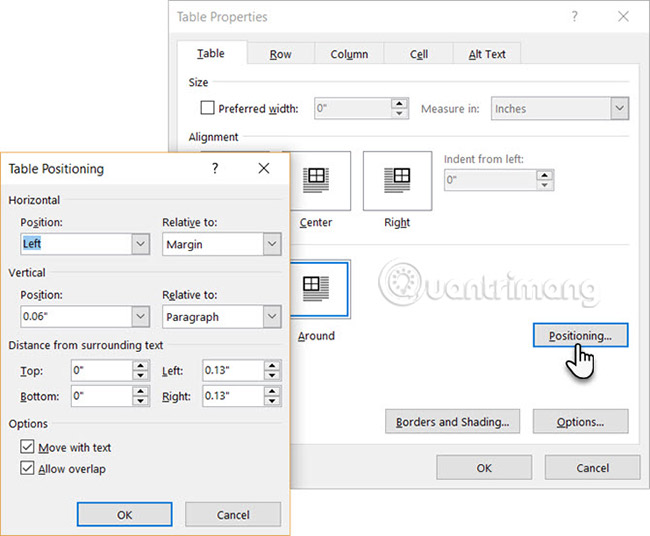
Select Move with Text if the text is directly related to the table data. The table is aligned vertically with the relevant paragraph around it. If the data in the table applies to the entire document, you can ignore this option.
2. Use the Ruler tool
The size and position of the table is an art. If you need precise measures to resize rows and columns in a table, use the Ruler tool.
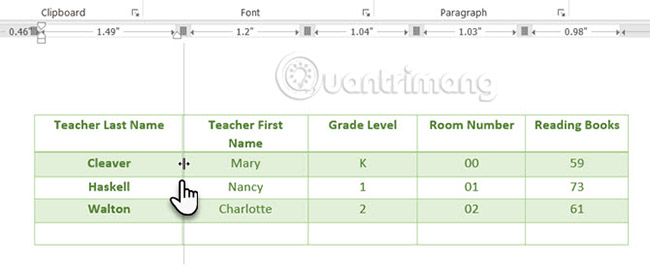
Move the mouse to the border. When the cursor with the double arrow appears, click on the border and hold down the ALT key . Microsoft Word displays specific metrics on Ruler. Move rows and columns to match your desired size.
3. Convert text into tables (and vice versa)
Tabular data provides information about its structure. It would be very annoying if Word didn't have something to handle data not in tabular form. You can convert data into tables immediately with the Insert Table command .
Select text. Go to Ribbon> Insert> Table> Insert Table.
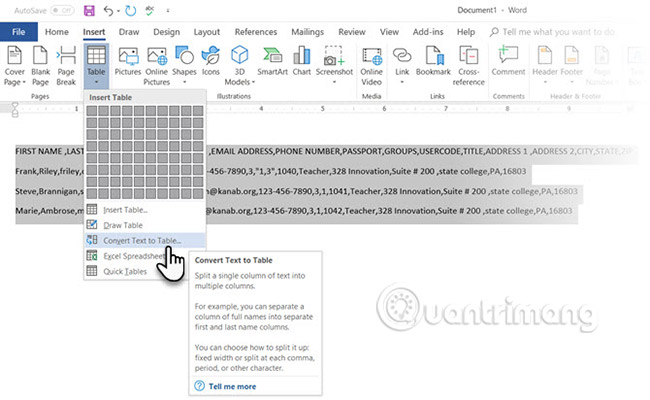
Microsoft Word translates text into tables
Microsoft Word determines the number of rows and columns required by looking at the text separators and then automatically matching the content. The Convert Text to Table dialog box gives you more control, if the previous operation doesn't work properly. You can also choose how the content of the table will appear on the page.
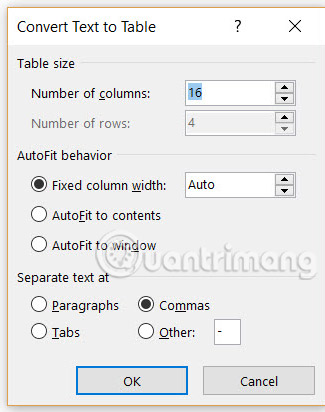
You can specify how Microsoft Word will separate data into rows and columns. Paragraph, tab, comma, or any other separator character. This allows you to easily import tabular data from plain CSV files or TXT files and convert them into formatted tables.
Convert tables into text
Reverse the process if someone asks you to send them valuable files separated by commas (or any other delimiter). Select the entire table by clicking on the handle 'move' above the table.
Go to Ribbon> Table Tools> Layout . In the Data Group, click Convert to Text.
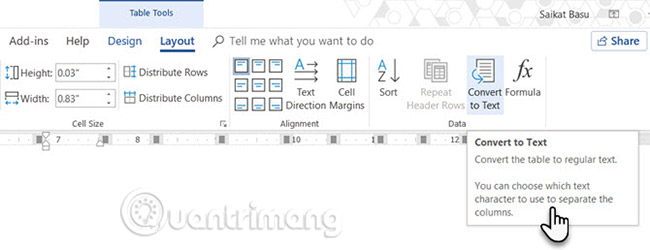
Pure text can be boring. When you have the opportunity, convert the data table into a more intuitive chart, with one of the less-used features like this in Microsoft Word.
Further reference: Instructions for converting table format in Word 2010 into text.
4. Enter the number of columns automatically
Microsoft Excel makes it easy to automatically fill a sequence of sequence numbers. But Microsoft Word does not and you may have to do this manually. However, there is a simpler way.
Create a new column for sequence numbers (if not already). Select this column by hovering over the entire column.
With the column selected, go to Home > Paragraph, then click the Numbering button to insert the numbered list.

A series of numbers will be automatically inserted into the column.
5. 'Freeze' tables!
Microsoft Word tables change their size to contain new data. You may sometimes not want these tables to be resized, even if new data is inserted. So 'freeze' the cells in the table.
The first step is to specify a fixed size for the cells. Go to Table Properties > Row, and then enter the value in the Specify height box . For the Row height section, select Exactly from the dropdown menu.
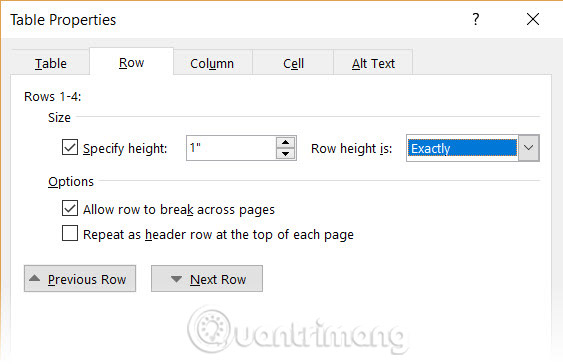
Now, select the Table tab , click the Options button , uncheck the Automatically Resize to Fit Contents check box.

Click OK twice to exit the Table Properties dialog box .
This also solves the problem of inserting images into a cell without making it expand to contain images. If the image is larger than the space available in the cell, the image will be cut to fit the box.
6. Change the row to the columns in the table
There are situations where you have to change rows into columns and vice versa (columns into rows). A possible situation is the number of columns that exceed the page margin. Converting columns around into rows and vice versa is called transposition.
The bad news is that Word doesn't have any method to handle this. Microsoft recommends that you copy and paste your table into Microsoft Excel and use the Transpose command in it. Then, copy paste the converted table back into Microsoft Word.
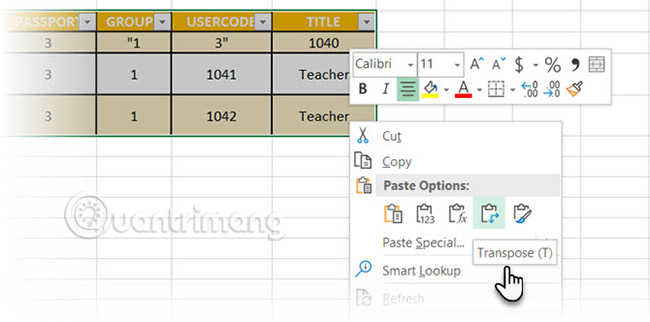
Refer to the article: How to convert columns into rows, rows into columns in Excel to know how to implement details.
7. Paste Excel tables into Gmail
You will find a simple way to do this. By default, Gmail does not retain the spreadsheet format when you paste from Microsoft Excel. To email tabular data without sending it as a separate attachment, use Microsoft Word as a bridge.
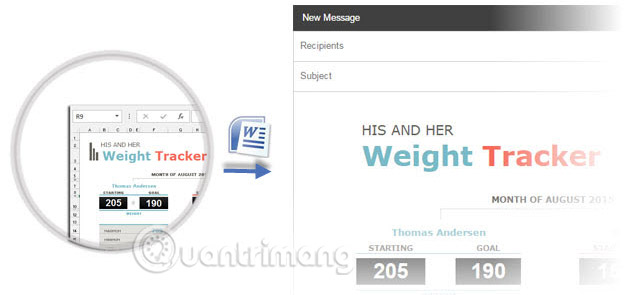
Select, copy and paste Microsoft Excel tables into Microsoft Word documents with source format. Now, copy and paste from Microsoft Word to Gmail. As you can see from the screenshot, the problem has been solved. You may have to tweak the formatted tables a bit more, but most formats are retained.
8. Reuse your tables to save time
You can save a lot of time by reusing tables, when you create professional reports and documents. Save blank table formats and insert new data when required. With this quick save feature, you will not have to recreate the layout from scratch for new data.
Choose a table. Go to Ribbon> Insert> Text group > click Quick Parts > Save Selection to Quick Part Gallery.
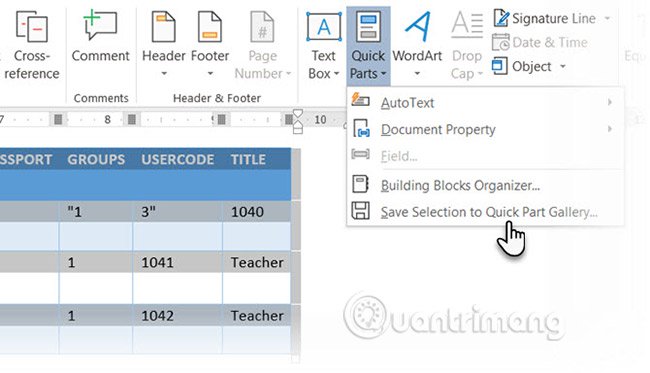
After you save the selection to Quick Part Gallery , you can reuse your selection by clicking on Quick Parts and selecting that option from the library.
Use Building Blocks Organizer to preview any tables you have created. You can also edit properties and delete tables from here.
These are just basic tips that Quantrimang wants to share with readers. Of course, they may not be enough for your daily work, but are also quite useful for those who are just beginning.
Table is a common point between Microsoft Word and Excel. Microsoft Excel is a better table processing tool, but good table management in Word is also a necessary skill. Use them everywhere when there is a chance!
Good luck!
See more:
- Useful tips on Microsoft Word 2016
- Useful Word tips you should not miss
- Summary of common Microsoft Word shortcuts